Reduce camera shake and blurry images by learning to hold your camera the right way
Hey guys, Brent here with a short tutorial showing you how to hold your camera for maximum form and function.
I’ve noticed in my workshops that most of the beginner students don’t hold their cameras properly. They tend to hold them in a way that causes camera shake and muscle fatigue, both of which lead to blurry images.
So what do you do? Do what the pros do!
By learning how to hold your camera the “right” way, you’ll not only look cool, you’ll also notice an improvement in the quality of your images.
Watch now to see how to hold that awesome camera you have!
In this episode:
(0:20) – BE the Tripod!
(2:08) – This is How You Do it!
(3:16) – Portrait-Landscape and Back Again
BE the Tripod
We already know that professionals look cool holding their cameras. But did you also know that they’re serving as their own tripod just by the way they hold their camera? There are three main points of contact you will want to learn and use.
Here’s how it’s done:
- Camera strap: The first thing you want to do is put the strap around your neck. That way if you accidentally drop the camera, and it happens to the best of us, it won’t go far. You’ll save a lot of money and heartache by doing this one “little” thing first.
- Left hand, point #1: This is your primary stabilizing point. You want to hold your hand out like you’re holding a plate and rest the lens in your palm. Make sure you glue your elbow to your ribs for full support. Notice you can still use your fingers to zoom and focus.
- Right hand, point #2: This is your control point. This hand holds the part of the camera known as the grip (which also happens to house the batteries). Hold the grip with all your fingers, leaving your index finger free to control the dials and shutter.
- Eye to eyepiece, point #3: The final point of contact is your eye upon the eyepiece with your right thumb gently resting on your forehead.
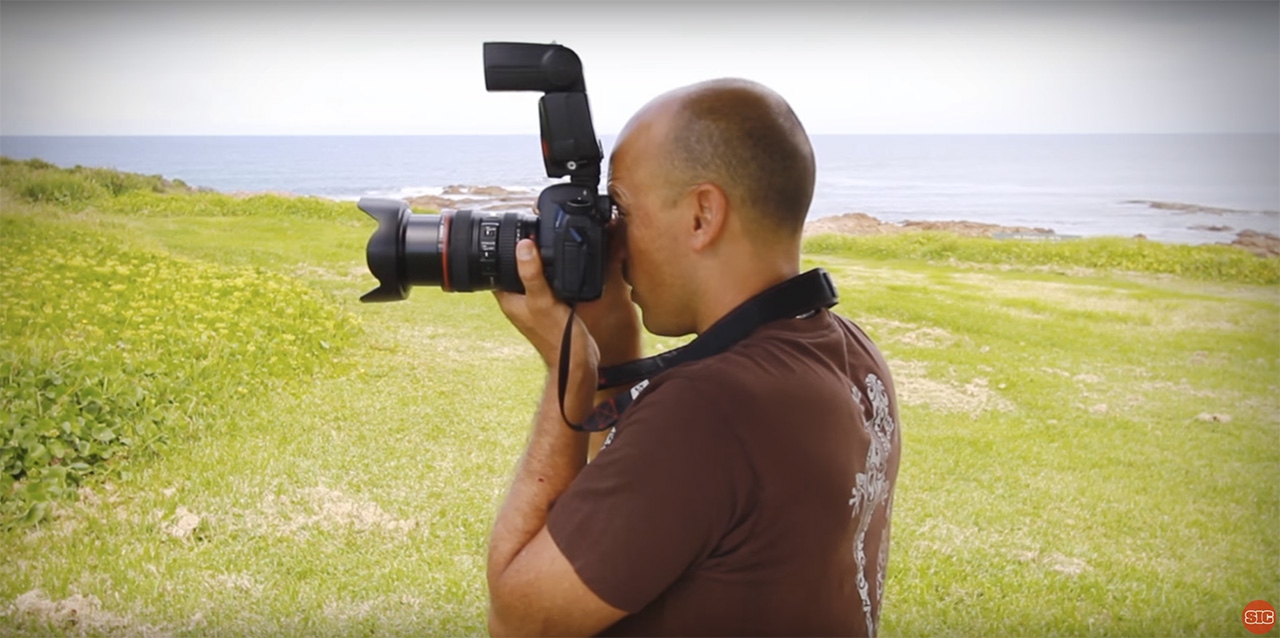
This is How You Do it! Landscape
As you can see from the image, I have the strap around my neck, my elbow is tucked into my ribs, the lens is resting on my left palm, my right hand is holding the grip, and the eyepiece is resting against my eyebrow. This gives me full control of the camera.
This is How You Do it! Portrait
When holding the camera in portrait orientation, you need to do something a little different with your right hand…rest it on your forehead. It’s really the only place for it and it helps stabilize the camera that much more.

FREE LANDSCAPE PHOTOGRAPHY COURSE
Summary
There is a “right” way to hold your camera to have the control and get better images. You ARE your own tripod:
By following these tips, you’ll not only look like a pro, your photos will consistently look better with less blur. AND you’ll experience less fatigue, which means you can shoot longer!
Let me know in the comments section below if you have any questions and I’ll get back to you!
Related Articles
Did you enjoy this article? Check out these related articles, too:
- Action Photo Tips: Cable SkiSunset Image Edit in Lightroom
Focus & Action Photography - Composition Tip for Better Photos (Fujifilm X-T1)Birubi Beach Sunset
Bend your knees for a whole new perspective – taking your images from average to epic in just a few inches. - Travel Portrait Tips – Composition
Stunning stormy sunsets
Do This Now
Be sure to check out my Essential Photography Skills 3rd Edition eBook. Gain confidence as you learn all you need to know to create consistently better photos!
I have essential tremor (ET) a neurological condition and also shoot a Sony A6000. I find my light tripod or turning the viewfinder off and holding my camera close when shooting close to my body works really good for me. It’s the shutter release technique and breathing you left out that make a big difference hand held for me. Thinking prone is also great for a change of prospective in framing the shot. I fond thinking my most effect tool. You think thing through so well and get those thoughts across well.
Brent
Well done, its ALWAYS good to refresh habits to correct bad ones and to reassure your doing things correctly!
Wishing you and your followers a GREAT DAY.
Thanks Michael
Very cool. I am right handed and love the idea of using my left hand and arm like that. My issue is I am legally blind in my left eye and moving the camera to view out the right eye makes the left arm a bit unsteady. Any ideas? Or should I try to become a ‘lefty’ for photography purposes?
The eyebrow tip was great, what does someone, like my wife, who wears glasses handle this?
Thanks again!
Hi John. It works pretty much the same for both eyes. I have seen many pro’s using their right eye to view and holding the camera in the same way – you will get used to it. Brent
Hi Brent.
John had a question about glasses. I have the same question – how to hold a camera correctly if I have to wear glasses (camera cannot be adjusted for my high
corrective prescription. I am looking forward to your reply. Thanks for the video!
Wear your glasses and push them up to the eye-piece, if camera cannot be adjusted for prescription. Brent
Hi all,
There is a special eye piece for glasses called: Hoodman Eyecup For Glasses.
It works great but is not cheap! Search it on the internet or YouTube.
Thanks for that Hanny. B
Hi Brent, thank you for your labour of love. Great tips. One question, moving from landscape to portrait mode you said move the camera anti-clockwise but I thought you actually moved it clockwise. Having said that I believe I have just twigged that facing out to your subject it is moving it anti-clockwise whereas facing the camera it is clockwise.
Yes anti clockwise from the photographers point of view. B
Very great tips which help me very much thanx a lot Brent
Great tips Brent…
Good stuff…I am also enjoying your series on how to photograph children. Thanks!
If I want to be taken as a pro someday, I need to act like a pro now, even as an amateur. Thanks for the points of contact!! One of my flaws is now corrected!!
Like the hint on how to hold the lens and the camera. So easy and feels just right
um… the music is good too, but much too loud, it almost drowns out your voice, which is what we want to hear
Superb practical advice; you just taught me something……thank you 🙂
getting to grips with it already thanks brent
Something I never thought about but that makes good sense. Many Thanks. Leonard
Yes, most people don’t think about how to hold their camera correctly. Cheers, Brent
thanks a lot. it’s good to learn something new everyday!
Brent,
Thanks for my first video the tips on hold to hold a camera was great looking forward to the next viedo.
Your welcome Luis. Enjoy. Brent
Although it may seem simple tips, you have brought home these to novices; especially the 3 point support. Such support was a must in the past when you did not have all the image stabilization lens. Good job and thanks.
I cannot wait for the next video. I’m working hard trying to figure out my new Canon 5d mark 2… Thanks for such great guidance!!
Glad you like it Valrie, the next one is all about tripods. Brent
Thankyou so much – I have been holding my camera the wrong way – followed your tutorial and it feels so much better and more comfortable. Much appreciated.
Many people get into the wrong habits early, glad I could help. Brent
Really Nice and very helpful…
Very helpful love your vedio thanks Brent!!!
Very much enjoy your videos on photography tips. I first used digital when it used a three inch floppy disc. I have learned more the past couple of weeks than with other videos. I am not a professional by any means, just an ole man who enjoys taking pictures.
I think you are going to love these photo tips and tricks. Brent
Excellent tips on how to hold the camera. congratulations
Thank you Brent , really helpful.
thanks!!!
Thanks Brett! Such a blessing to have run into your site=) I appreciate your passion and your kindess for sharing this with us!
Thank you Brent, Well explained and presented
a wonderful start to help us on the on the "Photographic Highway"
cheers
brent,thank you very much,very helpful.
Hi Brent,
Love watching your videos for really helpful tips especially for a beginner like me! Such an eye candy too! 🙂 thanks!
Funny, who is the eye candy? Maybe I should bring a model with me next time. Brent
hellow brient i like my first day photographic trainning how to hold digital SLR camera
Very good , clear and easy to understand instructions. Thank you
Thanks for the info, love your video.
thank you so much.. it relly helps
Some nice tips here. Your description of the "3 points of contact" way to hold a camera has helped correct my shooting. It's an easy way to remember how to hold the camera. Thanks very much for sharing qulity tips!
At the moment I feel like a sponge absorbing as much info as I can get. I've had my DSLR for a few years now and have always shot in "Auto".. Can't wait to get out of auto and start using the camera properly. Thanks Brent. I do agree with one comment further down the page though….can you give us hints for those of us that wear glasses. I try to not use my glasses when taking photo's but I'm sure there will come a time when I can no longer do that.
Would also love to do a hands on course with you….Any chance of you doing any around the Central Coast????
Hi Tracey. There is a setting on the eye piece for the camera, turn it clockwise and anti-clockwise until you see perfectly through the eye piece with your glasses on. Might do a video on this soon. B
I like that you gently remind the viewer several times to use the camera strap. Your instructions are clear, and easy to remember, and you mention the most important points several times: supporting the camera with the hand braced against the body, use of the strap …in case your hands get tired means no chance of a costly accident! Thank you.
Yup, I have learned the hard way too!!!
Brent, I find most online training to be poorly done and a sorry substitute for text. However, based on this first installment, I believe this series is going to be a pleasant exception.
Although I've been shooting photos for a lot of years, this video showed me I may not have been paying enough attention to points of support for the camera.
Thanks for the kind comments Lane Lester – I'm sure you will LOVE this series – Plus checkout some of my premium videos too. Cheers, Brent
Thanks for the insights. You have me going over all of my techiniqes for holding the DSLR and i use most of them just as you explain. I don't conciously tuck my arm into my ribs for each shot as you suggest. I do if I am purposly trying to obtain more stabiltiy but not all the time. I am sure if I start thinking about this and doing this automatically it will improve my camera stability for the better.
thats very useful to me as i want to learn more about basics of photography
Thanks so much Brent, well done, concise instruction. I've been recommending your instruction to photographer friends, and sharing your free .pdf.
Thanks for starting me off, looking forward to the rest of the videos
Ben
It is very informative and useful topic. Thanks.
Any advise for throse of us who wear glasses? Also, how do I use the adjustment on the eye peace to correct the power of my glasses?
Most cameras have an adjustment on the eyepiece for glasses. Check it out. Brent
Another suggestion is how to put the head in front of the camera, that is, not to put the head just right in front of the viewfinder because your nose maybe touch the camera. The head must be softly turn on the left is you are watching with the right eye.
tahnks friend
Thank you Brent! It really feels like learning concepts from a friend.
Saludos desde Argentina!
and useful for a longer time SLR user like me. Though I’ve looked like I’m using the correct technique I can see from watching your video that I’ve not been supporting with the left hand properly. Hard to avoid camera shake if one is both supporting and pressing the shutter with the right hand. Thanks for the lesson.
Yeah Trevor, I only noticed this once I was teaching my photographers who work for me. Easy to miss this simple technique – but it will save you in the long run. B
thank you for sharing,..it usefull for beginner like me..
Brent, thank you for this free video trainings! It´s much more easier and better to learn photography by watching you! If you read a book it´s not the same than you watch it on Video. So we can learn it step by step.
Also I can polish up my Australian English for our friends from Adelaide 🙂
Ha Ha. My accent is South African, American and Aussie. Do you like it? Brent
Very helpful. Thank you!
Really helpful.thanx and good luck for your projects
Every little bit helps. By putting little hints up it helps to understand photography & use of camera. Thanks Brent
No worries, glad you like. Brent