Find out everything you need to know about tripods and why they’re so important to have in your photography kit…
Share – Johny’s new ride!
Inspire – Get inspired by some images that can only be created with a tripod.
Create – We give you the low down on what makes a good tripod.
Got a photography question or feedback from the show leave a comment below or hit us up on Twitter.
Johny’s Twitter
Brent’s Twitter
Want to find out more about the lounge here’s a super deal just for you to take a sneak peek here>>>
Enjoy the Show & Share this post to spread the photo love.
Johny & Brent
Video Highlights & Time Codes:
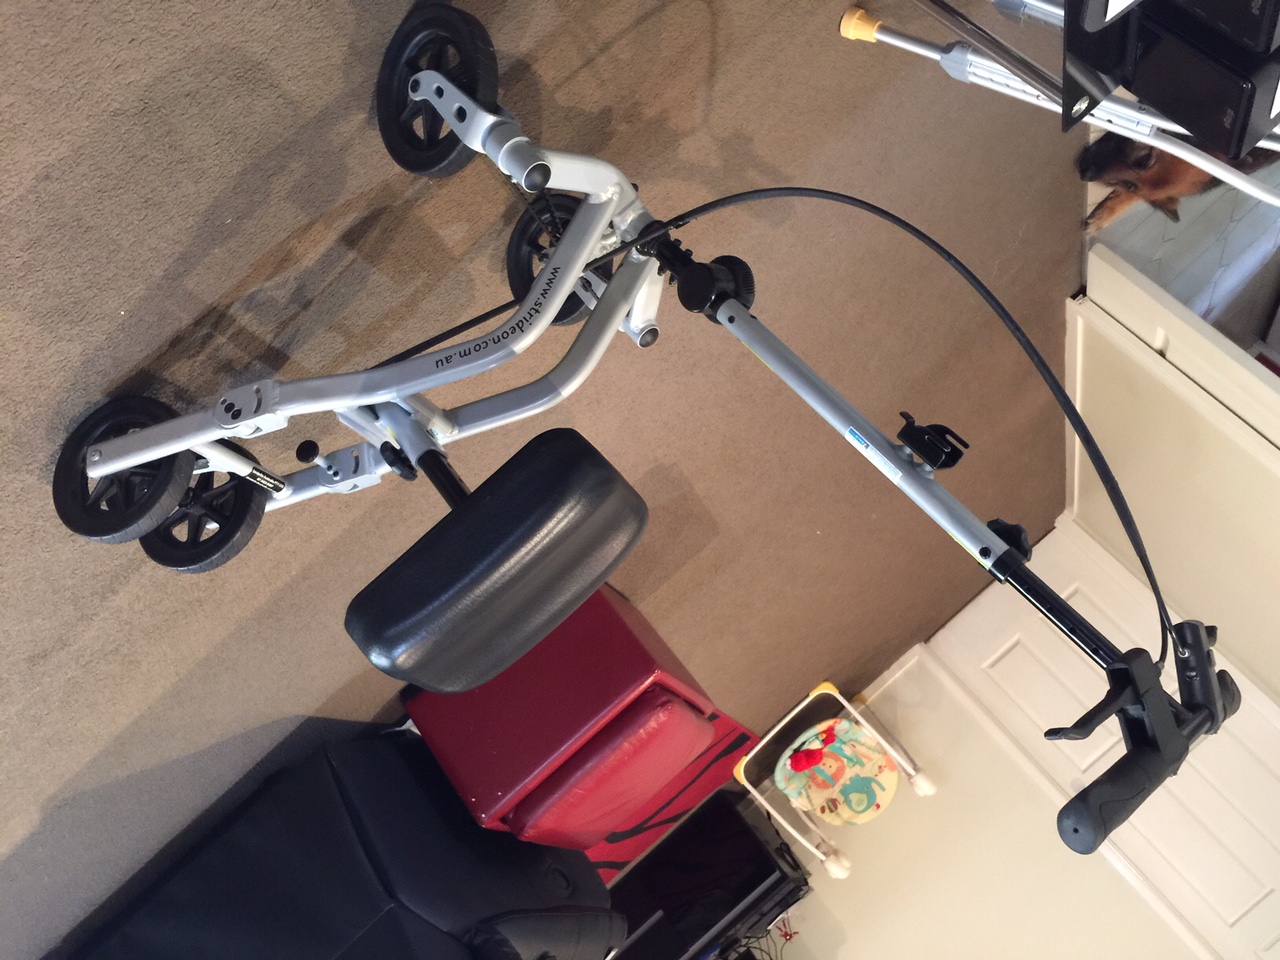
(00:57) Johny’s new ride
(02:52) Images that can only be created with a tripod
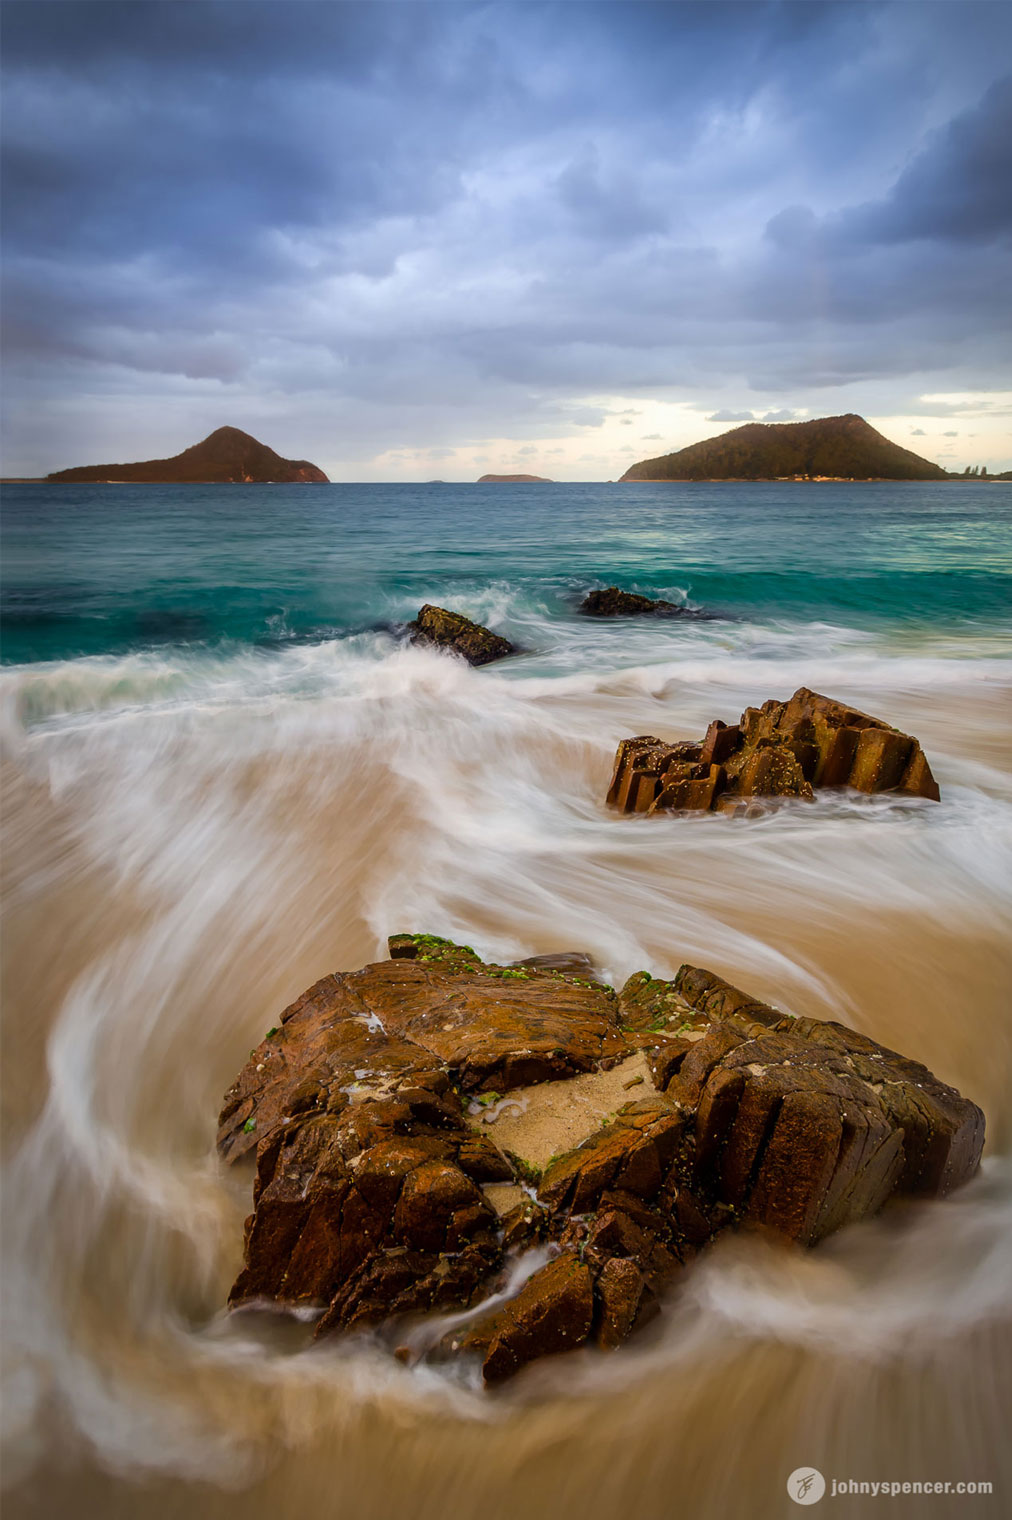
(03:01) Calm Strength – Tomaree Head
(03:35) Waves of light
(05:36) Starburst
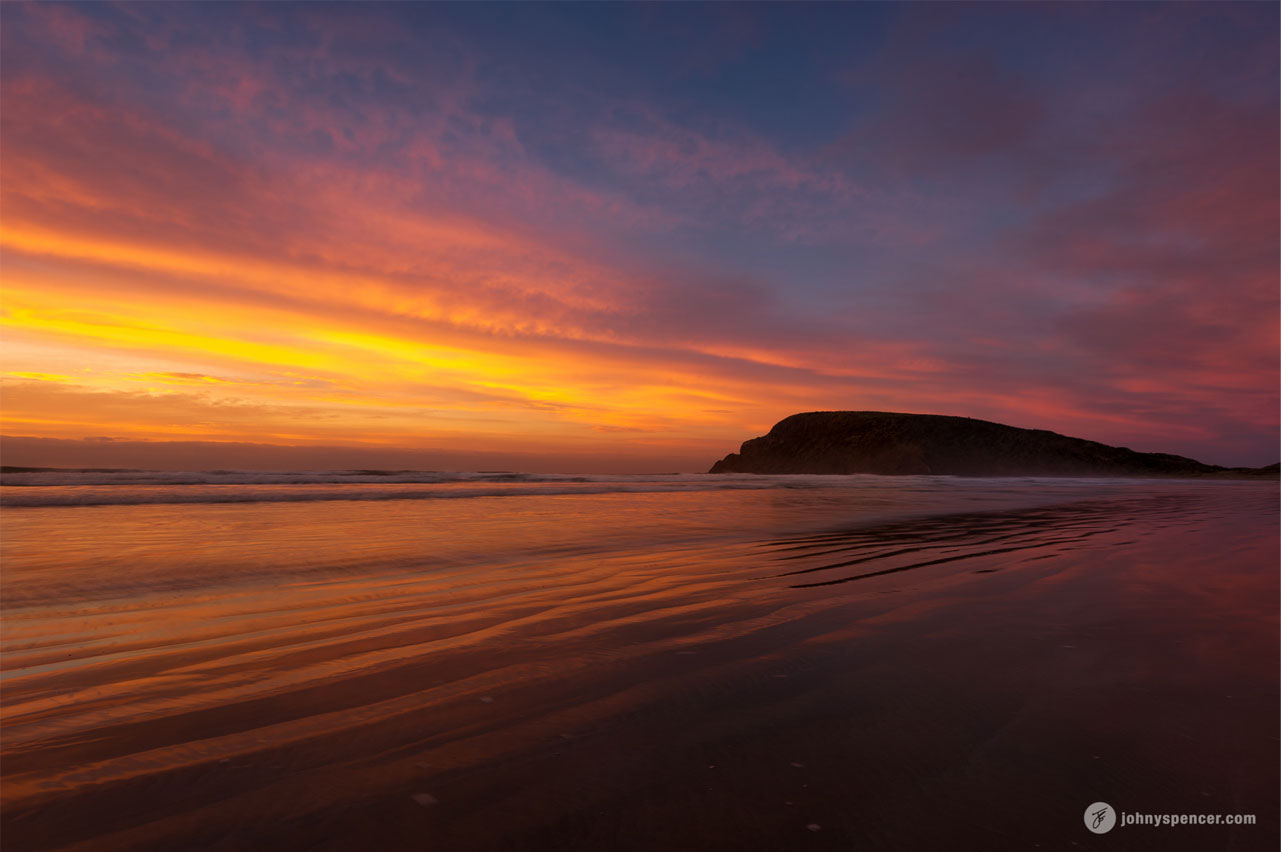
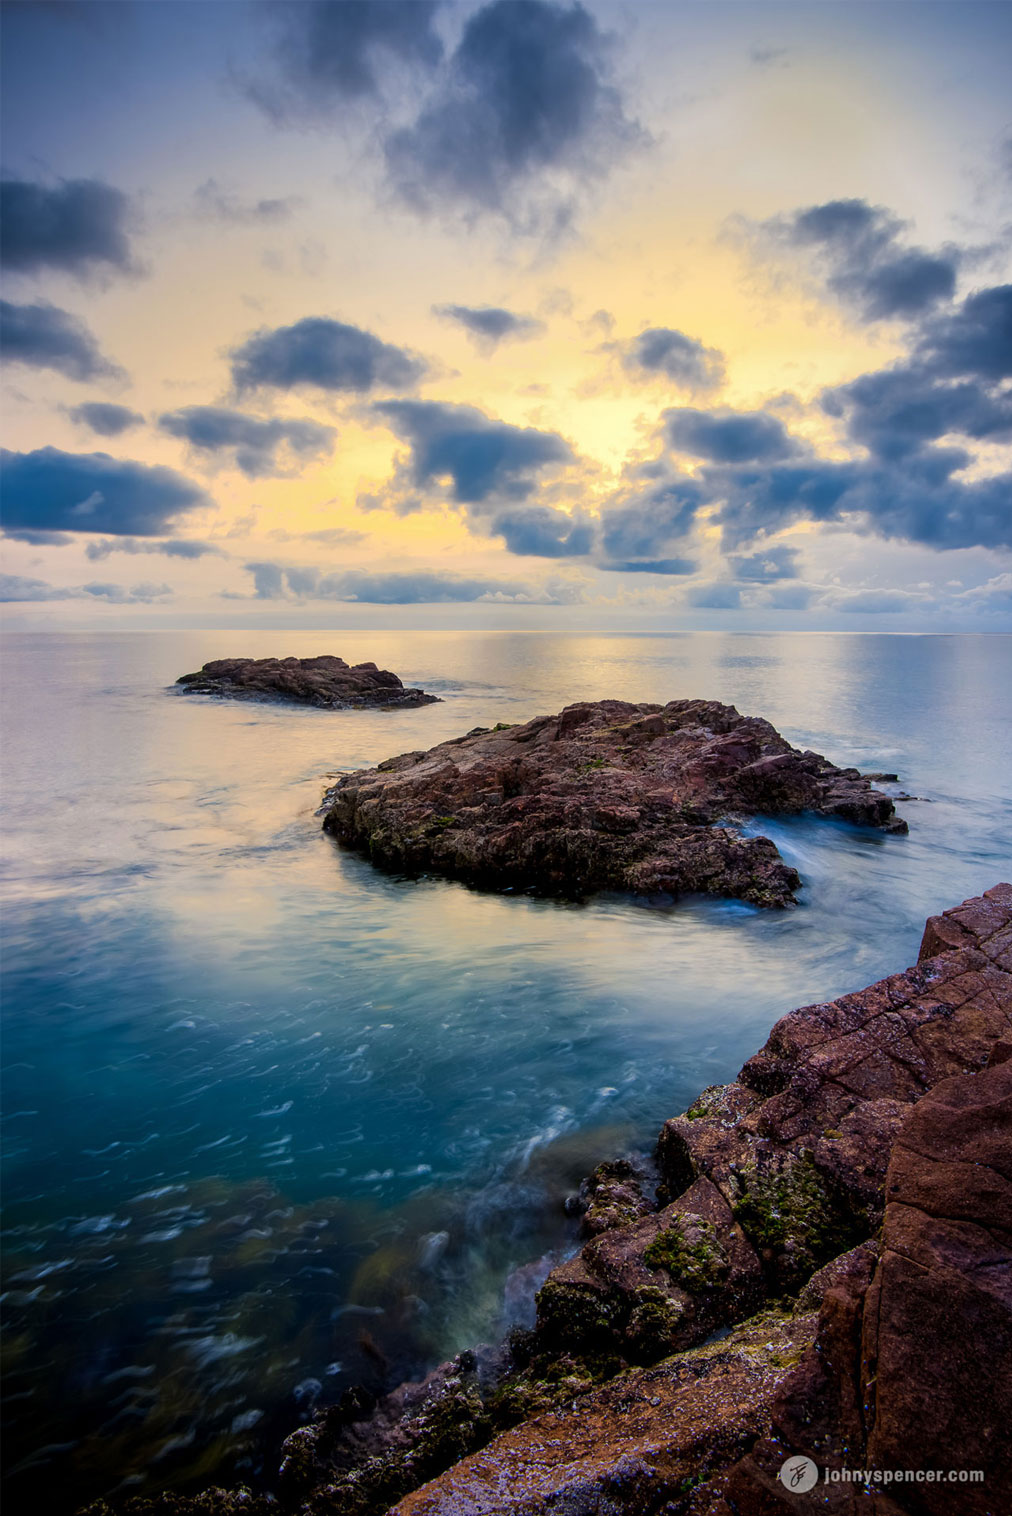
(06:05) Sunset
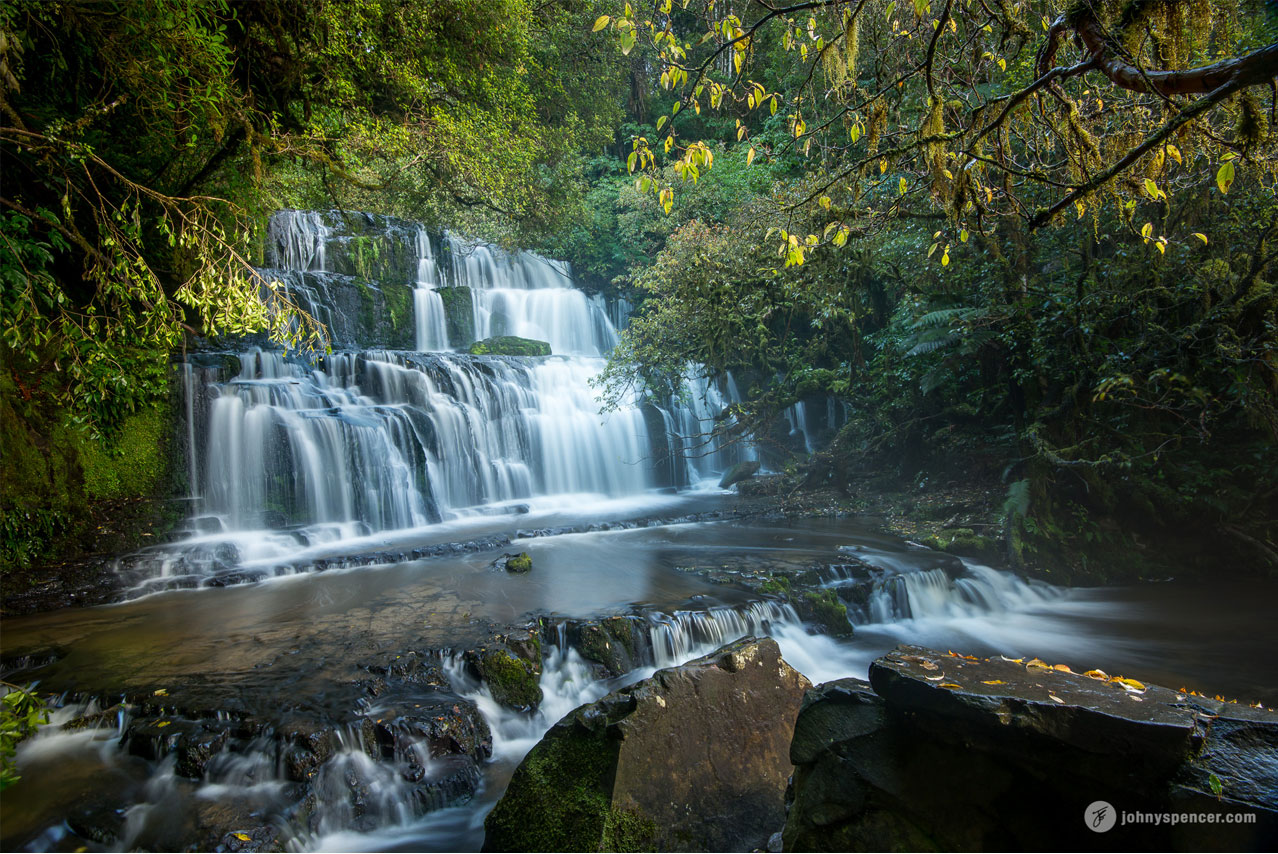
(07:14) Waterfalls – Catlins, New Zealand
(07:37) Sunrise
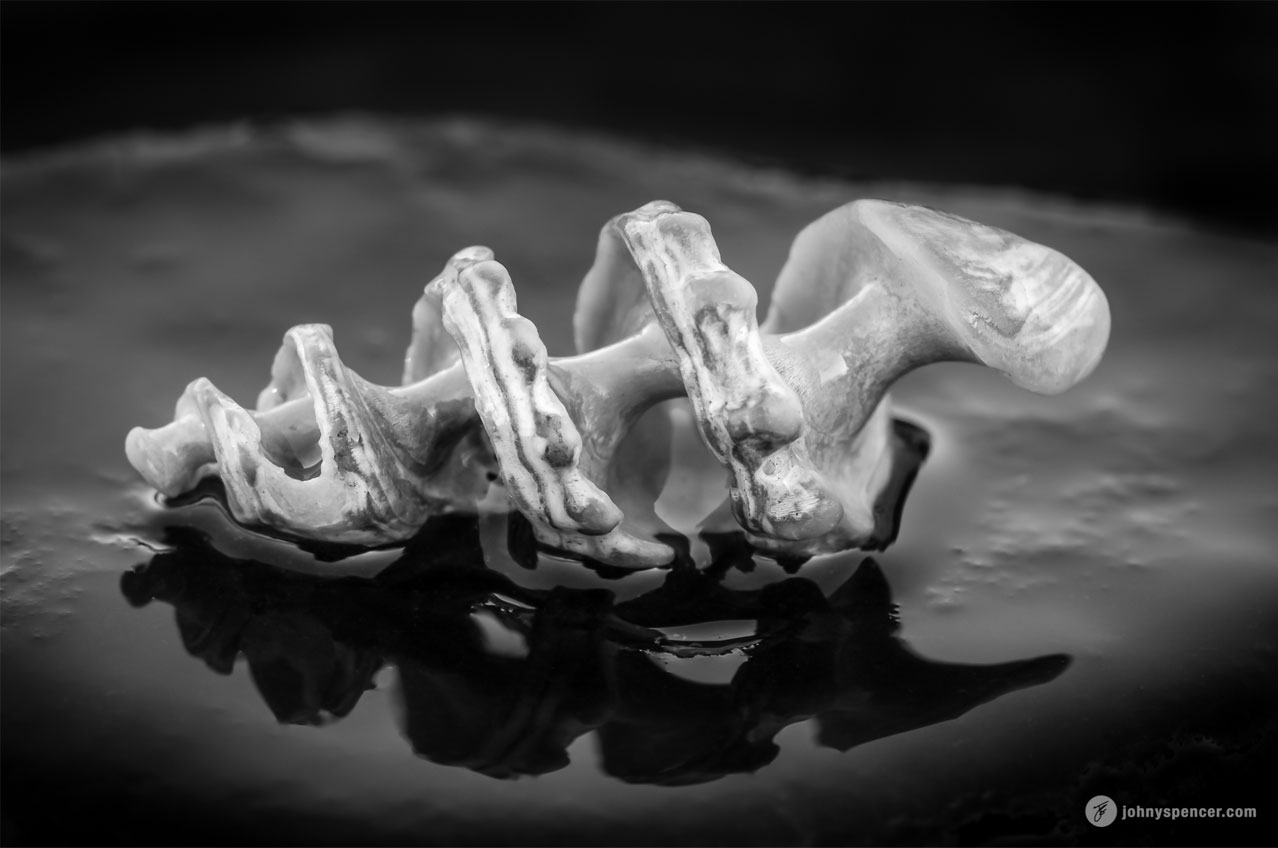
(08:35) Shell – Macro image
(00:11) Rule of thumb
(10:06) What makes a good tripod
(14:25) Main things to look/consider when buying a tripod
(17:29) What are the different heads?
(22:59) Quickly attaching your camera to the tripod
SHOW NOTES:
Share Inspire Create
SIC 43 – Talkin Tripods with J & B
Find out everything you need to know about tripods and why they’re so important to have in your photography kit
Share – Johny’s new ride!
Knee scooter
- big pad and a handlebars
- little basket on the front
- gets me off the crutches
Inspire – Get inspired by some images that can only be created with a tripod.
1st image – Calm Strength – Tomaree Head
- suck out effect
- slightly longer shutter speed
- locked down on a tripod
2nd image – Waves of light
- waves are breaking
- slow shutter speed
- panning when the waves come in
3rd image – Starburst
- 30 seconds to take this image
- bubbles from the white water
- 4 or 5 frames off
4th image – Sunset
- low light conditions
- locked down on a tripod
- tripod is giving in the water a smooth and glossy look
- bubbles are creating little swirl effect
5th image – Waterfalls – Catlins, New Zealand
- beautiful, silky smooth water
6th image – Sunrise
- low light condition
- cranking the ISO
7th image – Shell
- macro image
- locked down on a tripod
- no movement
Rule of thumb
- Camera lens
- Good camera bag
- Tripod
- Circular polarizing filter
Create – We give you the low down on what makes a good tripod.
1. steel tripod
- great for video
- on a budget
- a bit heavy but sturdy
2. aluminum tripod
- aluminum legs
3. carbon fiber tripod
- lighter and stronger
- big ball head on it
travel tripod/everyday tripod
- tiny
- bit unstable
- almost unusable
medium sized tripod
- much bigger
- could still carry on to the plane
- put it in your check bag
- more versatile all around tripod
big birther
- carbon fiber
- got a big ball head on it
Main things to look/consider:
- brand that’s in budget
- suitable for you camera
- come up with your height
- camera weight and the lens in it
What are the different heads?
- big ball section with one release that can go any direction
- travel tripod has small ball head
- like a 3 axis ball head
- video head
Quickly attaching your camera to the tripod:
1. Straight screw
- on the bottom of your camera
- goes in and locks it down in landscape mode
- when in portrait mode, flip it over
2. L bracket
- giving you 2 plates
- perspective orientation and portrait orientation.
- fast to switch in between landscape and portrait


Introduction
Johny: Hey guys, what’s up? Its Johny here sitting again still broken, still ankle, that’s all good man 2 weeks ago. And welcome to another episode of the SIC show. And I’m here with my main man B. How are you my brother?
Brent: Yeah man, I’m doing great today, awesome.
Johny: This week I’m gonna share a little story about my new ride.
Brent: And Johny’s gonna inspire us some great images that he shot with a tripod. And he’s going to talk about tripod. Which is the best tripod for you? What to look for when you’re buying a tripod; awesome.
Johny: Yeah, let’s do it man.
Johny’s got a new ride!
Johny: Hey buddy?
Brent: Yeah?
Johny: I wanted to share with you my new pimped out ride. I’ve got it here. As you guys know I still got a broken ankle. And there are about 2 and half weeks to go. Probably by the time you see this is more like 2 weeks. So check out this man. I’m just gonna put the image on screen now. It’s called a knee scooter. You know this it’s basically got a big pad and a handle bars. But it’s like of those normal scooters kids run sort of thing except it’s got 4 wheels. So it keeps itself upright which is awesome for me. It’s like having training wheels. I absolutely love it. But you put your knee on it man. And you put your bad leg on your knee coz it’s my ankle so I can put it on my knee. And then I use my other leg to push myself around.
Brent: Okay.
Johny: I can move quicker on this thing around the house than I’m walking.
Brent: Really?
Johny: And you know what the best thing is? You can’t see the photo coz there’s actually a little basket that goes on the front man. I put all my goodies in there. I am super stoked.
Brent: So how are you gonna pimped this thing out?
Johny: Yeah I know. It needs some mags and I recommend we can lower it a bit more.
Brent: Can we put like a lumiere light it or something?
Johny: Put like a stereo somewhere too.
Brent: Yeah totally. So what do you call it?
Johny: I don’t know. I just call it my lowrider man. Just to stride on. Let it ride.
Brent: Okay, so if you got really faster with the one leg, you go in circles?
Johny: Yeah you do man. And the faster, the thing is you know you got really fast in circle. That’s the beauty about it. Cool man, so I just want to share that little thing. You know the best thing actually guys the best thing about it is it gets me off the tripods. Man the tripods are just killing my back.
Brent: Tripods?
Johny: Oh tripods. (Laughing)
Brent: Crutches. (Laughing)
Johny: Crutches, so I use this one on my right arm. No I’m joking. Now gets me off these things man. These things are deadly bro. seriously hurt my back. Put me on back like 4 days you know a week of using it. It’s crazy man. Anyway, so that’s my new ride. I just want to share with you guys something a bit different and fun. I’ve never seen this before.
Brent: I like it. You got to pimp it out man.
Johny: I’ll tell you what, next time I break my ankle which is hopefully never but if I do man I’ll be going to get one these the first week. Love it.
Brent: Okay, awesome.
Images that can only be created with a tripod
Brent: Alright buddy what have you got to inspire us with?
Johny: Yes so I just wanna show you a couple of my images that would have been possible without using a tripod and explains you why that is? So I got the screencast running, so let’s jump into that and have a quick look now. So this first image you may have seen this before but man I just love this image. Every time I see this I go “wooohh I took that yeah” but anyway this Tomaree Head and this I called the suck out effect. This is when the waves washed in and washed out. I’ve got my camera mounted on a solid tripod here. And because I’ve had to use a slightly longer shutter speed I had to be locked down on a tripod. There’s no other way I could’ve captured this image without my tripod. So that’s the first one.
Brent: I love that. I love that shot there. The waves and the white water going out, suck out.
Johny: Just like lean lines.
Brent: It’s actually lean lines up to the headland over there, the Tomaree Head there.
Johny: Beautiful, so the next one. And you think yourself “oh okay” and so why would this be. Why would we use a tripod here? And basically what I was doing with this is I had myself set up on a tripod. The waves are breaking in pretty much the same spot. But because I’m panning and you can do this handheld but you gotta remember this is sunset so the light is quite low. So you know even though I’m on my or I was shooting it like a, I can’t remember what the shutter speed was but it was pretty slow. And what gives it that streaking motion too is I’m panning when the waves come in. So I’m on a tripod, it’s loosely so it’s not totally locked down. I’ve got a bit of movement. But it’s still doing a lot of stabilization.
Brent: Okay.
Johny: And I’m panning with the wave while shooting a slightly longer shutter speed and getting these effects. So I was locked down on tripod for this. And I tell you what? It made a hell of a lot easier to get this shot you know. In low light conditions get that movement and yeah something a bit abstract.
Brent: So you could do that with a monopod too right?
Johny: You could. You could certainly do it with a monopod but to be honest less you’re like a videographer or less you’re like big lenses you know. You see the guy shooting sports and are often have their 500 mils or 600 mil lens mounted on a monopod.
Brent: On a monopod, yeah.
Johny: I wouldn’t say run out and grab one. Because the matter of times we’ve actually used that monopods we’ve got Brent is very far in between. It’s awesome for running and going. When you a video and you’re running and going. We’ll show you a monopod a bit later. They’re awesome for that and if you got a really heavy lens but then again you know if you’ve got a really heavy lens in low light you’re gonna want a full tripod. So I mean sports maybe when you’re running and going and it’s nice and bright, perfect but yeah for that extra stabilization but yeah I wouldn’t recommend you running and get one. It’s not definitely my first.
Brent: Yeah, a couple of days ago someone emailed me and asked me whether I should take a monopod on a trip to America. And I said no.
Johny: You’re not gonna use it. Take a tripod and we’ll show you…
Brent: Yeah, take a small tripod or nothing.
Johny: Yeah that’s it. You got to travel with a tripod and I recommend if you can even if you just
grab a little travel tripod it’s still better than nothing at all. I’ll show you one in a bit later. Okay next image man. So this again, this is a suck out and what happen the lights just popped thru that little gap then I had about literally 30 seconds to take this image. And I only got about 4-5 frames off. And what’s happening to those the streaks that you can see on the foreground guys they’re actually little bubbles okay. So it’s the bubbles from the white water that came in and sucks the
light. It’s catching the sunlight.
Brent: That’s catching the sunlight, lovely.
Johny: So that’s another image man. I love this image; I mean that foreground is just so unique. I haven’t seen that in many images before. And certainly this is one of my portfolios.
Brent: Definitely.
Johny: So the next one. This one is slightly different. So we’ve got sunset now okay. We’ve got low light. So there are low light conditions. I’m locked down on a tripod, and you can see why I mean it wasn’t a very rough day for starters. There wasn’t so much swell. But you can see the tripod is giving in the water a smooth and glossy look. And what that does too is that helps with that reflection of the clouds and the lights coming thru. You can see how intense the reflection is on top of the water. If that water is all broken up and not silky smooth you don’t get that nice reflection there. The other thing that’s really nice too if you look down the foreground here, we’ll let that load up. I’m just waiting to load up there in screencast but you can see these little swirls in the foreground. And it’s really cool. It’s still loading up there guys. My Mac Pro I thinks it’s due for a time.
Brent: Oh okay, maybe she got PC.
Johny: Hell no.
Brent: Windows 10.
Johny: Hell no. Nothing against Windows but yeah I’m just using my Mac. So what you can see the little bubbles are creating these little swirl effect which is also I couldn’t have got without having my tripod. Alright so these little swirl effects is really cool. It just adds some a bit more interest in the foreground. So pretty cool man.
Brent: Yeah, love it.
Johny: Next one, let’s jump into the next one okay, of course a waterfall man, long exposure, Catlins in New Zealand. Beautiful man, there’s no way in hell I could’ve got this beautiful, silky smooth water without having my tripod.
Brent: Yes
Johny: It’s just a must man.
Brent: Waterfalls and I’ve been shooting waterfalls like last week and yeah definitely a tripod is one thing.
Johny: Yeah you need it.
Brent: You gotta have it.
Johny: Indeed man you gotta have it. And the last image here of course the sunrise. Okay so low light conditions and man you got to have…
Brent: Actually before sunrise right?
Johny: Yeah just before. The sun hasn’t come up. So this image is just before sunrise. This is another shot and basically without my tripod in this low light condition I would’ve cranked the ISO to 51 million.
Brent: What camera is that?
Johny: I don’t know man; maybe a secret one. Actually Canon produced one recently got some anyway it doesn’t matter. But anyway so I wouldn’t have get the touch of sunrise and get great details without cranking the ISO you know and still even then cranking the ISO I wouldn’t have gotten a fast enough shot to handheld this, just impossible. So you know to keep your image quality keep your eyes down and keep long enough shutter speed to capture enough without under exposing. It had to be on a tripod. And the last example I wanna show you guys is this is a macro image okay. So with macro again it doesn’t matter what time of the day you shoot with macro. You should be locked down on a tripod because you need to have no movement in that tripod. And then the slightest little bit of movement and you guys don’t know.
Brent: It’s magnified.
Johny: Yeah coz it’s a one to one magnification. The slightest movement and a little bit of wind, man like you get movement in your hair. So you need a nice and steady tripod for macro. You need to be locked down and it’s a must for shooting macro being lockdown in a tripod. Well that’s some few images there that I wanted to show you guys. So basically the rule of thumb you know like after buying your camera and your lens, man the tripod is probably the next thing. You know a good camera bag of course. Probably camera lens, a good camera bag, and then a tripod.
Brent: Yeah.
Johny: Seriously because you can do so much once you have a tripod. And once you get used to carrying it, it really isn’t a hassle. And once you get used to the images you can take by owning a tripod it’s just awesome.
Brent: If you’re a landscaped photographer obviously.
Johny: Yeah landscaped.
Brent: If you’re shooting portraits you’ll probably don’t need it.
Johny: Yeah probably not.
Brent: And then the next thing to get guys is a circular polarizing filter.
Johny: Definitely man; camera lens, a bag, a tripod, and circular polarizing filter, definitely man. Alright bro let’s get into the next section. I wanna talk about tripods.
Brent: Awesome, let’s get into it.
What makes a good tripod?
Brent: Alright buddy, so show this tripod you’ve been talking about.
Johny: Okay, so before we get started I wanna tell you guys okay. Basically tripods, it really comes down to personal preference with a lot of things okay. There are some things I’m gonna recommend today. I’m not gonna talk about brands. The brands ranges from anything up to thousands to you know hundred dollars. There’s so much wage in there; really you just gotta buy the one you guys can afford. There’s no hard and fast rules okay. Initially what you pay for on most tripods is you know you got all the old steels which I don’t even know if you can get a steel tripod, I mean you’ve got one.
Brent: Yeah, I’ve got one. Actually I think that’s a steel one.
Johny: Yeah you got a steel one. And I know Brent the other to look for to guys is often you’ll see a second hand tripods and don’t discount them you know. If you haven’t got a tripod at all and you can afford a second hand tripod just to get lock down, do it. Because man I tell you what, there so much you can do and we talked about that in the Inspire section. There so much you can do once you do own a tripod. So don’t just count that okay. So basically what you’re looking at, you’ve got your steel tripod which is obviously quite a bit heavy but really sturdy, often great for video and if you’re on a budget. And you’ve got your aluminum tripod, you move to that, your aluminum legs. We’ve got a few and actually yours was aluminum, your old school one.
Brent: And if you’re watching this in America, aluminum.
Johny: Aluminum yeah and then you start to move into carbon fiber. I’ve got a few of those. I can show you here in a minute. And they just become lighter and stronger. And often if you got to travel on a tripod, you’ve got to look it for something carbon fiber okay. So I’m gonna start with a travel tripod here. Basically you can see with this little tripod you can see how tiny it is. You can easily almost fit that into a lighter kit.
Brent: Not too bad.
Johny: It’s pretty light man. One thing I would say about travel tripods, if your tripod that you’re gonna buy is gonna be the only tripod that you’re gonna use all the time be really careful which one you buy okay. What I mean by that is this is great. It’s small, it’s compact. You can backpack with this and go wherever you want. But for everyday tripod it’s a little bit small. It’s a little bit too small.
Brent: So you mean not high enough?
Johny: But for me not high enough and the second thing is, you know you start getting a decent lens on this it becomes a little bit unstable.
Brent: Okay
Johny: And if you put this on the water with a bit of surge you know what we showed a couple of images before it becomes almost unusable. So when you start to do really long exposures and things like that and lock out for macro, I mean this is better. Better than having no tripod with you at all you know when you’re traveling. But all I say in general having a travel tripod buy something just a slightly a bit bigger than something like this and you’ll be able to use it every day. So it can be a travel tripod but it can also be your everyday tripod. So basically this one the legs just fold out.
Brent: Here we go.
Johny: There you go. So that’s a little travel tripod and really handy. It’s got a little ball head on it as well. We’ll talk about head in a minute. So I wanted to show you the next size up. Okay so this is probably the next size up. This is probably the next size up. And this is what I recommend something around this sort of height. And we’ll put it up maybe you’ll see they’re not extended but you can see how much bigger this size is compare to this size. So this is something you could still carry on to the plane. You know Jay and Varina they carry tripods onto the plane with their camera bag or what I do with my tripod which I’ll show you in a minute is I actually put it in my check bag. So that’s the other thing as well when you travel. So I recommend you guys for something tiny bit bigger and this just gonna make more useful. So this tripod it pretty much does anything you needed to do with this size. You know you can put a decent lens on it. And you can lift the legs up and put low on the ground and yeah it’s a more versatile all around tripod. But if you’re really looking for something small then you know the travel tripod is definitely the way to go.
Brent: Yeah.
Johny: Okay and then we move on to this fellow. Okay so this is big birther. This one is carbon fiber. It’s got a big ball head on it. Okay this one is gonna stick out of the frame coz it’s just massive. And I actually travel with this one Brent. So the ball head comes off and this one fits in my bag. It’s quite heavy. And it’s right on my face when I’m talking. You can see the difference. The range you can see there, guys. So you got the travel, you got the medium sized and we got something larger.
Brent: Okay I’ll get out of the way so you can…
Johny: Yeah so the main things to look for when you’re buying a tripod is obviously buy a brand that’s in budget. I mean that’s a big point and I’m gonna keep emphasizing that you know. You don’t have to buy the latest and greatest and lightest thing out there because you just wanna get yourself in a tripod and get one on your budget okay. But I highly recommend going for something this size. This one here I would definitely say it’s too big. It’s too big to travel with. I’m finding this thing too big and heavy to travel with you knows. And these days if you’ve gone to mirrorless system or something like that you never gonna need this.
Brent: You don’t need it.
Johny: You never gonna need a tripod this big. So this is way too big. I’m probably gonna actually downsize eventually so use this one around home and things like that and blowing conditions when we try and do things you know so I really need it locked down. And that’s about it.
Brent: So Johny when it comes to choosing the right tripod for you, what would you consider?
Johny: So the many things to consider obviously is to make sure the tripod you buy is going to be suitable for you camera and also something that’s gonna be able to come up with your height.
Brent: So basically the camera weight and the lens that you got in it.
Johny: Yes that’s right. So that’s the main things I would look at brother is making sure you’re buying something that’s gonna be suitable for your camera lens combination. Your biggest lens combination coz sometimes even with landscape photography and now we wanna put out our long lens, we wanna zoom in and get details. So we still need to be lock down on tripod with longer lenses okay. So the next things to consider probably I should show big birther here. This was one thing I really don’t like about the medium sized tripod I showed you. If you see here, this one thing really to consider guys if you’re gonna be shooting macro and stuff like that I mean look how long this center column is and this center column can really get in the way. And what I mean by that when you open these legs up you wanna be like way out on the ground like this you can see the center column is gonna stop you from getting close to the ground. With this one I can put the legs almost out 90 degrees and I’ll be flat on the ground.
Brent: Yeah so you can get lower.
Johny: So I can get really low perspective. And often we talked about perspective you know, sometimes getting really low it just changes the composition of your image and it’s a must man.
Brent: Totally.
Johny: You need to get into that leading lines or getting into that thing that’s on the foreground. It does just so much more versatility when you get low. And if you’re shooting macro it’s a must man. So be really careful of how long the center column is.
Brent: there are some center columns that actually can pull out and go in reverse so you actually got your camera hanging below the tripod.
Johny: Yeah you can.
Brent: If you wanted to really get close to the ground.
Johny: Yeah that’s it.
Brent: I’ve seen a couple of those.
Johny: Yup, there are some. And you could also buy some that I’ve seen before and we’ll talk about heads in a minute. Where you can screw one leg off and use it as a monopod if you think you’re gonna have a need for that but really I don’t know. So anyway, what are the different heads? Let’s talk about a few different heads.
Brent: Okay cool.
Johny: Okay so on big birther here you can see the ball head okay. This head here is a ball head. And what makes it a ball head? It’s got a big ball section here and there’s one release and as you can see I can go any direction with this head. It makes it really nice to adjust my camera while it’s on its ball head. It’s highly recommended. I love this big ball head. I’ve got big hands so for me having ease of access to move my camera around is just awesome and I’ll show you something in a minute that makes it even better. And then we’ve got this style over here. It’s a ball head but it has a piece of grip okay. And you can see you can just grab the pistol and Brent this is yours. You love this one.
Brent: Yeah, I love this. I use this for landscape photography so if I’m shooting in landscape orientation mode I leave it like that. And then if I wanna go to portrait orientation I’ll just go like this. And let it go. And it grabs the ball when you release this pistol grip. So basically you pull the pistol like that and that releases it and when you let go it grabs the ball and it makes it stable.
Johny: Yeah, I’ll go say one thing about this style over say you went something like this little travel here, I mean it got more room to grip on and really make a change fast but this little thing here with my big hands it’s really fiddley. I mean it’s okay if you need a little travel tripod on the go. But man I tell you what? I would something with a bigger grip or like I showed you before that I can really I mean I’ve got big hands so to get my hands to normally move around. I mean that’s one big disadvantage when you go with a smaller ball head is often the little release mechanism is small. That’s what I found anyway. And there’s one other type guys and you probably said it before, we don’t have one here to show you and we might drop some image in but they basically got it’s like a 3 axis ball head. Honestly I just find them composent, confusing, they just and I’m sure people love them and a few love them but that’s fine. There’s no problem with that.
Brent: It just takes longer to get your composition.
Johny: Yeah, it’s just like I mean I get confused like 3 things then goes, anyway and you know the other I find about it and I paid one before is when it’s strapped your pack and you’re walking thru the bush, man those little handles getting caught and everything, it’s just not as easy you know. The harder the mechanism to pack and just yeah so I highly recommend whatever you get, get a ball head because it makes just so much easier.
Brent: What about this one Johny?
Johny: Oh yeah so we should just tell people about it. And probably you’ve seen these out there as well. So this is a video head okay guys.
Brent: It’s a monopod.
Johny: Yes this is a monopod too that I was talking about before. This one setup for video. And basically the idea of this it’s got a fluid head so you can pan and tilt a lot easier. So if you see something like this online and the head is there at least you know what it is. Probably no use to most photographers but if you’re doing a bit of video yeah. I would still honestly if you’re a photographer out here and you’re doing more stills than video, don’t worry about a video head. Get yourself a good ball head. I mean lot of the stuff we shoot with a static shot I’m on my bigger tripod that I showed you before for the videos. So I wouldn’t worry about video heads. But at least you know what it is and what to look for.
Brent: And let’s talk about the legs and the tempting mechanism.
Johny: I’m gonna show this one here coz it’s the other good comparison. So this is another thing
that’s a big personal preference man. You know I personally I love this type so a turn and a release, a turn and a lock. So I prefer this. I prefer a lock quicker. Brent how about yourself?
Brent: I find these take me longer to get open and into position than these. However these ones you know this is with a little clip. The clip goes like that and it clips back and locks down. Sometimes this one’s getting loose. And once it’s loosed you actually get a special tool to get it there and tighten it up. Now if you’re out the wilderness, it’s loosed and you don’t have the tool and it’s loosed, your tripod it’s not gonna be stable and you’re screwed basically. So these ones are probably more you know sustainable.
Johny: Yeah, I definitely agree mate. Actually the thing I found with this one if you don’t keep the maintenance up to this clip type there man, I tell you what. They’re gonna lock up and lock your tripod down. Coz what happen you get sand or mud or whatever in there I’ll tell you. They just get suck and you can’t remove it. The other great thing about this it’s really easy without a tool in the field. Just keep unscrewing this all the way to that whole section of the tripod will slide out you’ll be all to just get in there and clean it up in the field without any tools. So I mean I’m a big fan of a quick release type. Again guys this is something that’s personal preference. Go to your local camera store, try both of them and see how you feel about it. But like Brent said he likes the other one coz…
Brent: It’s quicker.
Johny: He finds it quicker. I mean I find it more composent. Coz I’m just so quick and easy to do. I just need to free and pull them out.
Brent: Or maybe I’m doing it wrong Johny.
Johny: Well it’s what you’re used to guys. I mean it really is and what you prefer. There’s no right or wrong answer here okay. So this type you can get in the field and you can easily undo even without a tool. The other type if you don’t have a tool and it comes loose, man epic fail. I actually had that. I’ve had one of the things dropped out and because that’s it my tripod’s gone. If I can’t fix that up in the field, out in the other ball or whatever, it’s done. That’s it man. Cool, so we’ve talked about different tripods, we’ve talked about different heads. Now I want to talk about quickly and I need the big birther up here again in a minute. I wanted to talk about quickly attaching your camera to the tripod, the little plates.
Brent: Quick release plates.
Johny: Yeah that’s what I was trying to think. So there are 2 types, so this one here is just a straight screw on the bottom of your camera. And that’s just goes in and locks it down in portrait mode. So basically your camera’s stuck like that in portrait okay. And then you have to tilt. And then when you’re camera is lock in there sorry in landscape mode not in portrait. Anyway so it’s locked down in landscape mode and then when you need to get to portrait mode and you got to flop it over like that so then your camera would be in portrait mode like that. Then what happens with that is you can see from this point to that point your camera is now off access. Okay so what I mean by that is your camera is moved from here with your composition to over here and now you got to move your tripod to get it back on your composition.
Brent: Okay.
Johny: So that’s one thing I don’t like about this style of plate okay. And guys the rule of thumb when you’re out shooting particularly landscape is always take a landscape perspective and a portrait perspective shot.
Brent: Orientation.
Johny: Orientation that’s what I meant. That’s why he’s here.
Brent: I’m just the tripod hanging over dude.
Johny: You are man, I didn’t see you.
Brent: This is hard work.
Johny: I know man, you’re rocking it bro. So anyway, just stick with me. This is a big one. I really love this thing. What this is called? It’s called and L bracket; an L to the bracket. You can see its L shaped like love, photography love. Anyway, and what that does is it fits your camera like this. And basically once it’s done it’s just giving you the same as the other thing but on the side as well so it’s giving you 2 plates, perspective orientation and portrait orientation. So what happens guys when you’ve got locked down your tripod and what happens when you got lock down on your tripod you can see I also gonna do is quick release my camera and flip it over and my camera stayed on the same axis. It’s really fast to switch in between landscape and portrait. So I’m a big fan of the L bracket. Downside is it adds a little bit of bulk and tiny bit of weight in your camera but man I tell you what, for having that versatility to flip it both orientations. It’s a must man, so man that’s it. That’s my little round up with tripods. If you haven’t got one and you’ve got those other things obviously a camera and a lens and good camera bag, look for a tripod next because it’s the next bit of equipment. It could just open up your creative choices you know there so many things. You know low light, longer shutter speeds you know; when you start stacking fields and doing you long exposures and macro work. There so much more opportunity to shoot different types and different looks of photography once you gets your tripod man. Jump out and do it guys. If you have any questions and comments about tripods or you have anything to add we’d love to see it man. Or you can either tweet me @ijohnny or leave your comment below this video man. We’d love to hear your feedback on tripods and if you have anything to add we’d love that too don’t we buddy?
Brent: Definitely, yeah leave comments below.
Johny: Cool man, it’s been another awesome show. I need to get home and get back on my scooter coz I’m missing it. I miss my scooter. It’s awesome.
Brent: Thanks Johny for sharing those inspirational images. I love those stuck out images man.
Johny: Yeah it’s fun man. And guys we hope that’s giving you some information for going out and when you gotta purchase your tripod and don’t discount second hand. I’m really gonna keep saying that you know. Don’t discount on looking out on second hand. You know eBay, I think Amazon even does second hand stuff now. There are plenty of places. I’m sure your local camera club people are upgrading their tripods. And you know always looking at getting one second handed. And don’t think you have to go and spend thousands on a tripod. You know if you can’t find a good second hand one, there some great Chinese knock off top brands, they are just fine. I’ve got made in and used a Chinese brand and I think for the last 5 years and he’s been in salt water. Man the thing is still going.
Brent: Yeah, doesn’t everything made in China anyway?
Johny: Well I don’t know but anyway this one was a cheaper brand and this thing is still rolling like a bomb.
Brent: My tripod that I’ve used up until now really for the past 12 or 13 or 14 years was second hand when I got it; actually borrowed it from my friend. I will return it.
Johny: Yeah when moving places probably. Cool man.
Brent: Awesome guys.
Johny: It’s been an awesome show. We hope you enjoyed it.
Brent: We’ll see you next week.
Johny: See you next week. And by the way Brent, I believe you may have something to give away. Do you have something you wanna talk about yet?
Brent: I don’t know. Remind me.
Johny: Remind you, I know you’ve been working on a new little free mini course.
Brent: Oh yes, a couple of free mini courses.
Johny: This is exciting.
Brent: If any of you watching guys are interested in this portrait photography, landscape photography, post processing which Johny’s expert or making money from photography. I’ve got a couple of free mini courses which probably about time this goes to air. It might be ready or actually the following week.
Johny: But anyway, keep a look out guys coz we’re both working on some free mini course that we wanna give to you guys to make sure you know we’ve given you all the information to help you out as much as we can to master your photography. And keep an eye coz that does gonna happen very soon. We’ve been working really hard to get this done and as you guys know we’re extremely passionate about helping other photographers achieve their goals and we just wanna give this stuff away and share don’t we brother?
Brent: Awesome, yeah.
Johny: Cool man.
Brent: So catch you guys next week.
Johny: See you next week.