Discover the power of the print, plus how to shoot after dark!
Share – The Power of the Print, why you should print your images LARGE!
Inspire – Milky way image and the story behind it.
Create – How to shoot images of stars, and the one big mistake that Brent made!
Got a photography question or feedback from the show leave a comment below or hit us up on Twitter.
Johny’s Twitter
Brent’s Twitter
Want to find out more about the lounge here’s a super deal just for you to take a sneak peek HERE>>>
Enjoy the Show & Share this post to spread the photo love.
Johny & Brent
Video Highlights & Time codes:
(01:14) Purchase photo from another photographer
(04:39) Image of the Milky Way After Dark
(08:06) Creating the Image
(12:55) Main things to creating this type of photography
Show Notes:
Share Inspire Create
Purchase photo from another photographer
- Print it big
- Don’t be scared to purchase someone else’s image
Photographing After Dark
- image of the Milky Way
- blended 2 images together
- add a human element
Creating the Image:
- flashlight/torch
- 30 second exposure
- 6400 ISO
Images taken:
- lighting up the background
- less light
- light for less time
- flashlight into the foreground
Main things:
- open up your lenses wide
- focus on infinity
- 25-30 seconds ISO
- trip with cable release or soft timer
- flashlight
Introduction
Johny: Hey Guys, what’s up? It’s Johny here and welcome to another episode of the SIC show and as always I’m super pumped to be here and I’m here with my main man B. How are you my Brother?
Brent: I’m feelin’ good Johny. When are you going to be walking again? We’re still sitting because Johny’s still got a broken ankle.
Johny: Actually I could stand, Man. Check this out. This week on the show we’re going to talk about the power of the print.
Brent: Awesome, Guys. And I’m going to inspire you with an amazing image that I took after dark. A star trail shot. And then I’m going to show you how we actually create and we will discuss photographing after dark.
Johny: Let’s do it, Man.
Brent: Awesome, enjoy.
The Power of the Print, why you should print your images LARGE!
Johny: So B man, share a story with us Brother.
Brent: I’m going to share this. Look at those, Guys.
Johny: That is so cool.
Brent: Now I didn’t take this photo.
Johny: Really?
Brent: Yeah.
Johny: Where did it come from then?
Brent: Keith took it. Keith Singer from the Share Inspire Create (SIC) Lounge, our photo community.
Johny: This is the one that you’re getting Keith to print.
Brent: Yeah, so I bought it from Keith. Now the story behind this dandelion is Keith has been in the lounge for quite a while. He’s actually showed this image. I think it was one of the assignments that we had in the lounge. And we encouraged him. I was so impressed with this image. I said “Print it large”.
Johny: Print it big.
Brent: Print it big and he did. And he actually sent us a message to say “Thanks for encouraging me to print this big”, and this is actually what he said “I’ve never printed larger than 8×10. And only a few of those in the last 4 years or so and I’m so excited to see the 2 images I had printed large.” Awesome, so I actually bought this image and I printed it on a canvas. And it’s just awesome. Actually I had this in our lounge, our family lounge. I had some people over and said “Brent, great image.” And I said “No, that’s not mine. It’s actually someone from my community, printed it and bought it from him”. So there we go, Guys.
Johny: I just love the detail. I love the negative exposure you know.
Brent: So I just want to share it with you and you know what? If you’ve got a great image, print it large.
Johny: Print it big, Man.
Brent: And also don’t be scared to purchase someone else’s image that you really like. You know, I’ve been a professional photographer for like over a decade. And I think this might be one of the first images I’ve ever bought from another photographer.
Johny: That is inspiring and you know the fact that you’ve done that with Keith and you know he’s been shooting for a little while now and I think he’s not a pro is he? It’s not his full time job is it? But, Man, the encouragement we just kind of give Keith and the strength to move forward. Now he saw his print and that’s just awesome.
Brent: And thank you Keith. Thanks for the contribution to our community.
Johny: Really appreciate it, Bro.
Brent: You know, I really like seeing how you’ve progressed. You’ve got confidence from posting your images in the Share Inspire Create (SIC) Lounge. And then printing them large and that gave you so much satisfaction to see them actually big and not just on a small screen and then I think this is one of the best purchased and investments I’ve ever done is to buy your image. Thank you, Man.
Johny: Yeah, it’s awesome Bro. And Guys, I just want to point out if you haven’t printed anything before, it’s really the last step of your photography. It really is the last thing that you can do once you’ve taken the image, process your image, printing it is the last step. But it often gets forgotten these days, Man. And dude get out there and print it and keep it. We love your work, Brother.
Brent: And I think most of us are actually forgetting it nowadays. So we look at them. They are all in a digital device. You’re looking on your phone or laptop and you know what? And like they get lost. We’ve taken so many of them and they’re back up in some hard drive and somewhere you lose the hard drive somehow. You’ve misplaced it and it is gone. And you know what? Print is on the wall. You see it every day. You get the maximum satisfaction with something that you’ve created.
Johny: Get it from the digital file and getting something physical that you can see every day. It’s awesome.
Milky Way image and the story behind it
Johny: Hey Buddy, inspire us with one of your cool images, Bro.
Brent: Alright Guys, so actually last night just a few hours ago, I finally got to edit these images. The Milky Way that I photographed probably 10 o’clock at night a few months ago. And the story behind this is actually I put one of my goals in the SIC Lounge our community, you know something that I want to achieve photographically. And the photo that I’m showing, he called me up and said “Brent I’m going to go shoot some star trail. I see you’ve actually put your goals in the lounge. Do you want to come?” And I thought “Yup, I should go because I put it out there and show it to people and that’s what I want to do and that’s an opportunity, I’m going to go.” So I went.
Johny: That’s a big deal. I love it.
Brent: So we drive through to my house. We grabbed the gear we need and asked him a few questions because he’s an expert at shooting star trails.
Johny: He post some beautiful stars. I’ve seen his work and it’s nice, Man. He has some great stuff.
Brent: And he posts it to all over Facebook too and he’s really good. So he came to my house. I think we grabbed the beer rich and put it in our pocket. And we grabbed our stuff and we walked down to this area that’s just probably 10 minutes’ walk from where I used to live. And went on there and set up and asked him how to do it? And we photographed probably about 2 hours you know because we’re doing 30 seconds exposure. I want to get the star trails. And stitch them together like he does. He does a really good job at stitching. So you get the little stars moving out to the sky. Anyway so we got an assignment in the lounge right now called “After Dark”. So I didn’t have any images after dark. So I thought I’m going to go and edit this one. So what I did Guys was I actually blended 2 images together.
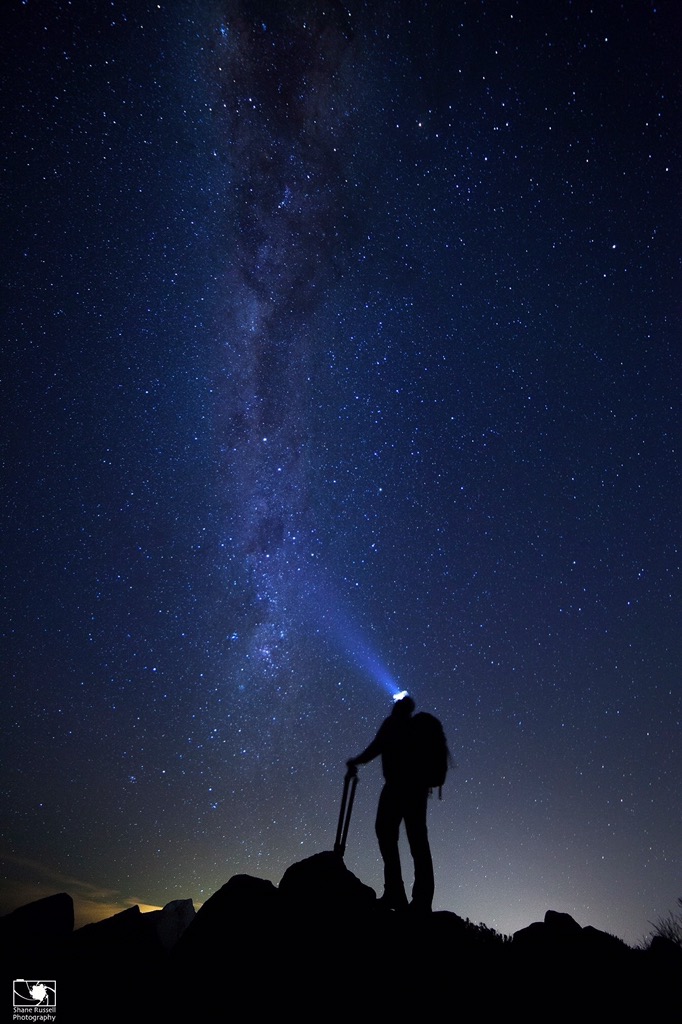
Johny: Before we get into that Man, we should probably hold that off for the Create. But I want to say check out this image that I’m going to show you now. This is a picture of me and what I love about this image the most is that it’s been taken with a really wide angle lens. Now honestly, I wanted to say Shane took me out one time as well because I’ve known not a lot of this type of photography as well. I’ve absolutely love it. I think it’s beautiful. But that’s me standing on a rock. And I’ve got my head lighter punch showing up into the night. So if you do this photography and you can’t find anything nice don’t forget to add a human element because it really shows the expense of the stars and it makes you drop 40 kilos of the wider lens you need. It’s just a beautiful image. And it’s one of my favorite portraits that anyone has taken of me because it’s me in the wilderness basically. You know this awesome Milky Way and taken by a great photographer. Thanks again Shane. So it’s very cool, Man.
Brent: Awesome, Man.
Johny: So I think it’s such a great photography. And you know one thing I really love about it? You’re not watching around. You can’t watch it, Man. I mean it’s one thing but you know you got that few seconds of light before the sun drops. So just after the sun drops. You know you’ve got time. You can go out there, set up and find the Milky Way and you know, you sit out there, quiet and it’s dark and you just listen and you can see some stuff, you know. Obviously, the best night to go is when the moon isn’t out. So the things are totally dark.
Brent: I think it was about 3 or 4 nights in the month. That’s the perfect time. Just before New Moon and after New Moon. I think 3 or 4 days around it.
Johny: So it’s an exciting photography and thanks for that shot Shane because I really love it. It’s one of my favorite images taken of myself. That’s really cool.
Brent: That’s awesome.
Johny: So don’t forget, add a human element. It’s cool.
How to shoot images of stars, and the one big mistake that Brent made!
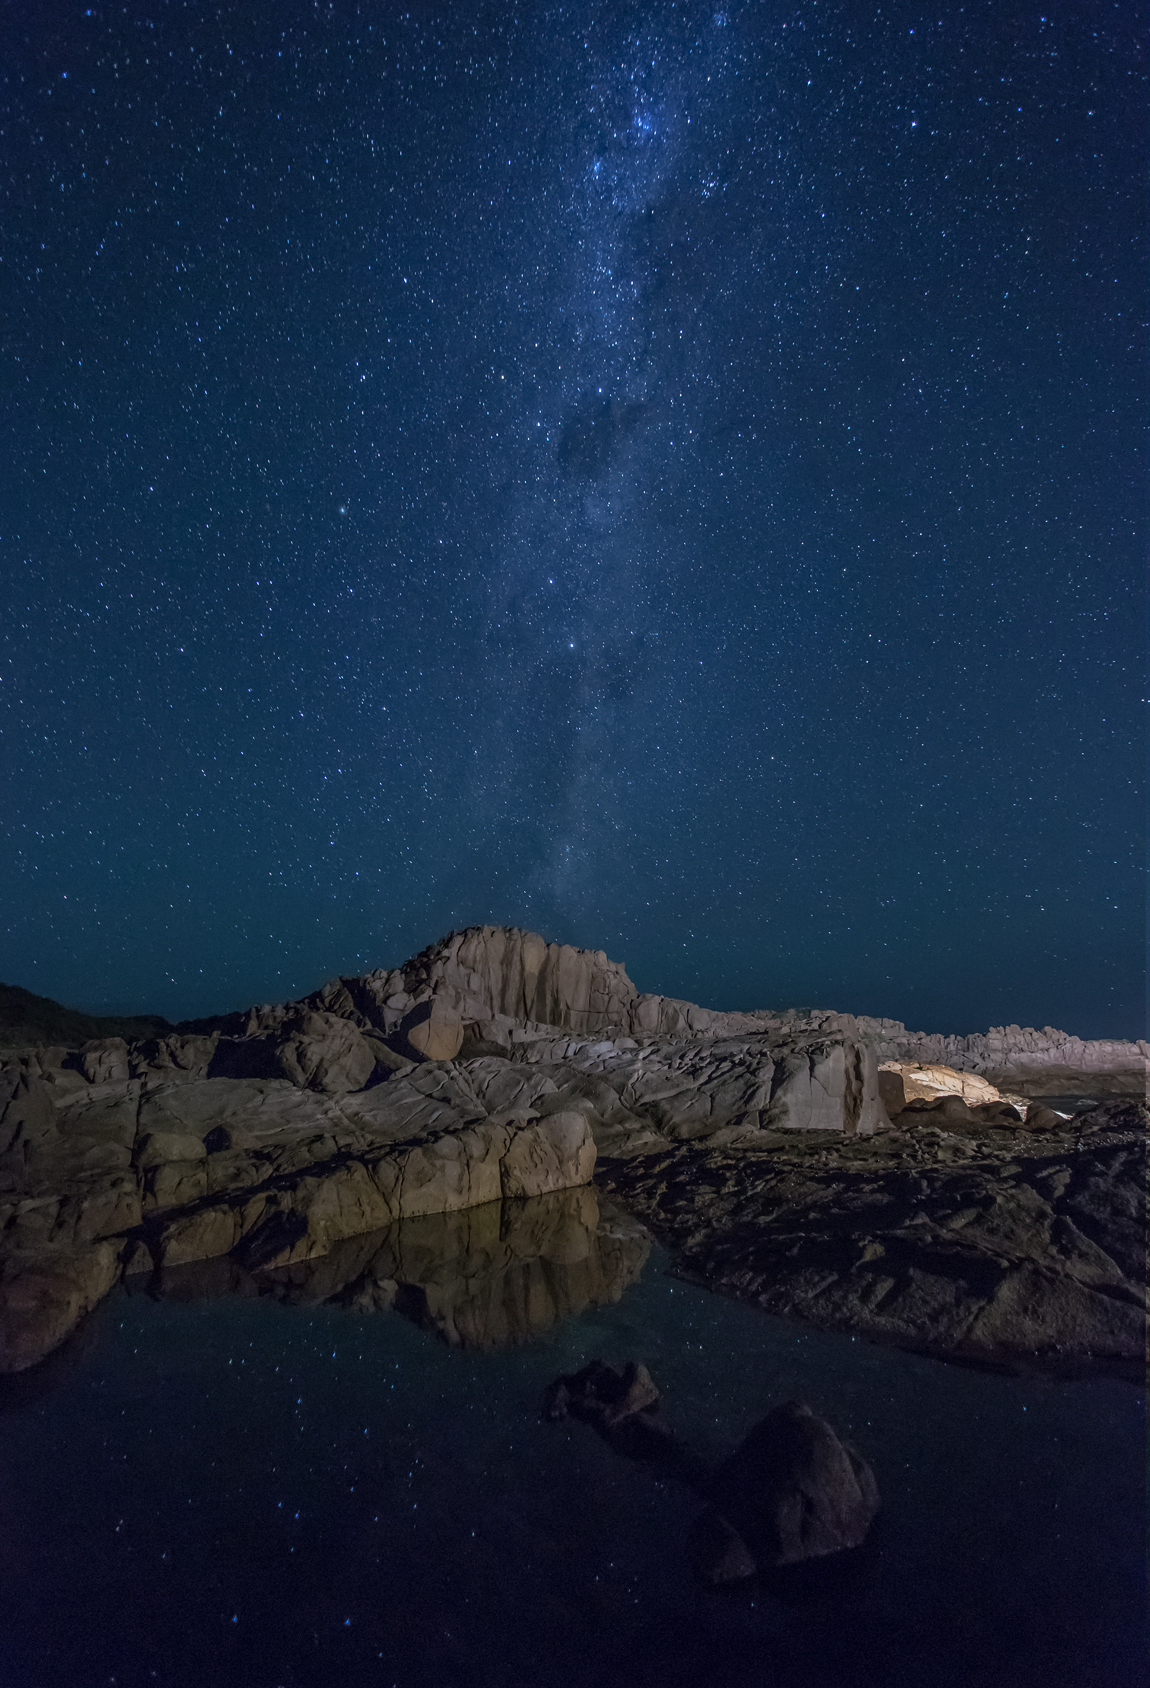
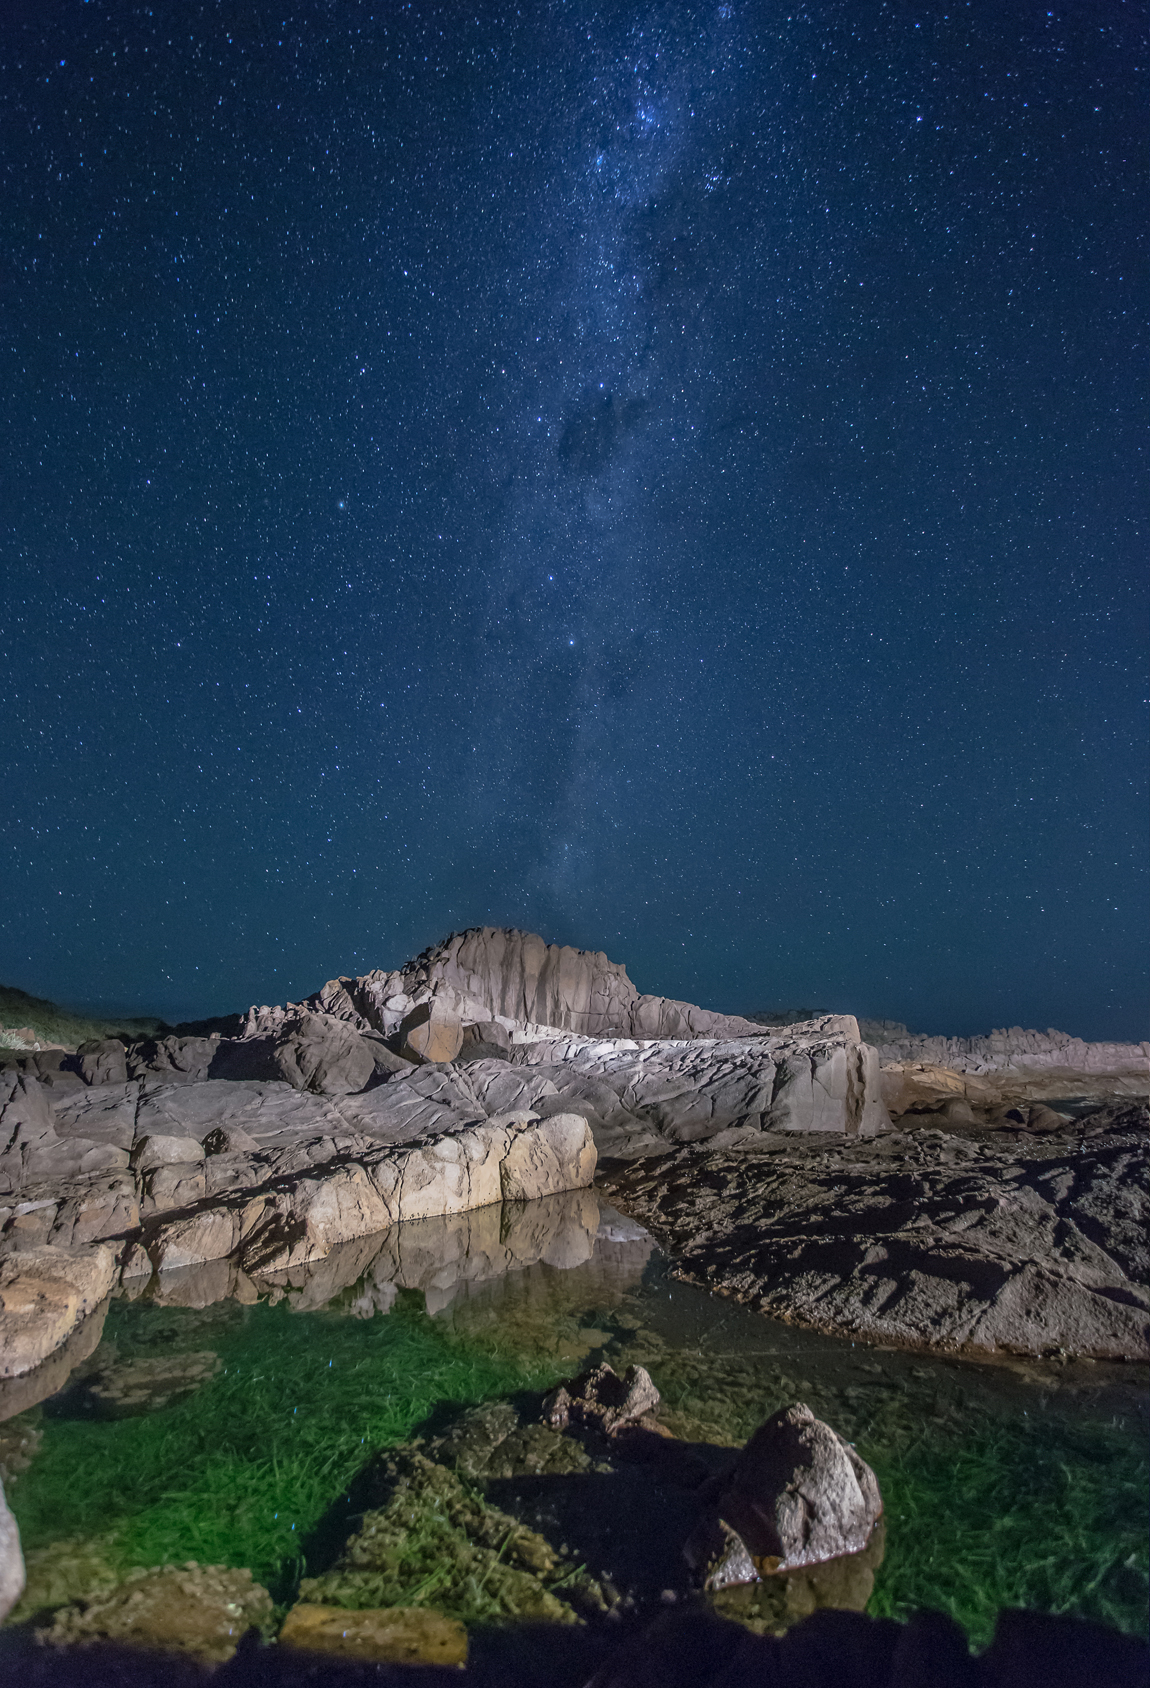
Brent: Alright, let’s jump into the Create section where I’ll tell you how I actually created this image. So what I did Guys was we got out there and we’re shooting a bunch of images. Maybe we shot 450 images of the sky and the Milky Way moving. Well, actually the earth moving and the Milky Way is staying still, right? Depends on which preference point you take, righ? So at the end, I wanted to do a couple of images. A couple of still images I could use straight away. So I’ve used a flashlight, a torch as we call it here in Australia. And I lit up the foreground as I took a long exposure image; a 30 second exposure image to get the sky or expose for the sky. And I had it at a very high ISO, 6400 ISO. 30 second exposure with the F4 lens wide open which is probably not the best thing because not everything is in focus here. The foreground rock is hardly out of focus. So hyperfocal distance.
Johny: It becomes really difficult particularly if you’re setting up in a dark. Even at 10 o’clock you’re only going to set up at sunset at 5:30 until 10. So it does become really difficult to get a focus.
Brent: Actually a really good tip there was actually I got Shane to shine his flashlight on a point in the landscape and then I went into live view on my camera and actually made sure that point was in focus.
Johny: And really what you can do as well with flashlight you can just crank the hell of the light and max it, it can go in the live view. And then it lets you see as well, so that helps. So focus can be different but often you know if you can try and get it on infinity or you know if you’re going to shoot the foreground and the Milky Way at separate times and blend them later you know you can put an infinity, shoot the Milky Way, focus the foreground. So all the foreground is in focus and then shoot the foreground and then you can blend them together. So it’s almost a shot stacking you know. Well, sort of it is because you’re focusing closer, that’s if you’re having trouble getting everything in focus because it can be hard.
Brent: And that’s probably what I should’ve done. I should’ve taken one more image with the foreground locked in focus, really focus. But you know what’s like? It’s totally dark.
Johny: It’s hard, Man.
Brent: You’re tripping on the rocks every time you walk around because you got a 30 second exposure so you let the camera expose and then you kind of run away as far as you can and then light up the scene from the side because I don’t want the lit from behind the camera. I want it shadowed. So you’re jumping every rock at night.
Johny: And another big thing about lighting besides the camera is getting light bleak because you’ve got your camera here and flashing over here. Man, you get light coming straight into the lens. The other reason why you don’t want to get longer with seconds is you want to freeze the stars; 25 to 30 seconds will freeze the stars. It’s long enough exposure to capture enough light with your camera to get a decent exposure. But any longer than that you start to see slight movements in the stars.
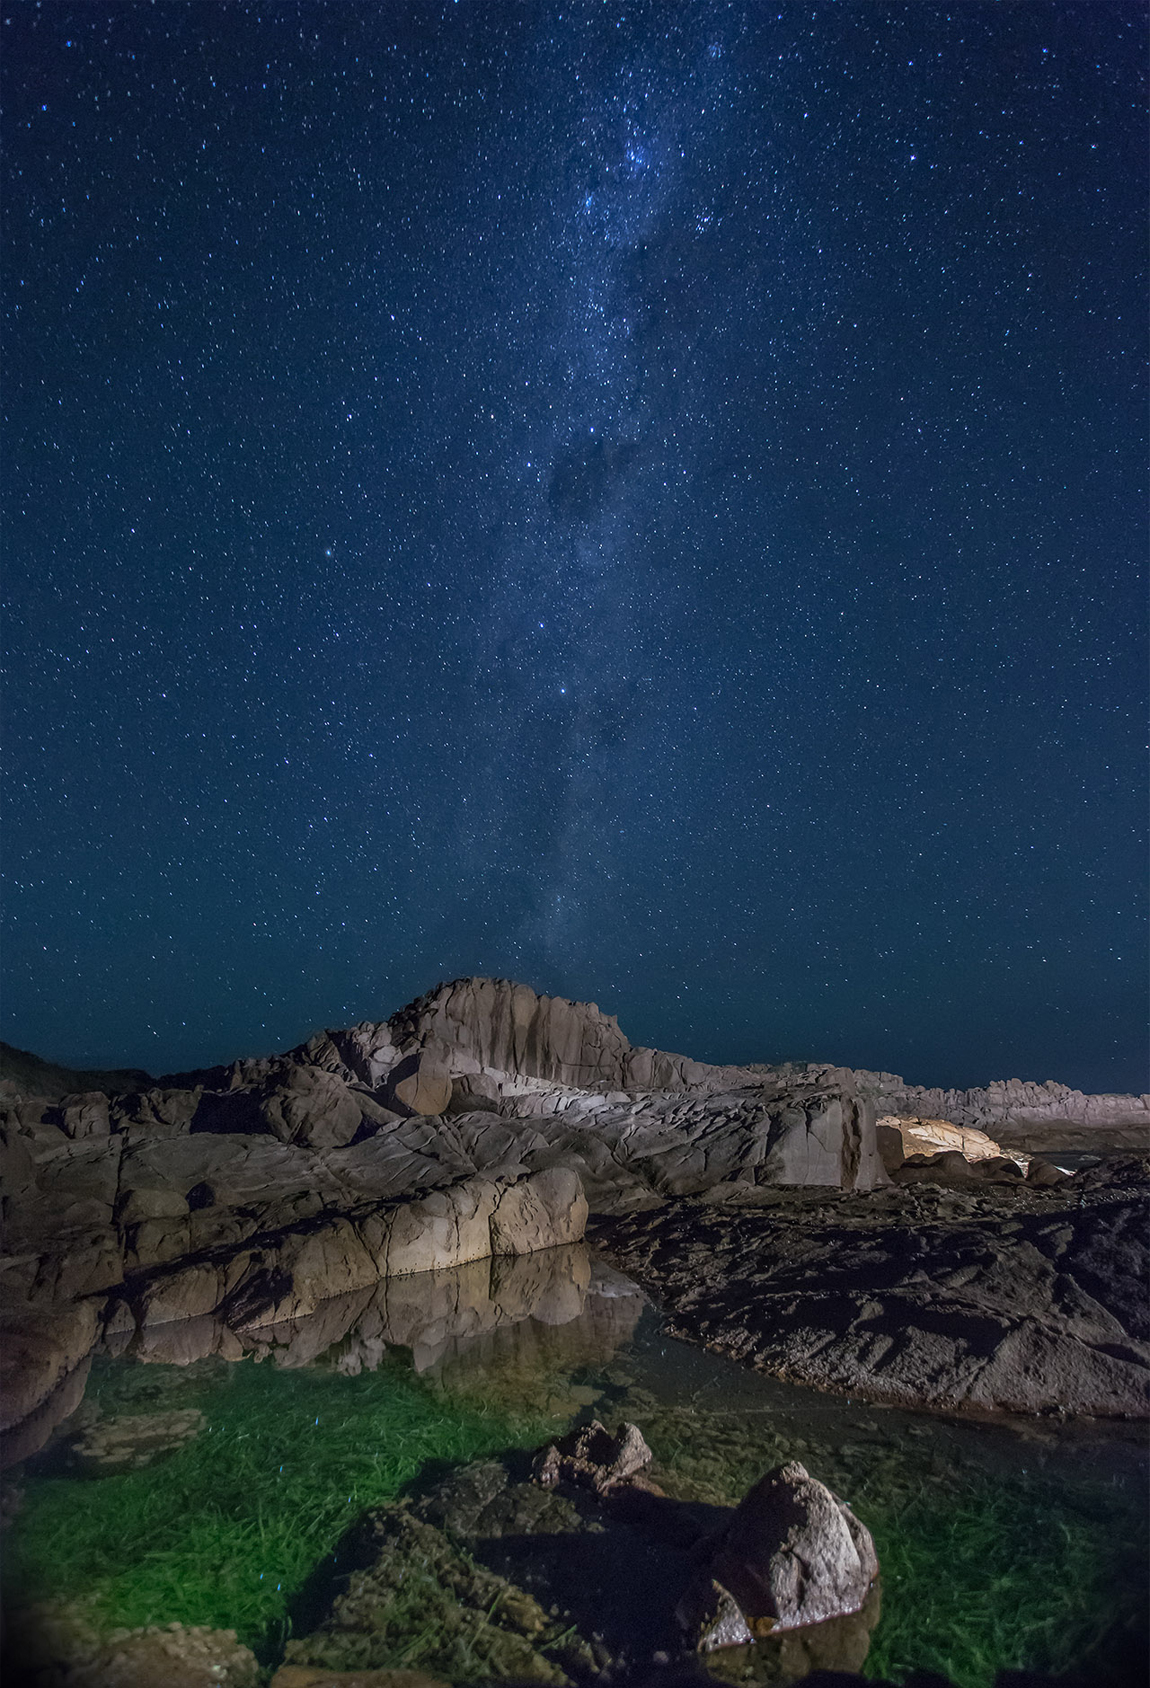
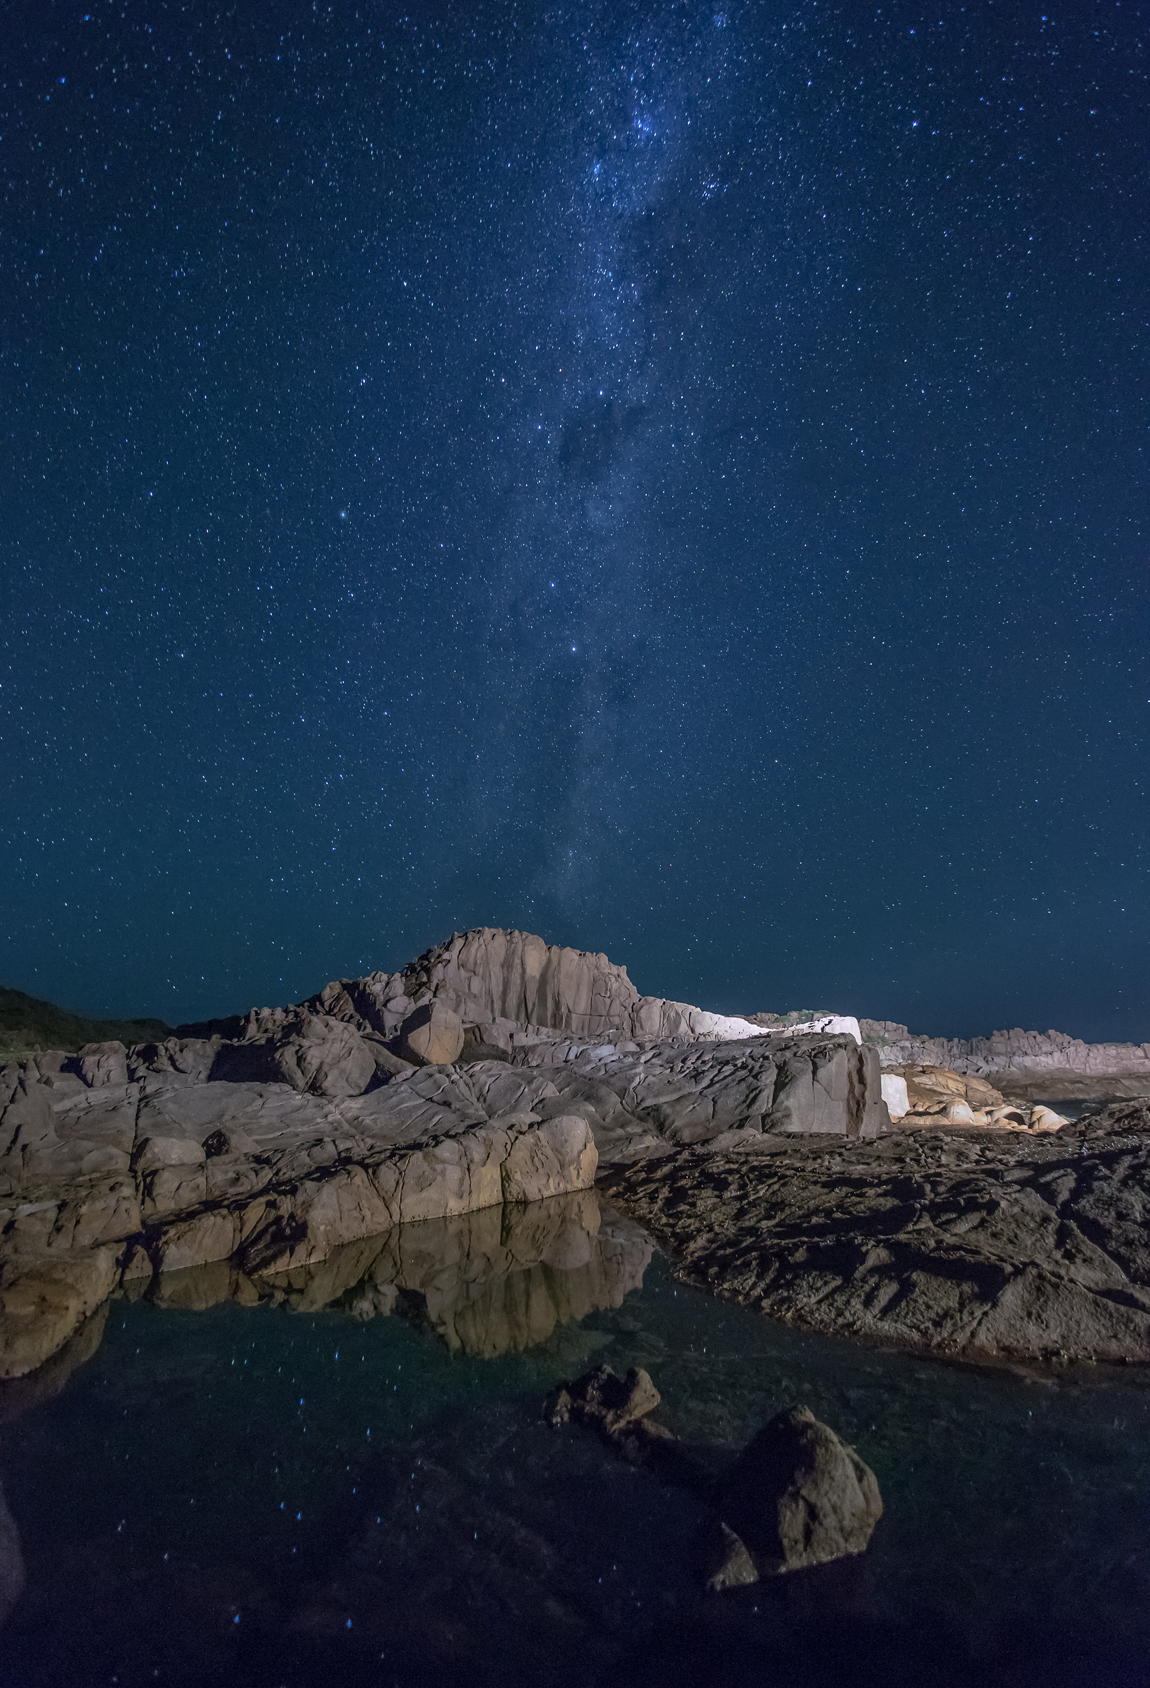
Brent: But even with 30 seconds I’m seeing slight movements. So Guys, I took these 3 images. I’m giving to you now. Where I try to paint light onto the rocks and the foreground. So this first one over here was just lighting up the background. The rocks on the background, the little hill over there and you can see the flashlight it’s a little harsh on some of the rocks. The next one is I tried it again with less light. So, you just paint lights. You might paint for like 3 seconds. You show the flashlight for 3 seconds, you stop and then you come back and have a look at the image. And if there’s too much light you go back blended and you shot it for 1 second.
Johny: It’s all about just having to go. You work it out.
Brent: So the next one here I’ve shone the light for less time and less exposure on the rocks. Have a look at the star reflections in front of you. The star reflections and I thought “Okay, the foreground”, because I’ve got this nice green.
Johny: To show more.
Brent: I wanted it to show, so actually flash or shun the torch or flashlight into the foreground to actually get what’s under the water. So the next one is what’s under the water. So you can see how when you shun under the water you aren’t getting any reflection or the stars reflecting on the water.
Johny: You get the nice green.
Brent: To get the nice green. That was actually too much green so the final image was I blended those last two. The one where I’ve got the stars’ reflections on the water and the green and I didn’t use as much intensity in the green there.
Johny: So you put it in Photoshop, layers and just manually blended with a brush.
Brent: Then I got to that image there.
Key Things in Creating After Dark Images
Johny: Which is I think you’ve done a great job. One thing I really love about this image is, this is a good thing having the Milky Way come out of something, you know. It looks really nice. So the main things are open up your lenses wide as it can go with F stop basically you know 2.8, F4 and try and focus on infinity if you can. You know 25-30 seconds you want to crank that ISO. You know, don’t pair with 64 depending on the sensitivity of your camera. Don’t be scared because a lot of it can be fixed in post, that noise and you want to be lock down on a tripod with a cable release or soft timer if you got it whichever way you like to shoot. So nothing is moving. And a little bit of flashlight and you want to shoot for the foreground and you want to shoot for the Milky Way and definitely blend it in post. Those are the main points when you’re shooting this type of photography. And don’t forget the human element. It’s really cool, Man.
Brent: And also spend some time when you get there to find the perfect composition. So we probably spent maybe 45 minutes walking around. Looking at where the Milky Way is going and then finding the point of interest and finding a peak and then we shot a couple of other ten shots to see which would work. And I finally set up for this shot.
Johny: I mean you’re lucky because you know the area pretty well down there at the rocks but if you’ve never been there in the daytime, Man, you’ve got to go to the location and see it in daylight before you go there in the dark. Not only to feel safe but try to find something you think that’s going to be awesome for your foreground. You know in the light and then go back at night. You’re pretty much good to go. And there are awesome smartphone Apps too that will actually help you predict where the Milky Way is going to be during the night and during the day when you’re scouting.
Brent: You know what Guys? It’s better if you go with someone else. Because you got someone to talk to, you know. It can be for a couple of hours.
Johny: Yeah, that’s it.
Brent: And it can get a little lonely if you’re looking at the camera every 30 seconds.
Johny: In the dark it’s scary or scared in the dark like Johny. Yeah, I can get scared so you need people to hold your hand.
Brent: Awesome, Guys. Well that’s it. So there’s another show for you.
Johny: But hey, I want to mention. I’m super pumped about this assignment in the lounge like “After Dark”. Man, this is the one that the community has voted for which also I really love. Community driven, you know. It’s so great and these assignments forced people to go out and shoot for that one thing. And we’ve talked about this before and I just love it because it forces me to go out every month, shoot something for that assignment. Do something I may not always do. You know, I may not always shoot that type of photography or that genre of photography.
Brent: But it pushes you.
Johny: Pushes you out of your comfort zone and really makes you grow as a photographer. I love it, Man. And other than that you get to post and critique your image after which is awesome.
Brent: And give you a positive and encouraging feedback.
Johny: Which is Man, I tell you. It’s nothing better than saying to people that they’re putting image in the lounge. They’ve given some feedback and put the next image. The images just transformed because they got people they can trust giving them honest and positive feedback. It’s not just like “Great image”, which is totally useless. It doesn’t help you grow as a photographer at all.
Brent: And I think for me what I’m loving the most about the SIC lounge, our community is the progress and the confidence the photographers are getting in there. You know, like look at Ricardo winning that award.
Johny: It’s awesome.
Brent: So people are progressing and it’s actually working. And that for me is the biggest encouragement to my teaching and our community photographers are getting better. I’m loving that.
Johny: I just love it. It makes me so happy. Cool Guys, it’s been another epic show. B man, thanks for sharing. I love them. After dark images, that’s awesome. Keith man, cool print, Bro. As photographers we are not often buying other photographer’s work but if you see something you really like, buy it Because you never know that one purchase that you might make for that photographer, it might change everything. The one thing that takes me from where I am over that hump to you know.
Brent: Yeah, gives confidence. And also that print might be worth a lot of money in the later years when the photographer becomes famous.
Johny: That’s it, Man.
Brent: Awesome, and Keith if you need to come to Australia and actually sign this for me.
Johny: Oh yeah, that’s a good point.
Brent: I want you to sign it because one day when you become famous.
Johny: Another epic show, Guys. Hope you enjoyed it. If you want to find me hit me up on Twitter @ijohny or you can find me in the lounge.
Brent: And Guys, by the way, we’ve got Johny and I have created some amazing free courses. So click the link above and grab our free courses on how to improve your photography.
Johny: Click the link and it’ll be there.
Brent: So grab one of our free courses and let us teach you.
Johny: And Guys, if you love the show please get iTunes and give us a rating and as always give us some feedback. We’d love to hear from you on what do you think of the show.
Brent: Awesome, Guys. I’ll see you in the lounge.
Johny: Have a great week.