Wow, what a great response to the last blog post about travel photography.
So, here is another one.
For those that missed the last post, we (my family and I) are on a 3 month caravan tour around Australia, no schedule, no agenda, just go where we feel like, stay as long (or short) as we like and take in as many experiences as we can, while home schooling the kids and running my photography business remotely. Sounds like fun? It is and we have experienced things that will live with me forever.
Lets see what we can learn from some of the images I have captured on our Australian Tour. Remember: CLICK ON THE IMAGES TO VIEW THEM LARGE
Waterfalls & the tropics
Below is the same waterfall taken at 2 separate times of the day. Which do you like better?
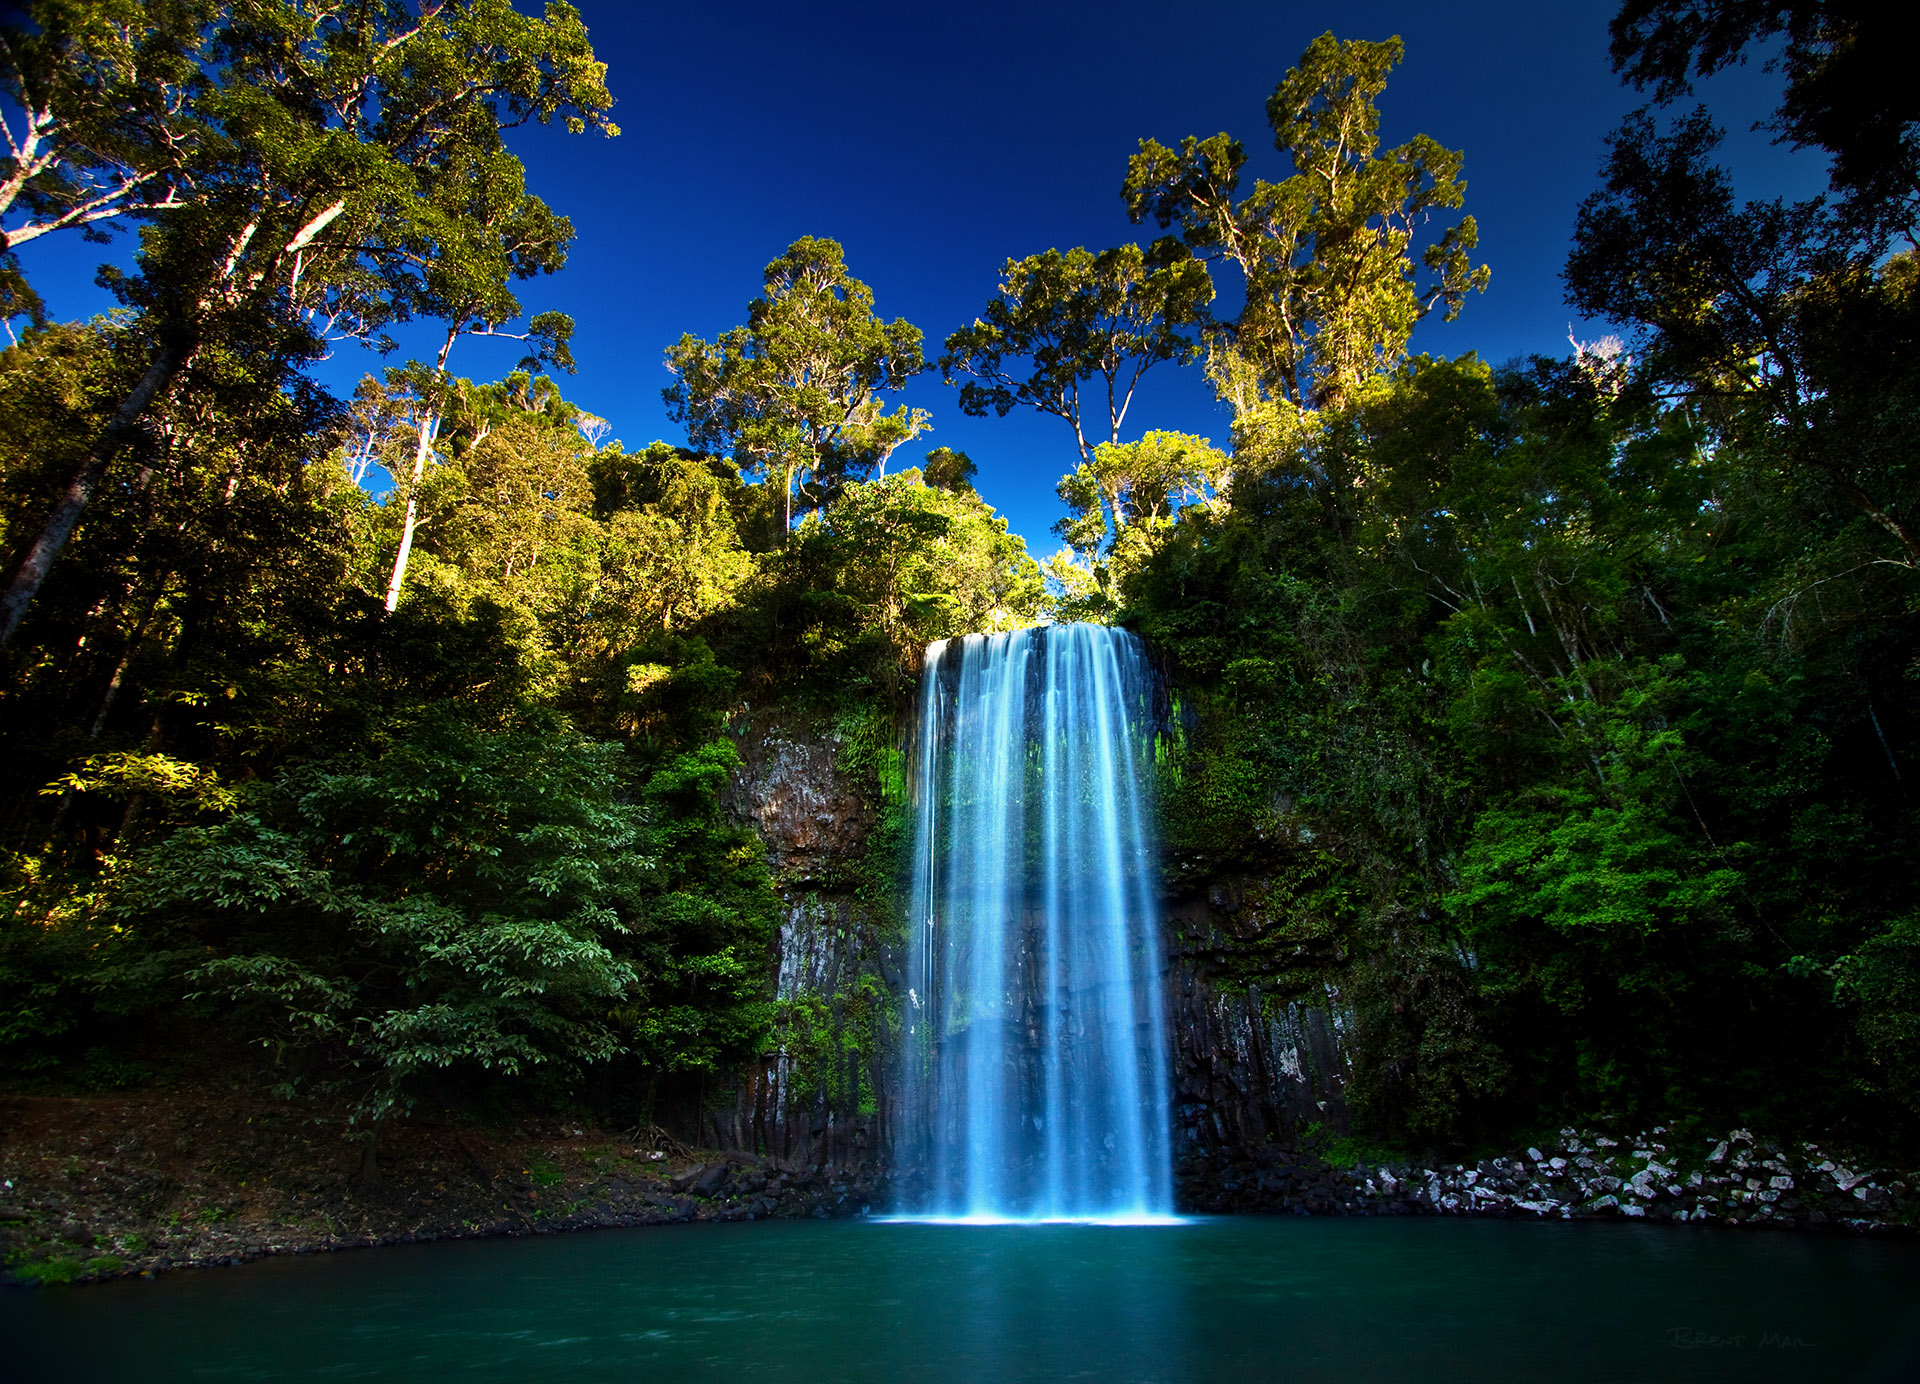
Above: Millaa Millaa falls taken in the late afternoon. See the sunshine on the trees above.

Here is the same spot photographed the following morning. Is this version better?
Tips for photographing waterfalls
Both images were taken at a slower shutter speed of 1/2 second. I photographed most of the waterfalls at this shutter speed, why? At half a second shutter speed the falling water creates a nice milky, smooth look. However there are a few problems you might encounter when shooting at a slower shutter speed, these are:
1. Tripod is a must: You will not be able to hand-hold your camera at 1/2 second shutter speed, the whole image will be blurred. You will need a sturdy tripod, or maybe rest your camera on something solid, and set the delayed shutter release option (you know the one where you setup the camera and then run and jump into the image with your family or friends and then the camera fires about 8 seconds later).
2. ND filters are needed: The sunlight will most probably be too bright for your camera to use a slow shutter speed. What I mean is, your camera will revert to a faster shutter speed at the smallest aperture (f18 or f22) and there will still be too much light at 1/2 a second shutter speed and your image will be badly over-exposed and look yuck!
To compensate for too much light, I used a few filters to reduce the light entering my camera and to even-out the exposure of the scene. The filters I used are called ND (neutral density) filters. These are the same filters I use in my Long Exposure & Sunset Courses.
I also used a circular polarizing filter – to make the sky really blue and take out reflections from the water.
Waterfall photography series coming soon…
I went back to these water falls and recorded a video series on how I photographed them, from the equipment I used, the techniques as well as the post processing. Stay tuned, I’ll edit and release this pretty soon.
Photographing wildlife in a different way:
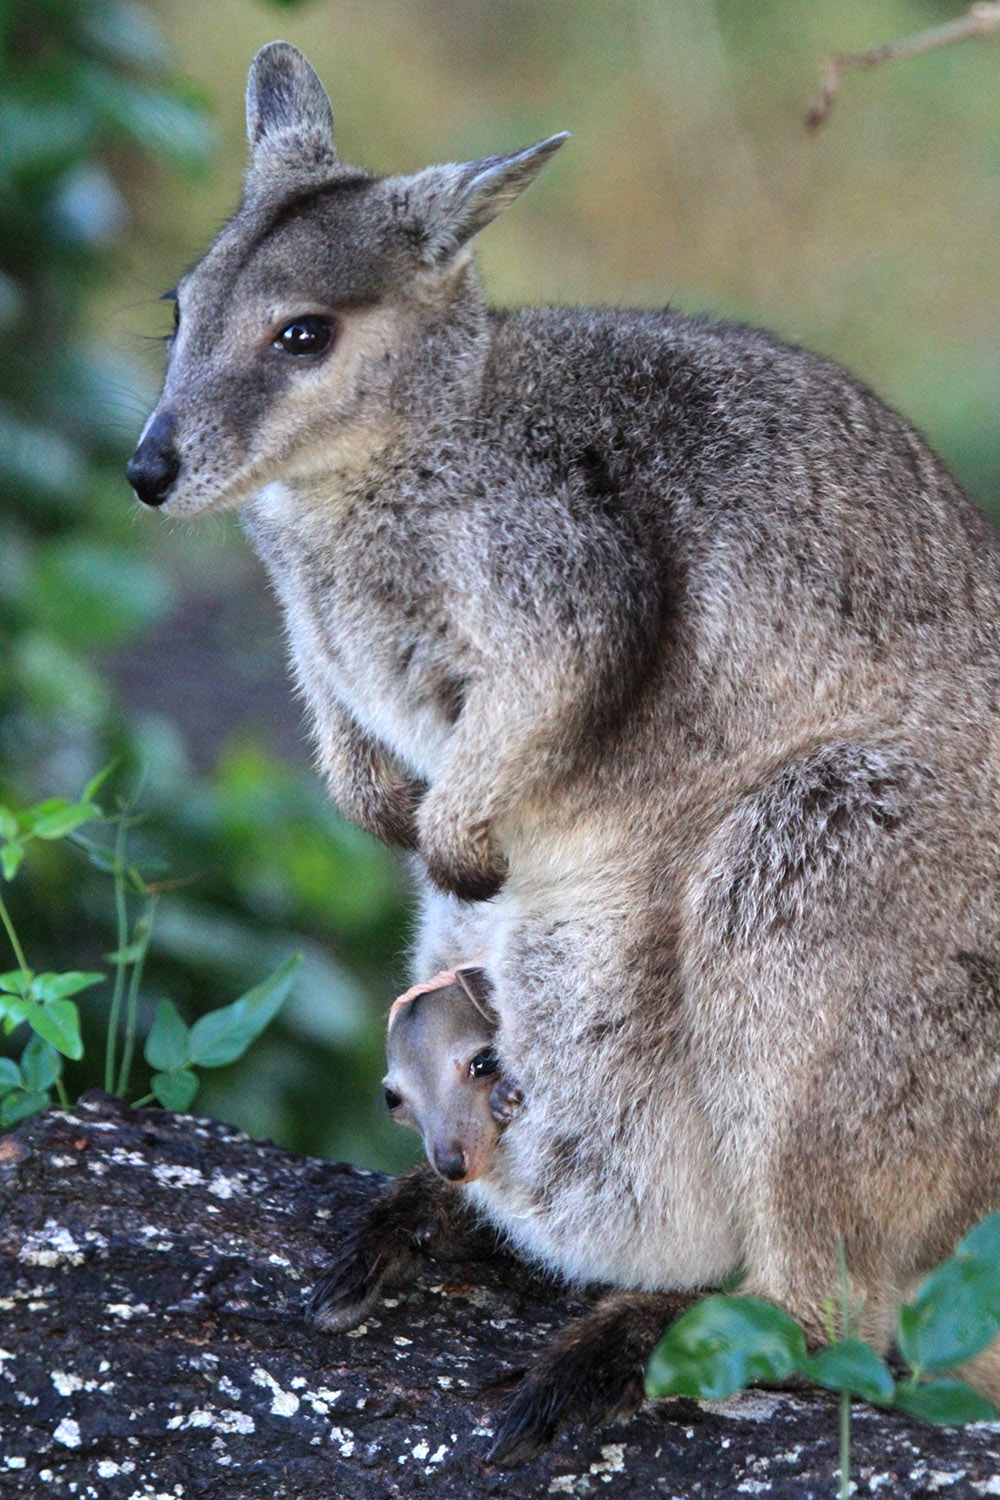
A little wallaby with it’s joey in her pouch.
Notice the point of view in this photograph? I focused on the little joey and not on the mothers eyes. Also, I photographed this with a 135mm f2.0 lens, not your usual wildlife lens – but it’s all I could get my hands on in the time I had. Remember the saying “the best camera is the one you have on you”?
Finally I’ll add some colour…
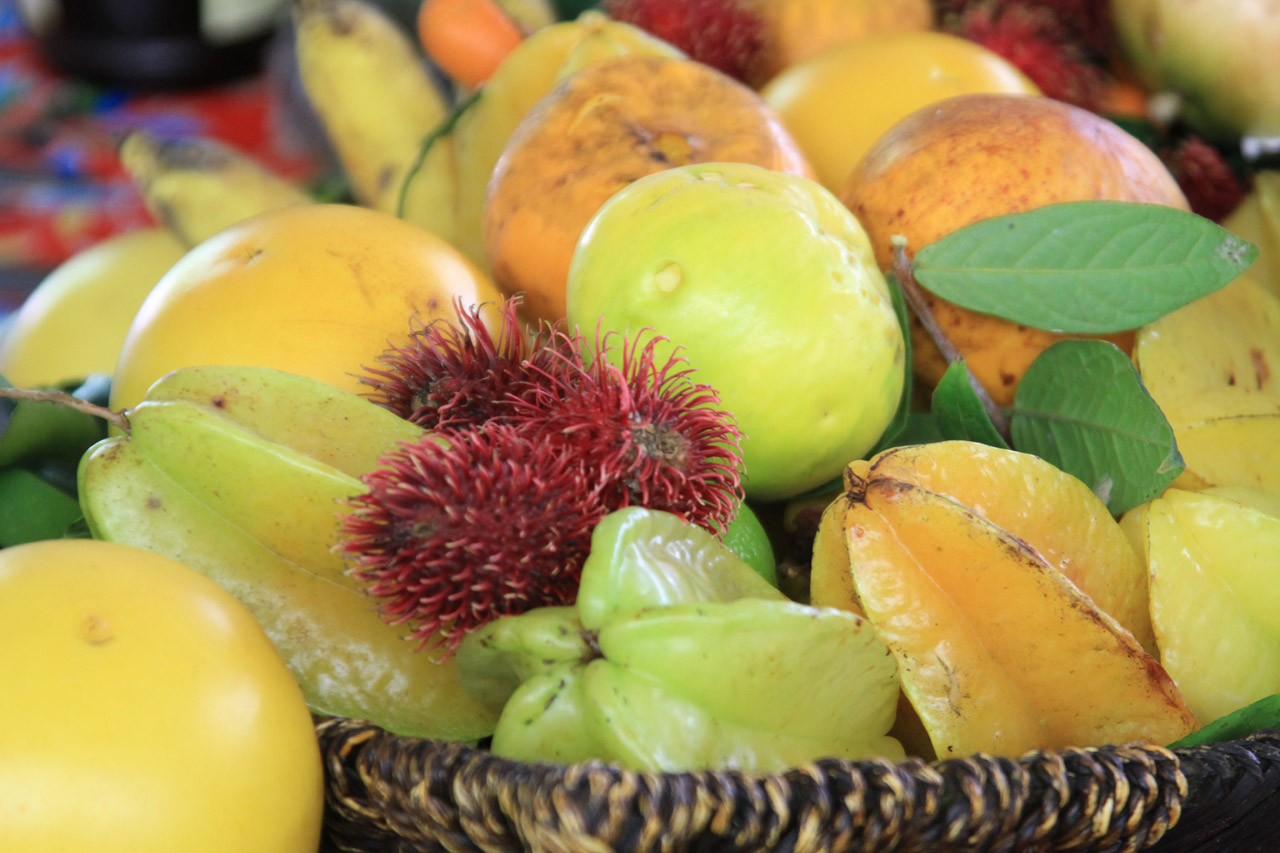
Above is a very colourful fruit platter at Mission Beach. We tasted all of these fruits, and It’s something you should do if you ever get a chance. They call it a fruit safari, and my taste-buds travelled a few times around the world!
Photographed at a very shallow depth of field. F4.5 (very large aperture – wide open) at 105mm (zoomed right in) to create that shallow depth of field.
If you want to follow me as I travel, then checkout Google Plus or FaceBook.
What do you think of these travel photo’s? Did you learn something new? Please leave your comments below, I reply to them all.
Cheers, Brent
Hi Brent,
I am a new subscriber to your blog/website and while I have been photographing for a few years now, there have always been some things I have struggled with and not quite grasped (technical). You have a very unique and easy way of delivering information which has helped me a lot. I find your short videos very easy to follow. In saying that, I am still very much a more hands on type person and learn best that way. Do you ever present any courses in person or just through what you sell on your website?
Love the photos from your travels
Thanks
Sharon
(PS I also hail from the ‘Motherland’ and there’s nothing more special than those African sunrises and sunsets)
For sure Sharon. I do hands-on workshops and will be doing a few more this summer here in aus. I plan to do a workshop in Africa next year too. There Is so much more I want to teach and for most people it’s more accessible through video and online. Where do you live? Brent
Hi Brent, I’ve just seen your reply…..only cause I wasn’t sure where to find replies as I don’t get alerts.
I live on the Gold Coast.
I posted another question to you the other day too but don’t know where or if the response is there. Anyway, I’ve just invested in your course you had on special. Previously I mentioned I’d just invested in a 7D….upgraded from a 450D. Big jump for me! Amongst others I have a 70-300mm lens which I purchased about 5yrs ago and find it’s my most versatile lens. The problem I’m having with the 7D and will be to my lack of skills, is that after mastering the focus recompose technique, my photos are all out of focus now. Not so much stills but anything with motion and I’m done! It’s very frustrating and I don’t know how to correct it. The tracking system is obviously much more sophisticated and it’s causing me much disappointment and frustration. Do you have any tips on how to use or master these tracking systems? Is it perhaps possible my lens is not compatible with the 7D? It shouldn’t be though as it’s also a canon. My next plan is to upgrade to a faster lens but the budget is a bit tight. Any comments?
Thanks
Hi Brent, it’s great to enjoy all of your photos especially the Queensland one. I will be moving to Newcastle very soon, and a lot of beautiful views there, especially the seashore and beach. I want to capture more scenic views and nature. I would like to have a your suggestion, what kind of camera brand and type of lens that might fit with my interest? Thank you, Alam.
That’s great Alam. Contact me when you get closer to Newcastle. Brent
I love them both. That’s my problem. I can never decide which is the best. Sometimes I’ll take 5 or 6 of the same thing and still can’t decide. Great Wallaby photo. Thanks for tips, Mary
Perspective vise I like both waterfall photographs, however colors are more pleasing in the first one (I would think that the second shot was a tough one with all that strong shade on the left). Best Regards Nenad
The way you have sunlight at the top down into deep shade, but still showing the great colours in the green bush below; I just loved this shot. plus that’s a great shot of the coy joey
The second..well too much in the foreground, and strong sunlight, that robbed the beauty and mystery of the shot. but I not understand what is 1/2 of a second, is that 1/500, or 1/20th. Excuse this I am new to photography, and find your emails easy to follow except for shutter speed. It must be 1/500 for you to freeze the waterfall, right. Now will get the ND filters , learning how to use them
and use the holder for the polarizer and the filter mm .. work to be done, ciao Brent
Thanks Dorothy. Half a second is 1/2 seconds it’s a much slower than 1/20th. Just set your camera to shutter priority mode and dial the shutter speed down slower and slower l until it displays 0.5 seconds. Cheers. Brent
Hi Brent,
I love the first waterfall photo. You could just loose yourself there. The second one feels a little too busy with the palm tree in the foreground. Also gives the appearance of some HDR processing. The wallaby with baby is outstanding!!! I really enjoy photographing wildlife and they don’t pose for the camera so sometimes it’s just get the shot. You don’t have time to worry about all the rules, i.e. rule of thirds etc. that is what pp is for.
Your trip sounds wonderful, have a great time.
Carol
Thanks Carol. Like your your comments on the waterfall and how the simple image is better without the tree. Cheers. Brent
Hey Brent,
Personally, I like the first of the two waterfall photos. The second one has too much sunlight and it almost overexposes it. I like how the sunlight is above the waterfall in the first photo and the waterfall itself appears almost perfectly exposed.
I don’t normally have a “set” shutter speed when photographing waterfalls. The situation, lighting and gut feeling usually determine what I’ll use.
Depending on the light, I’ll use either a 0.6, 0.9 or 1.2 ND filter. Do you have a preference or does the light usually determine that? On a recent outing I used my 0.6. It added just enough darkness to allow for a longer shutter speed because the sun was coming through the leaves. It wasn’t a particular good time of day to photograph the waterfall but it was the only time we had (I was with a group).
As for the wallaby, that’s a very cool shot. But for all 3 photos it doesn’t appear you followed the rule of thirds. Is there a particular reason for this?
I always enjoy looking at your photographs. They are very inspiring.
Kris
One more thing – I ALWAYS have my circular polarizer on my lens. I never leave home without it.
Kris
Me too, mine is actually fixed to the front of my filter holder too. B
Great points there Kris. I only have one ND filter (0.9) for this type of photography, but I do stack it with my Graduated ND filters and circular polarizing filter.
I experimented with shutter speed and 1/2 second is my go-to speed. From there I might change it depending on how fast the water is flowing, and weather there are clouds and I want to show cloud movement too.
No rules used with wallaby, could not zoom with fixed focal length lens, and I did not know how long she would sit there for either. Good spotting, and thanks for your thoughts.
Cheers, Brent
Thank you for gave me goods tips.
No worries Leo. B