How to make your photo editing quick and fun with LR presets.
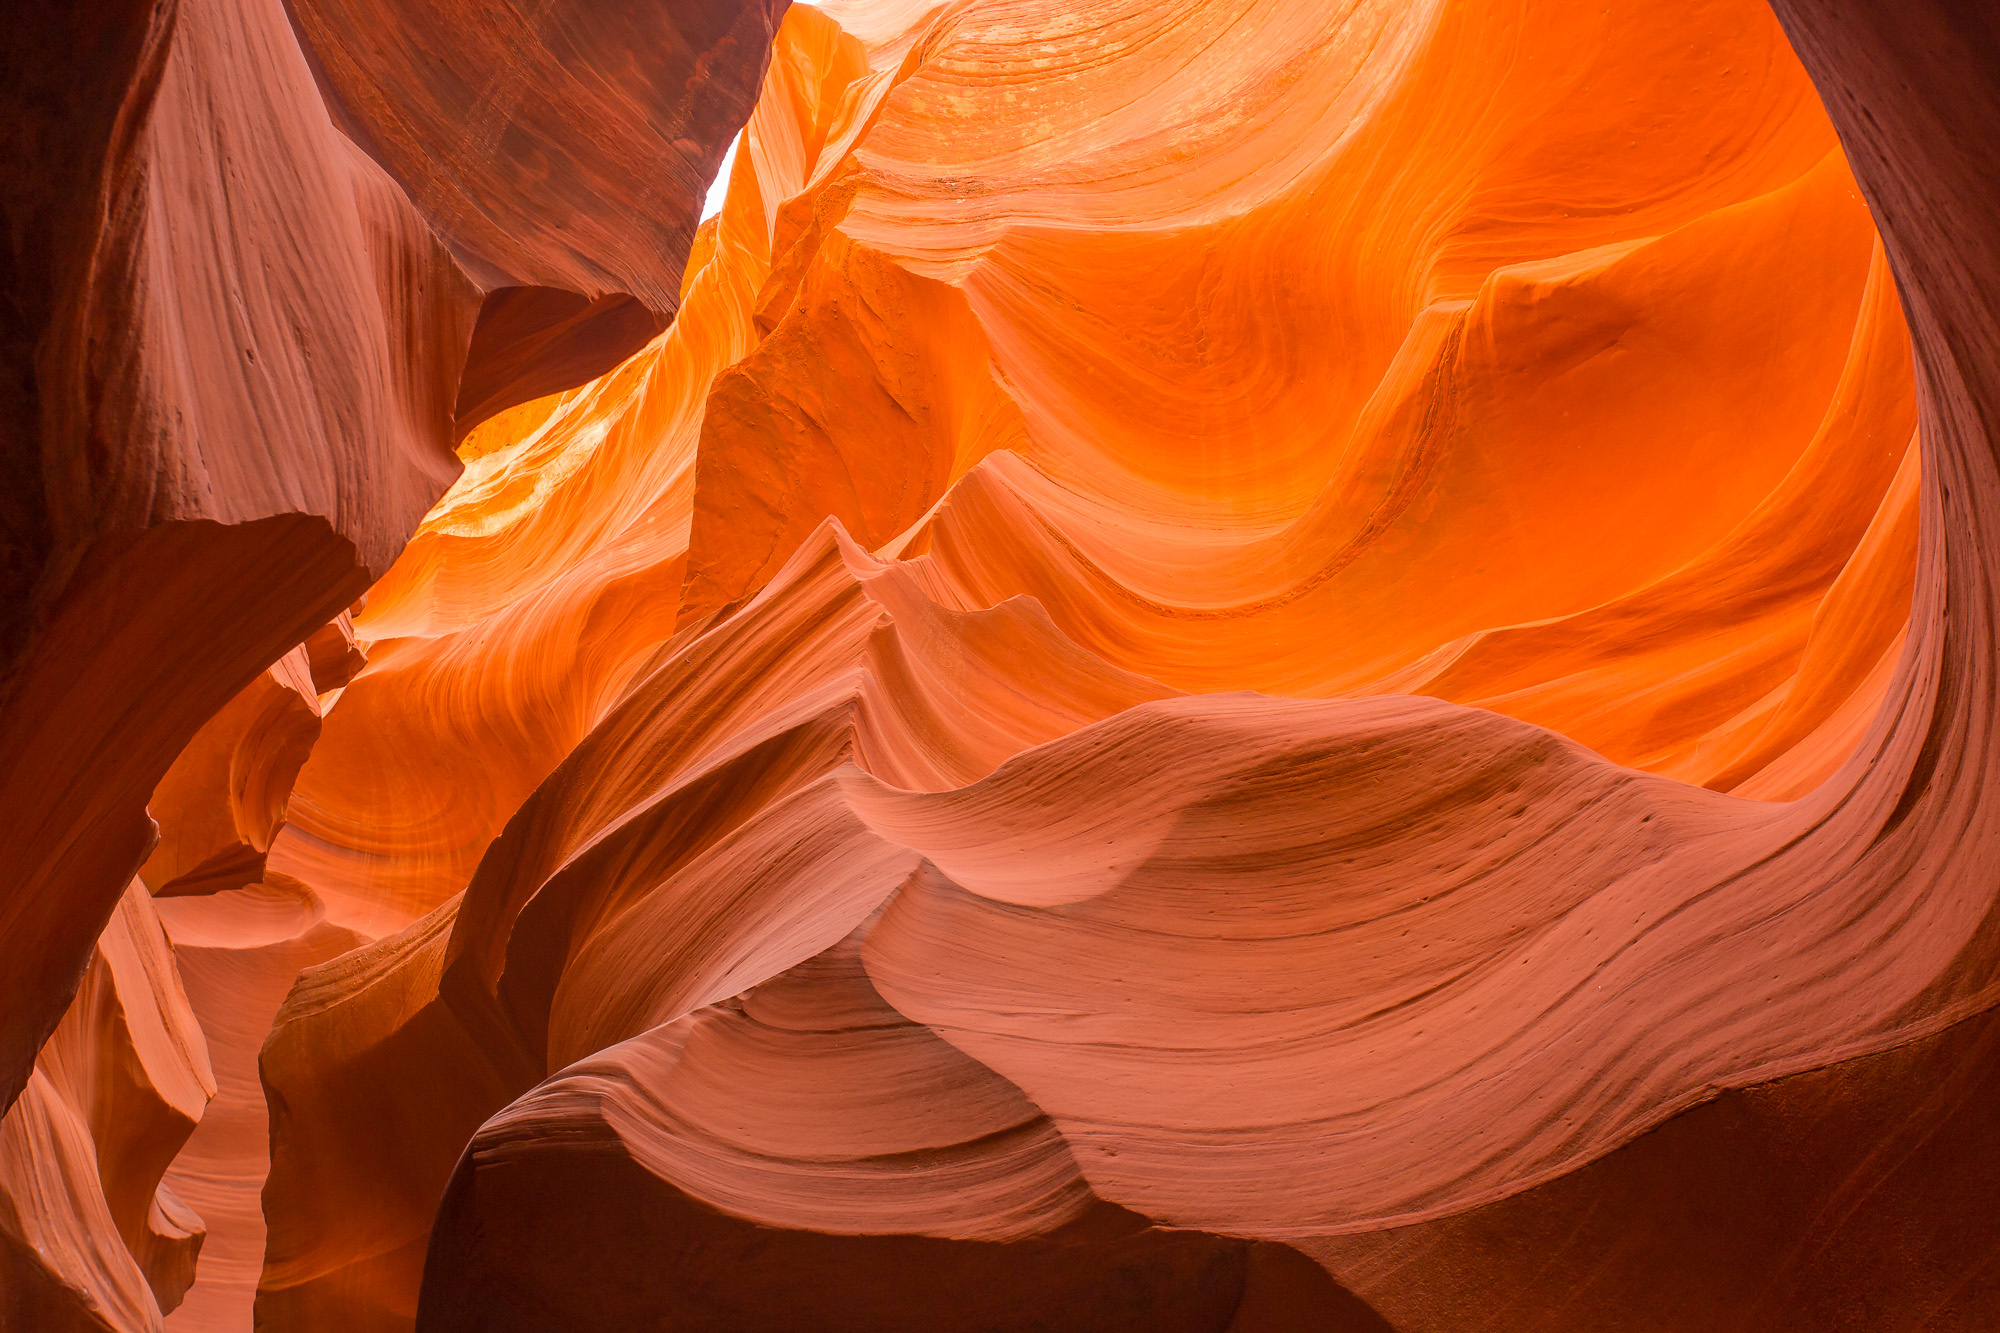
Hey guys! Brent here with another Quick Tip for you. Today, I will be showing you how to use my friend Johny Spencer’s Lightroom Workflow Preset Bundle to edit an image I took in Antelope Canyon, Arizona.
The canyon is stunning and if you ever get a chance to visit, you must go. ![]() It’s an amazing place. Even though there are a lot of people, you are shooting up above their heads, so you don’t have to worry about them in your photos.
It’s an amazing place. Even though there are a lot of people, you are shooting up above their heads, so you don’t have to worry about them in your photos.
This preset is unique in that it is multiple steps instead of just one, like most presets on the market today. What makes this great is that you actually get to learn how editing in Lightroom works rather than clicking once and getting a final image that may look stunning, but you have no idea how it got that way. This approach will help you truly learn how to edit in Lightroom, and I love that.
So, watch now to see just how I do it!
In this episode:
(00:42) – Edit image taken from Antelope Canyon
(01:42) – Original off the camera image edit
(02:03) – Lightroom workflow presets
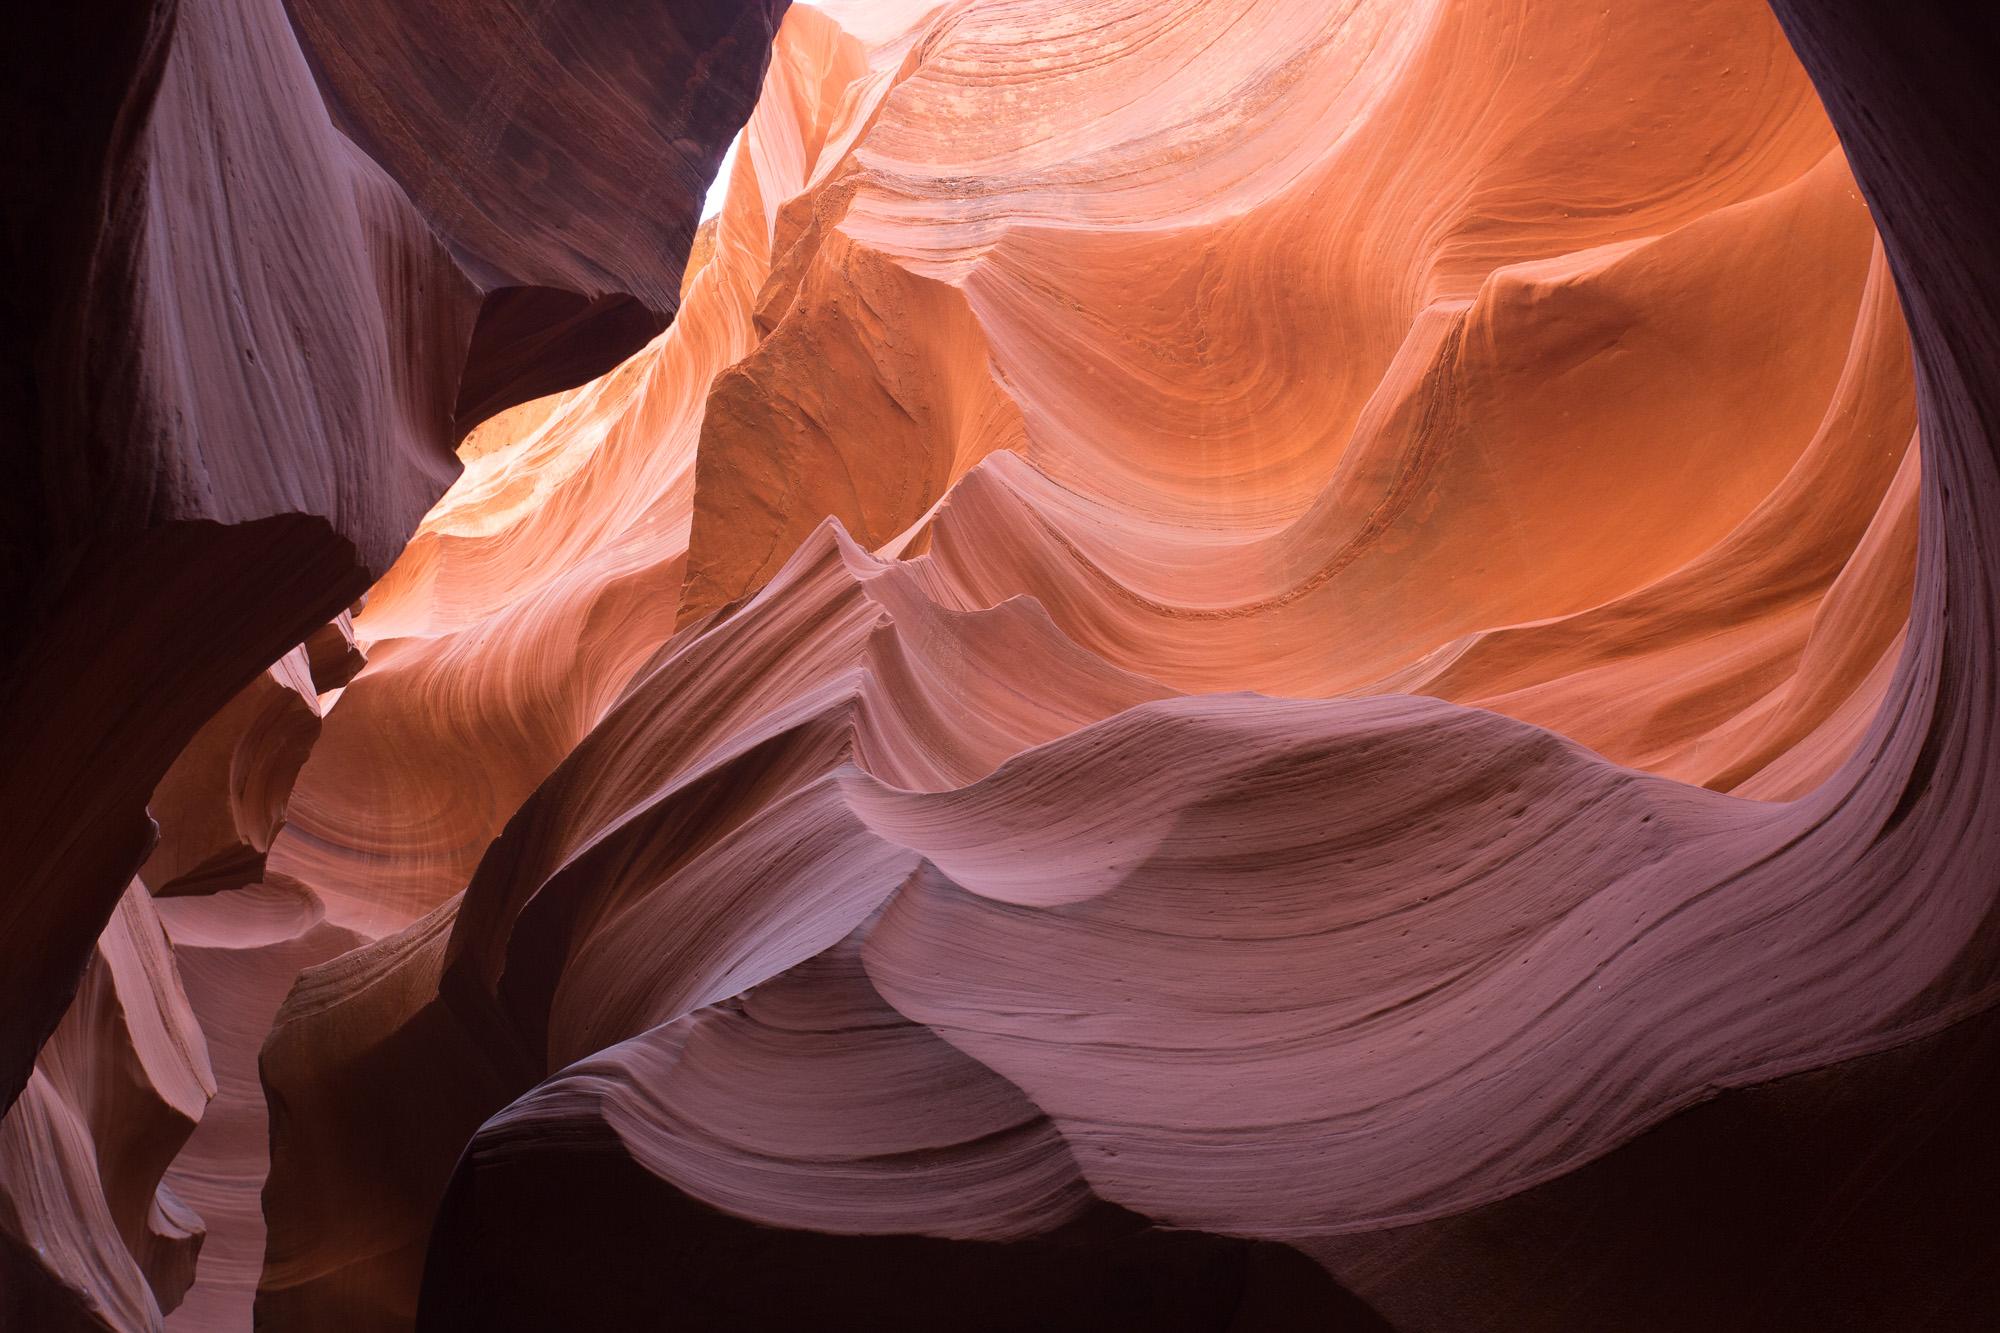
(11:34) – Before and after image
Photographing In Dynamic Light Conditions
Antelope Canyon is spectacular to photograph, but can be a bit of a challenge because the range of light in the canyon is so dramatic: The highlights are very bright and the shadows are very dark. Getting a proper exposure in these conditions is difficult, but you can use a technique called bracketing to get what you’re looking, which is exactly what I did for most of my images.
Even though this tutorial isn’t specifically about bracketing, I want to give you a brief overview in case you’re not familiar with it:
Bracketing your images:
- Shoot three images in a row, one to two exposure stops apart
- One should be exposed for the shadows, the next for the midtones, and the third for the highlights
- Combine the three exposures in your editing software to create one image that covers the entire range of light
Now that you have a general idea of bracketing and the importance of using it in high dynamic lighting conditions, let’s move on to this preset I keep talking about. You’re going to love it!
The Power of the Workflow Preset:
For this Quick Tip, I wanted to find one photo that had a narrower light range so I could edit it in one go to make it beautiful. It’s a perfect demonstration of how well Johny’s Workflow Preset works.
As mentioned in the introduction, what makes Johny’s Workflow Preset so powerful is that it is organized as a series of steps instead of being a one-click solution. Most presets available are fantastic, but with only one click to get to done, you don’t get the chance to learn about Lightroom or how to edit images for yourself.
By going through Johny’s Workflow, you get to see the effect each step has on the photograph. Not only do you learn about Lightroom, you also learn more about photography! This preset is functional AND educational. The more you use it, the more you learn how you can edit without using it. “Teach a man to fish and you feed him for a lifetime.”
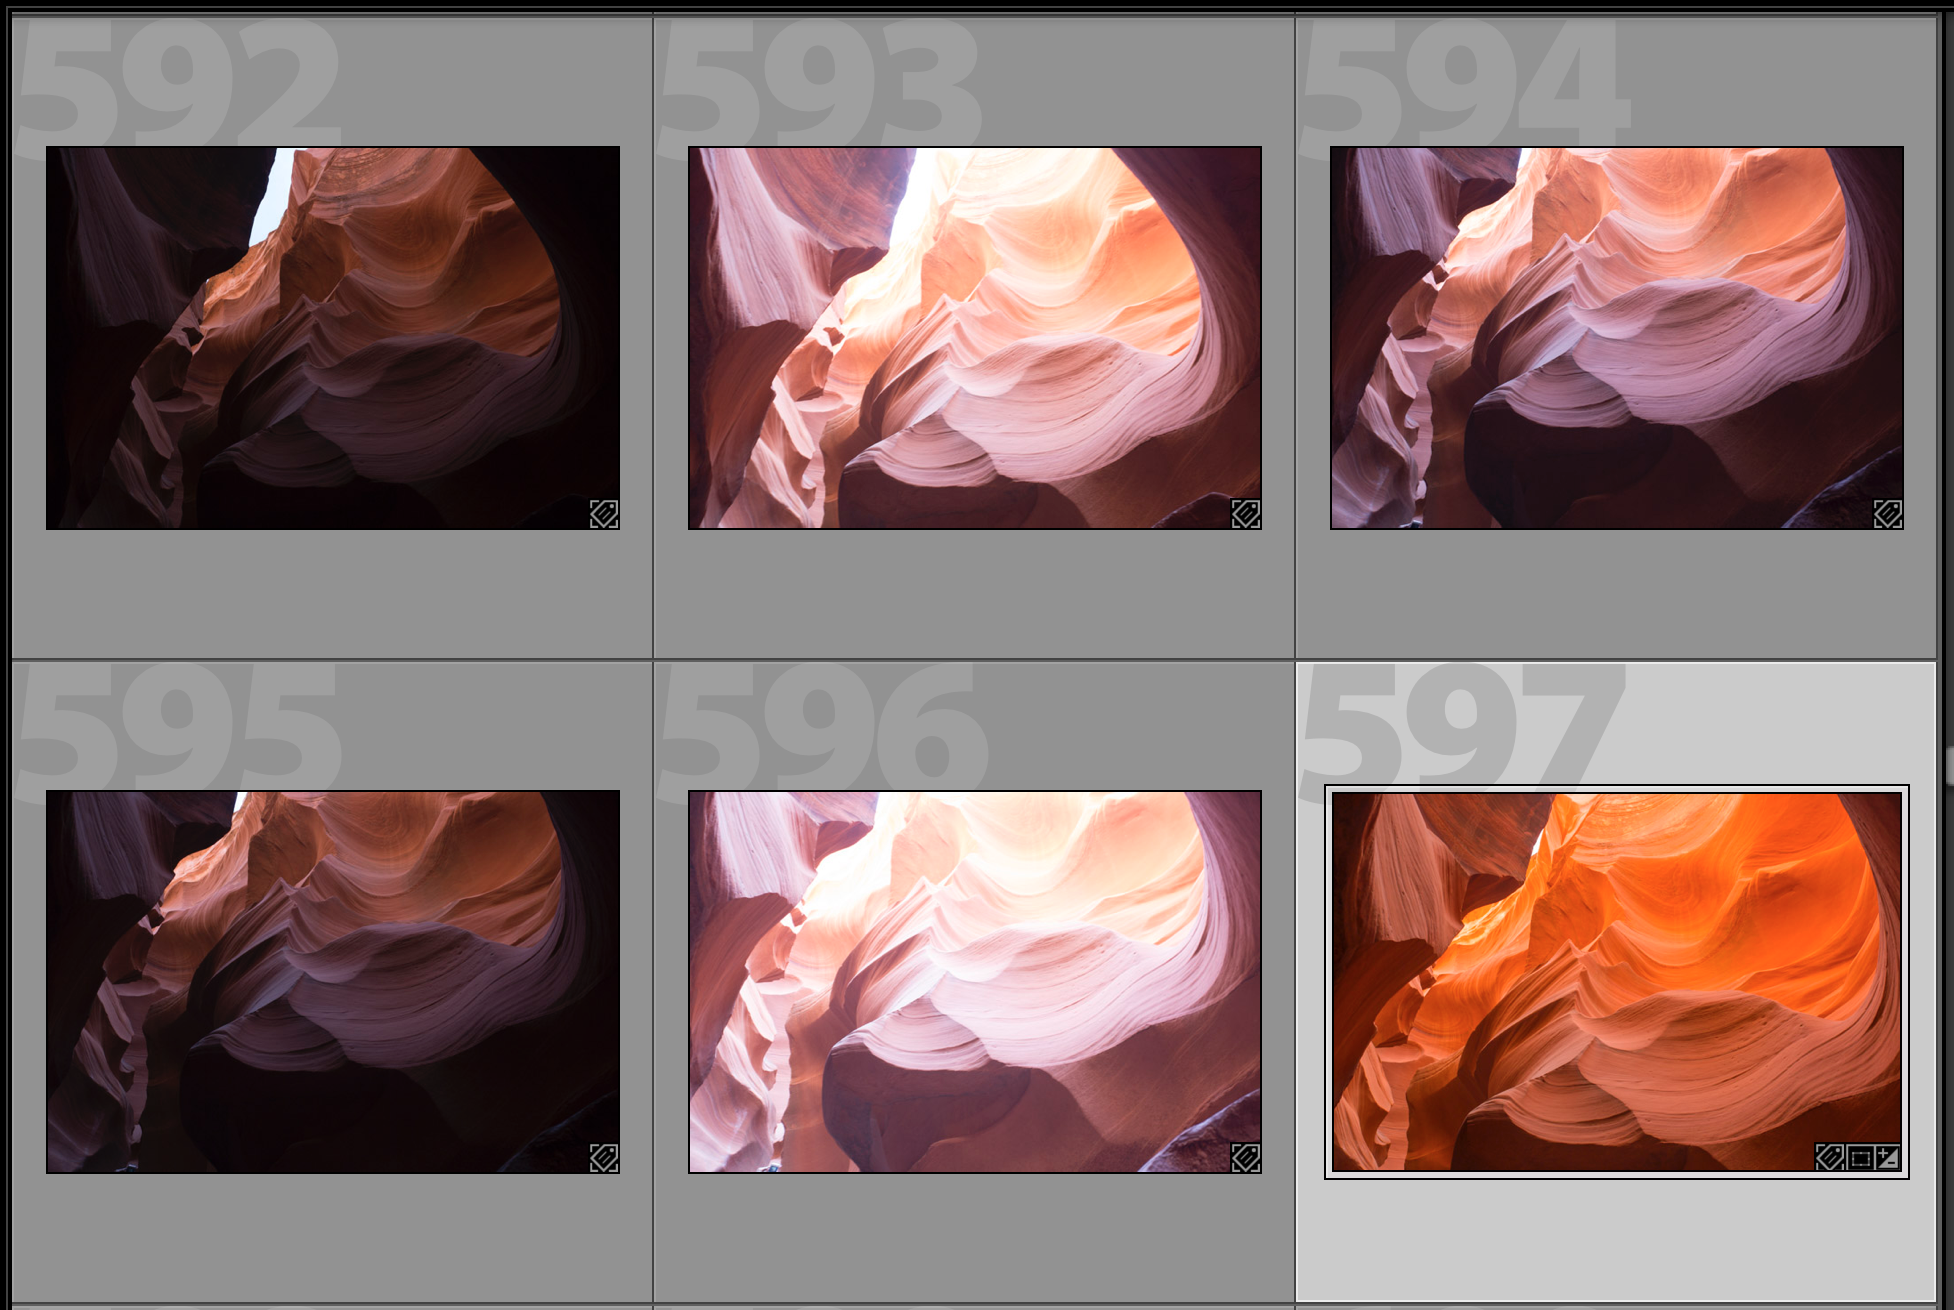
12 Steps to Amazing
This particular preset is organized in 12 main steps, labeled 0 – 12. Each main step has a set of options under it, labeled as A, B, C, etc. These step options give you different settings or strengths for the main step. You choose the option that is best suited to the photo you’re editing. If you hover over any of the steps, you will see a preview of the impact on your image in the thumbnail above the preset.
Here are the steps I took to edit the image in the tutorial:
0. Crop Straighten Manually: This has to be done in the Basics panel
1. White Balance: Adjust the “temperature” of the image – I used Cloudy based on the recommendation of the tour guide.
2. Exposure Lighten: Increases exposure, brightens image Brightness .50 I used my histogram as a guide, not the appearance of the image. Monitors vary in brightness and are not a reliable indication of the true brightness. You want to be sure the image covers the entire range of light, from shadow to highlight (left to right)
3. Exposure Darken: Decreases exposure, darkens image. Not needed for this image.
If the image was too bright according to the histogram, you would use this to reduce the exposure.
4. Highlights: Increases or reduces highlights. Decrease by 75. Massive highlights due to light entering the canyon needed to be reduced
5. Shadows: Increases or reduces shadows. Increase by 75. The shadows in the corners were very dark and needed to be brightened
6. Set White & Black Point: This has to be done in the Basics panel Hover over Whites, hold Shift, and double-click. Hover over Blacks, hold Shift, and double-click. Sometimes, LR overcompensates so I manually increased the whites a little bit to get my histogram more balanced
7. Contrast: Increases or decreases overall contrast. Increase by 10
8. Sharpening: Makes image appear more sharp, reduces softness. Medium. Zoom to sharpen.
9. Noise Reduction: Reduces grainy appearance in shadows due to higher ISO. Medium. Navigate to and zoom in on a shadow.
10. Vignette: Adds a darker area around edges of photo for extra impact
Not needed in this image because of existing shadows around edge
11. Vibrance: Amps up or dampens muted colors
Medium
12. Saturation: Amps up or dampens overall color intensity. Light. Many newbie photographers make the mistake of using too much saturation, which really kills the image, making it look fake. A little saturation goes a LONG way
When working with presets, it’s important to understand that the effects stack. Notice that each step in Johny’s Workflow has a Reset option for just that reason. If you don’t like an effect, be sure to click reset before trying another.
Finishing Touches
Because I shot this image in a really dark area, I want to be sure the the noise and sharpness are good. To do this, I am going to go to the Detail panel:
- Sharpening
Hold down the option or alt key and drag the Masking slider to the right
The white parts are what get sharpened, while black is left alone
Adjust the Amount slider to increase/decrease the amount of sharpening, making the white edges sharper - Noise Reduction
Zoom into a darker area of the image
Check effectiveness of current noise reduction setting by toggling the Detail button on/off
You can see that when it is turned on, the noise is softened and looks much better
Summing it up:
Editing photos in Lightroom can be lots of fun but sometimes time consuming. Especially when you are first starting out. Presets can greatly increase productivity, but often don’t help you learn how to edit. That’s what I love about Johny’s Workflow Presets. It makes your photo editing quick and fun. You can still learn while producing great photos instead of wasting large amounts of time on the traditional learning curve. Once you’re familiar with the preset, you can edit an image in just one to two minutes.
Follow the 12 steps and see how they impact your image. Play with it. Have fun!
Related Articles
Did you enjoy this article? You may be interested in these related articles too:
- Give Your Photos a One-Two Punch Using Framing Learn to use a powerful composition technique to make your subjects stand out!
- Sunset Image Edit in Lightroom How to Edit a Sunset Image in Lightroom (from start to finish)
- Bringing Splendor Back – A Horse at Dawn: Lightroom Edit Taking an Image from Dull to WOW Using Just the Basic Panel and Graduated Filters in Lightroom.
Your Feedback Wanted:
What do you think of Johny’s Workflow Preset?
I’d love to get your input, so leave your comments below.
This is great information. Where do I get the presets? The link below the YouTube video does not connect. Cheers,
No longer available David – sorry. Brent