Creating wild images without traveling too far.
Shooting Wild Images
There are many places we can go to find wild images. Traveling to far off places isn’t always possible so in order to get photos of wild animals, birds or bugs we can explore areas that are near by. We can also choose to find other definitions of the word. Wild child, wild hair, wild weather, or a wild ride in a car or at an amusement park. It’s fun to try to think outside the box sometimes when creating an image for a theme.
Capturing Wild Images
Remember when shooting with a long lens to keep your shutter speed faster than your focal length in order to reduce camera shake.
Brent’s rule is to set your shutter speed at twice your focal length unless you are shooting in lower light and using higher ISO as that will lead to added noise in your image.
BootCamp Masterclass & Challenge – WILD
Ever wondered what happens inside Photo BootCamp Academy? Each month Brent creates a brand new Masterclass and challenge for BootCamp members and then gives feedback on images throughout the month. At the end of the month the best images are published in the magazine below.
Watch the full ‘WILD’ Masterclass and Challenge below and discover how to post process your wild image to make it POP!
Developing In Lightroom
1. First things first, take a look at your image, what do you see that distracts you from the main subject? Crop the image to get rid of any of these distracting elements. Use your crop tool guidelines to help create the best composition whether it’s the rule of thirds or any of the other compositional guidelines that are available. Straighten your image as well if necessary.
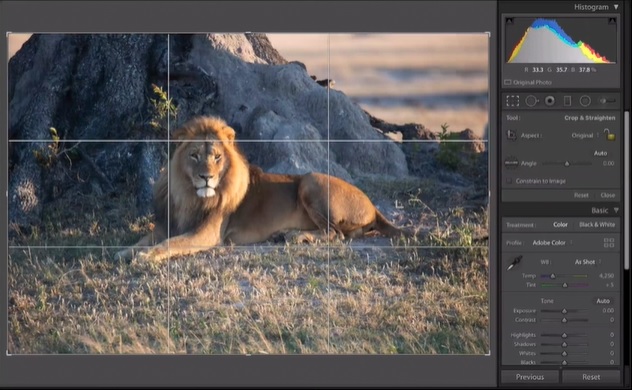
2. Next move on to the sliders. Check your white balance, is it okay as shot or does it need to be adjusted? Make sure your exposure is good, adjust if needed. Take a look at your histogram, are you clipping your whites or smashing your blacks? Do a highlight and shadows check and increase or decrease to bring out what you want to see in your image.
To set your whites and blacks in Lightroom just shift and double click white (or black) and it will automatically set the white/black points for you. Then adjust them further to your taste.
3. In the details panel, we’ll want to sharpen only parts of the image, not the blurred out background or parts of the images that you don’t really want to pop. To create a mask showing the edges and areas we want to sharpen Option/Alt click on Sharpen and drag to the right. This will show you the white areas that will be sharpened and the black areas that will not be. Select and increase the sharpening to where you want it to be. Reduce the noise either generally or colour noise if you were shooting at a higher ISO.
4. Enable profile correction based on the lens you’re using as every lens has light fall off so adjust the vignetting to compensate for this and to draw the attention to the subject of your image. Then click the remove chromatic aberration option.
5. You can go to the effects panel and add extra vignetting to your taste.
Using the backslash key will show you the before and after of your edited image. Use this to see what other changes may need to be made to help improve your shot.

6. Look for any other distractions, areas that may be too light or too dark. Using the gradient tool can make it easy to reduce exposure, highlights (or increase as the case may be) the areas that are distracting.
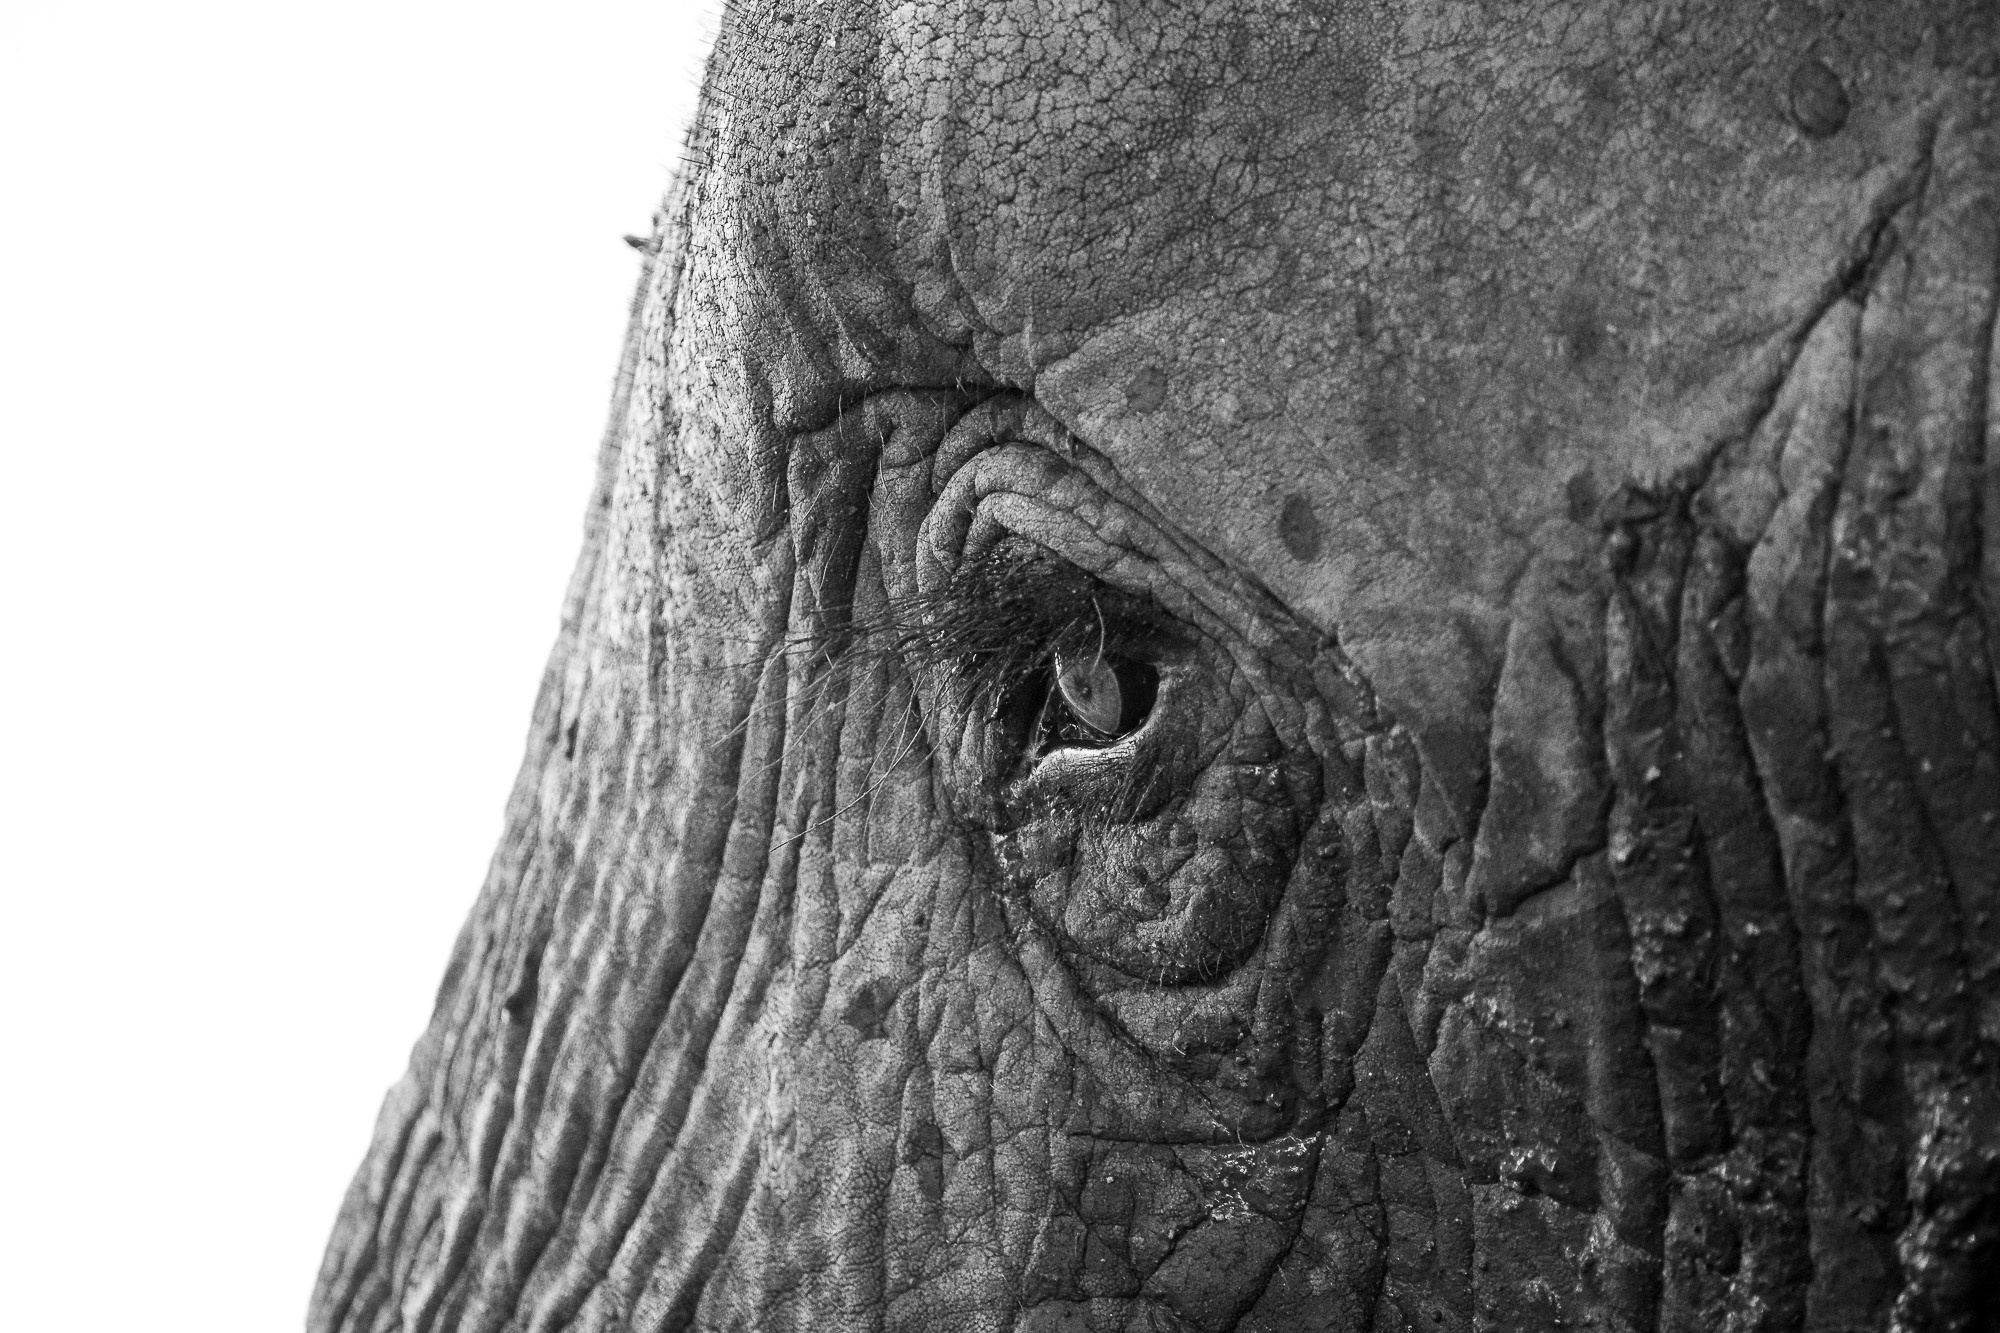
7. Zoom in on specific areas to make further enhancements. Use the radial filter to select specific elements such as eyes and faces. Make small adjustments to help that area pop more. Increase shadows in areas that are a bit dark, add a little clarity and contrast, maybe a little more sharpness. It doesn’t take much to add a little extra pop to specific areas of an image.
Go Find Your Wild
What is your version of wild? If you need some inspiration check out Pinterest and/or Google and do a search. There are plenty of interpretations out there or create your own.
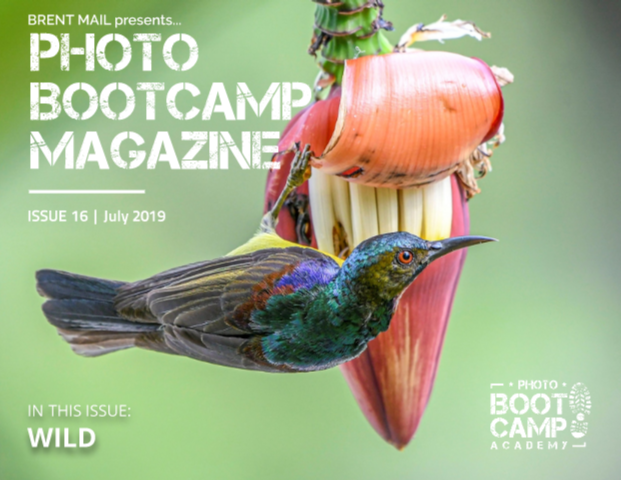
Photo BootCamp Magazine
On the following pages, see what wild images our BootCamp members have created!
And be sure to check out how you can join BootCamp at the end of the magazine!
(Larger file for desktop or iPad).
Alternatively if you have a slower connection you can view this magazine Here on ISSUU.
Below is a small sample of what’s in this magazine…
Join The Fastest, ‘Funnest’ Way To Improve Your Photography!
Photo BootCamp Academy is an online community where busy photographers gather to take their photography to new levels of enjoyment and progress.
- Discover exciting new skills
- Rekindle your passion for taking photos
- Improve fast with helpful feedback
- Experience enjoyment and progress
Inside BootCamp Magazine
Featured Artist
Let’s take a look at this month’s magazine. Here’s our featured artist of the month, Amber Pallas-Brunt from USA.
Amber said that she is so excited for this challenge as she was very fortunate to join Brent and several other amazing people in Africa! She’s just starting to sort through all of her images and just finally had to commit so she could start submitting. Amber chose this image because most of the time Baboon’s are not the most attractive creature. However, the babies and adolescent Baboon’s were adorable! Their human like qualities really endeared me to them.
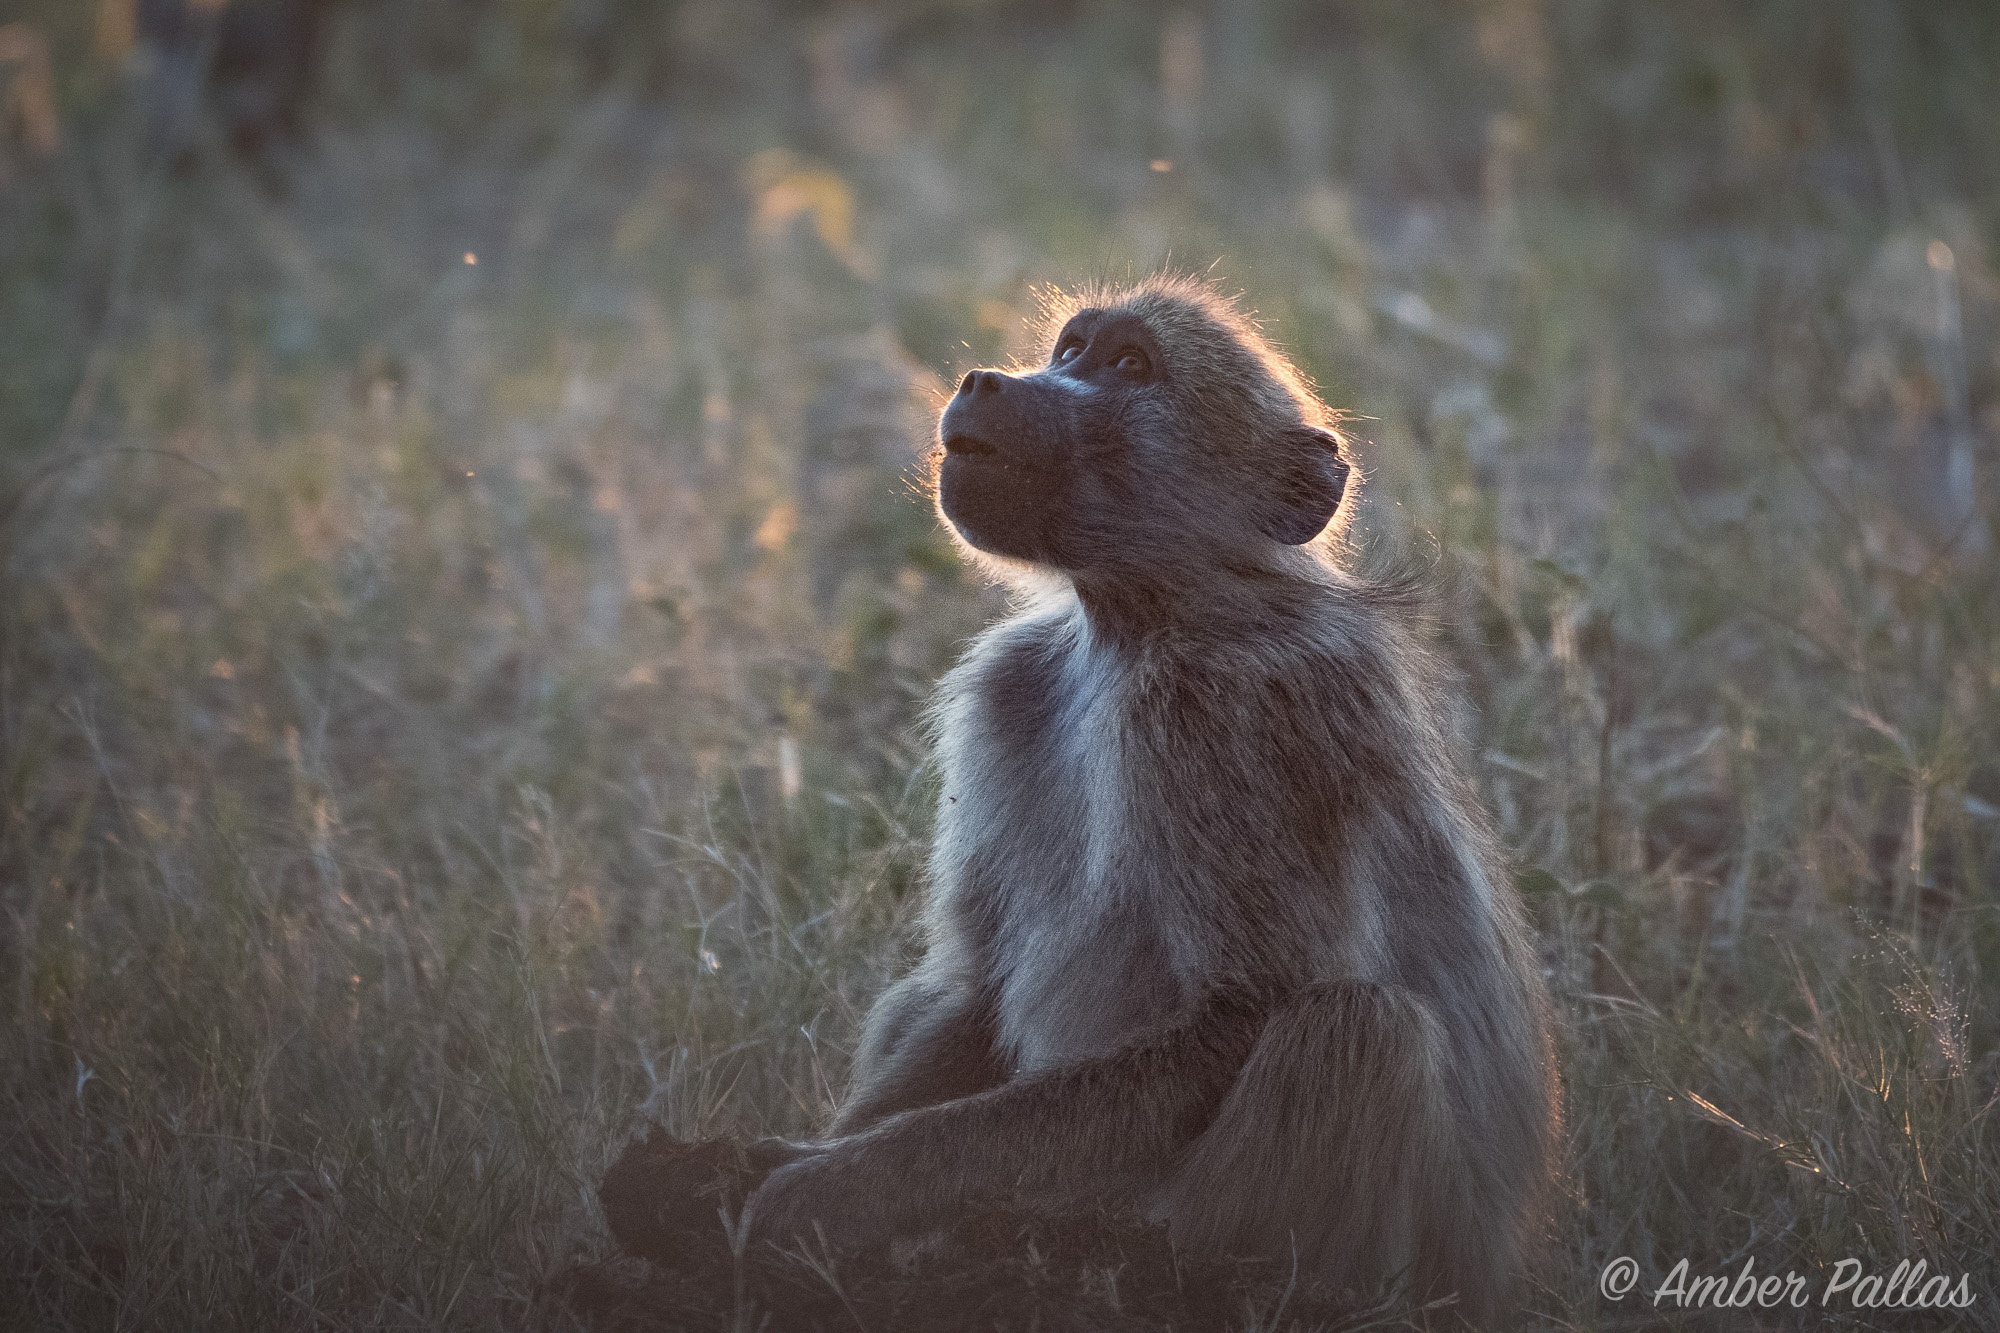
Comment: Sig Rannem – “Amber, I love this shot – especially the golden aura around the baboon’s head and the intent stare at whatever it is looking at – great job!”
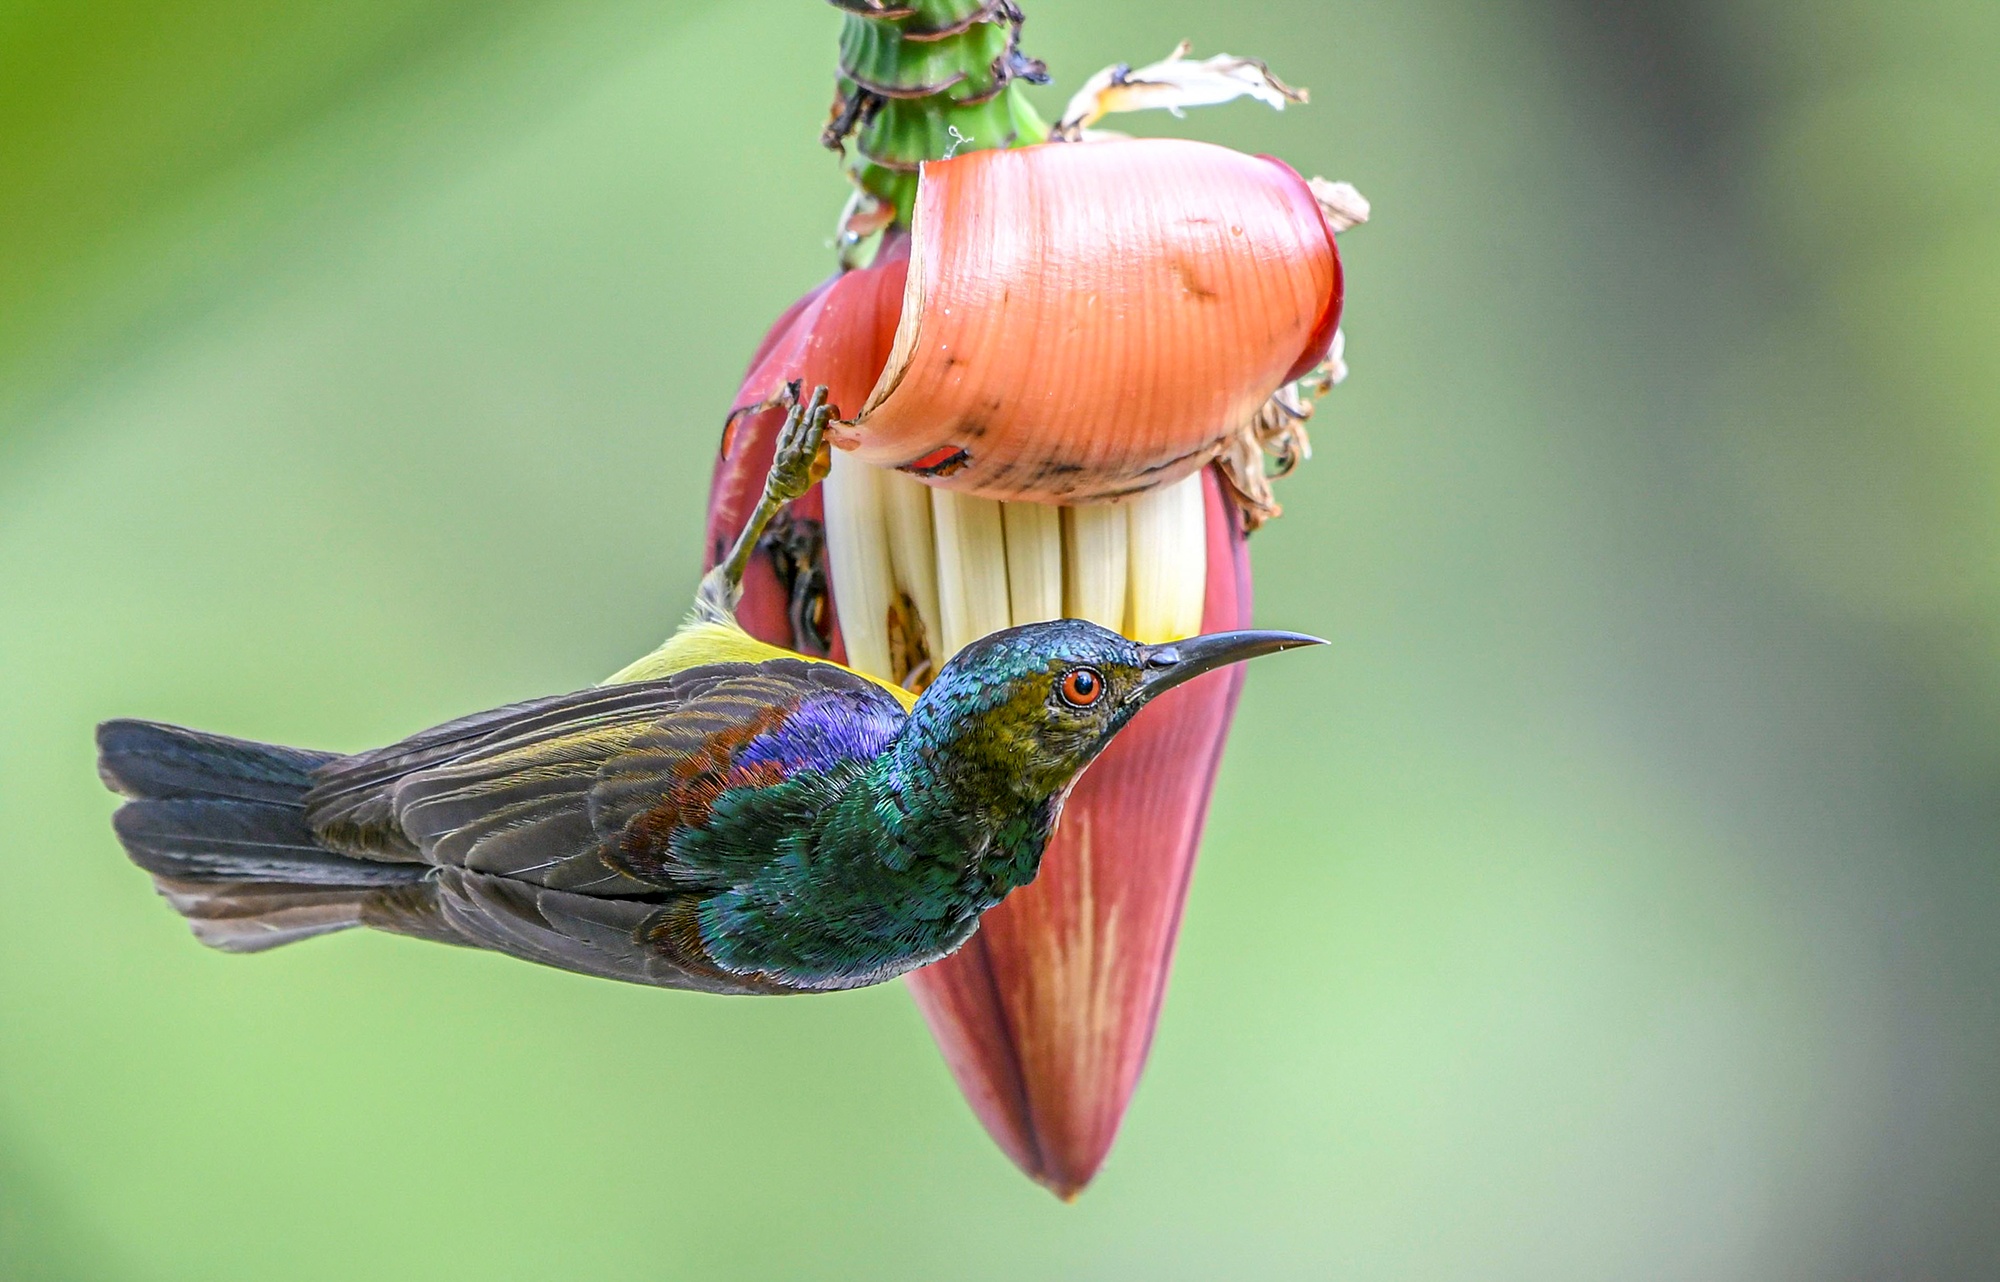
Cover Image
This month’s featured magazine cover image is Dave Koh from Singapore. He got this beautiful Brown-throated Sunbird who keep flying back to the banana flower and so he choose a clear unblocked background to capture the colors in the morning lightings.
Comment: Martin Gould – “Dave, I love the composition, with vertical banana flower and horizontal bird. Fab colours etc. Well done”
Active Members
Let’s have a look at some WILD images from our active members and be inspired with what they have created.
Let’s start with Deon van der Merwe from South Africa. This photo was taken in the Kruger National park. A number of bull elephants gathered at this watering hole. While one of the ellies rolled over and submerged himself in the deeper water. A few became restless and soon a skirmish erupted. Deon was very close to them when it happened. Initially it was only the two elephants in the picture, but later a third joined the fight while there were a few onlookers. He was fortunate enough to get quite a number of photographs of their behaviour before one of the elephants made it clear that he was too close and not welcome anymore. He had to make a hasty retreat.
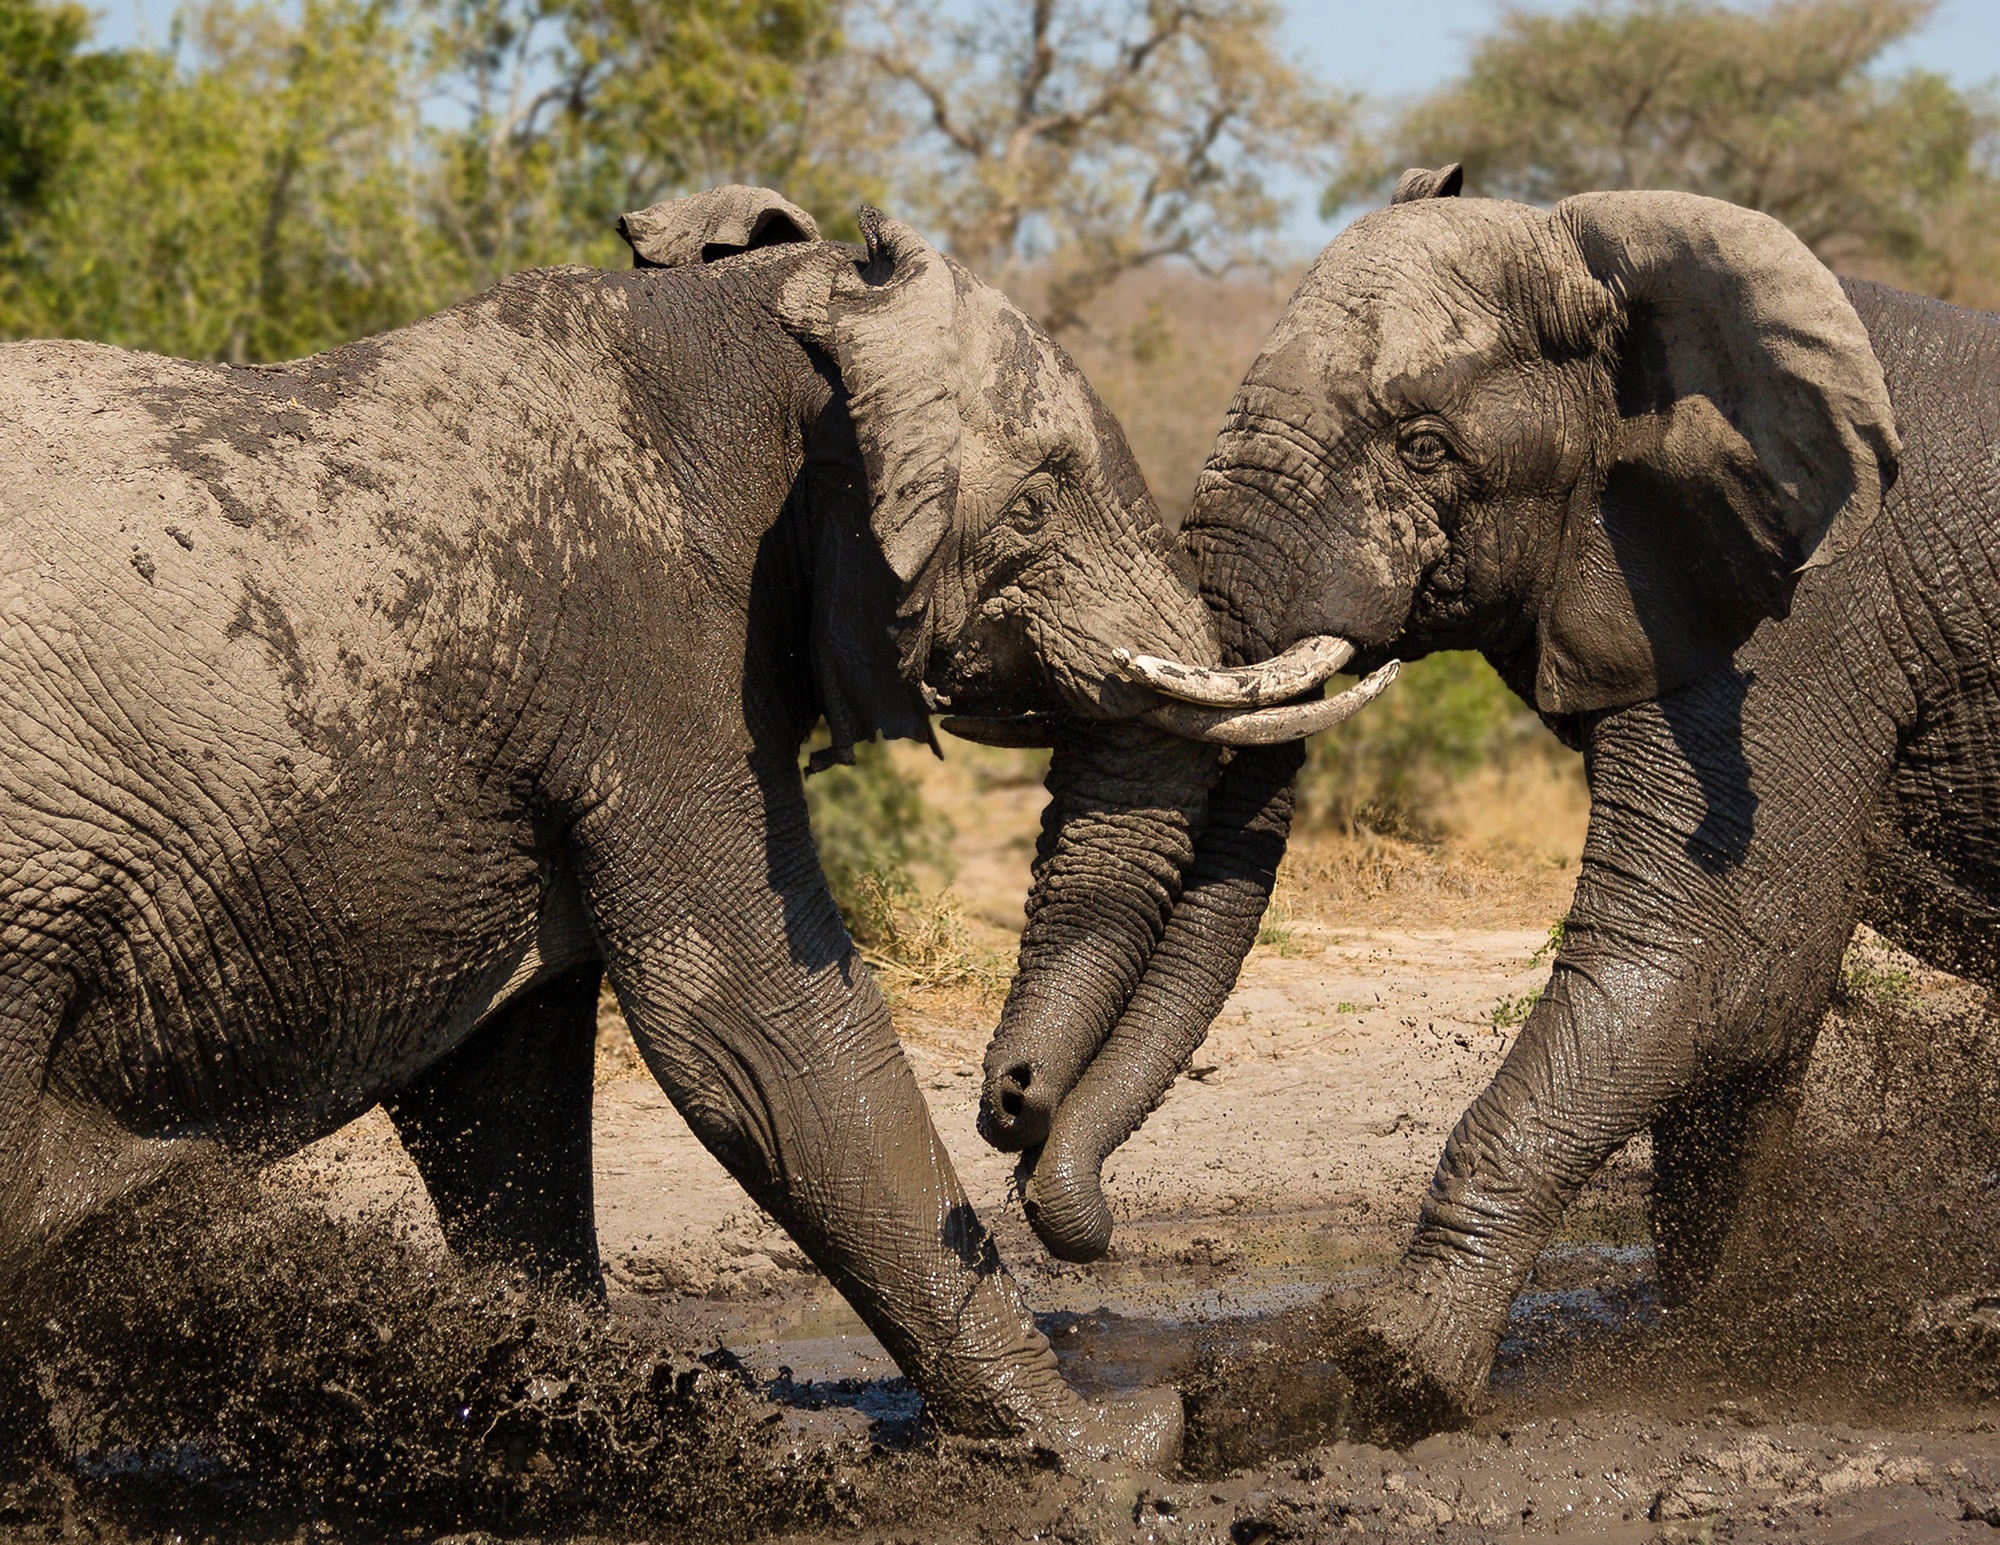
Comment: Romy Villanueva – “Really cool shot , Deon. Must have been a such a wild experience seeing them up close. Really nice shot!”
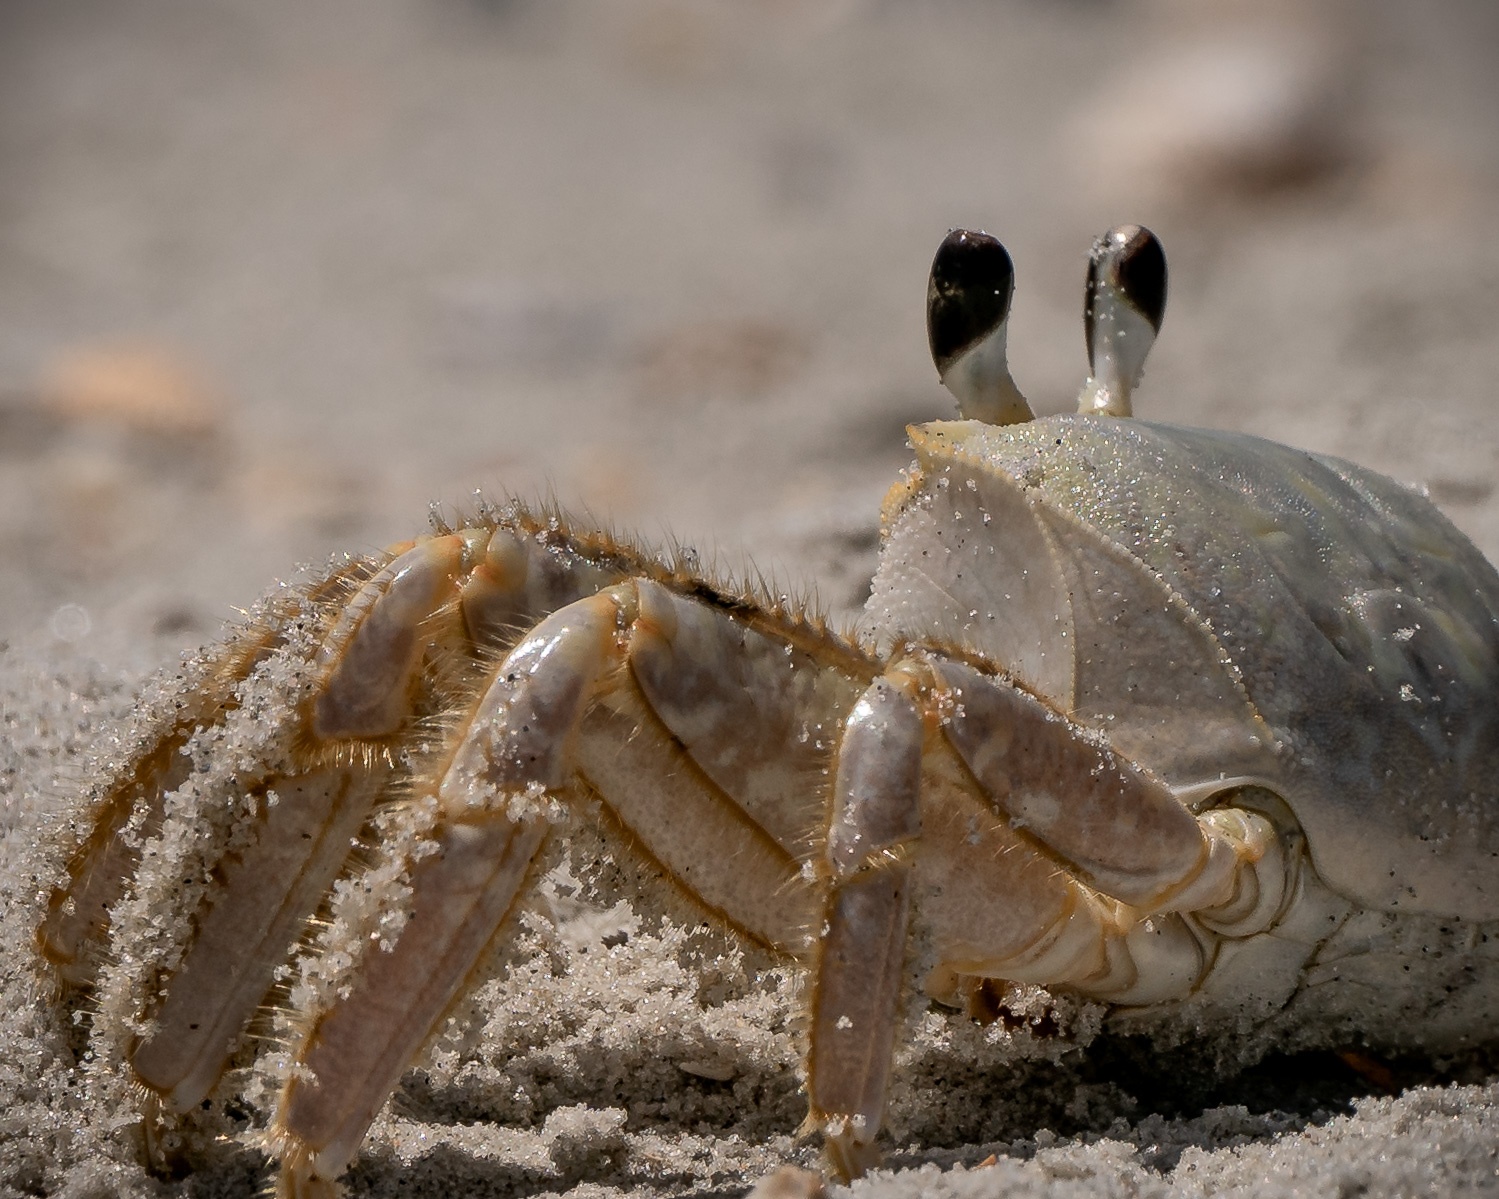
Then we have Christopher Goff from USA. He is a “ghost crab” – most feared wild predator of newly hatched baby sea turtles in their neonatal trek to the safety of the ocean. Otherwise extremely shy, this “denizen of the tide line” appears from his hole in the sand infrequently and only for extremely brief intervals, scurrying back to safety at the least hint of motion. Atlantic Seacoast, Eastern U.S.
Comment: Wayne Zussman – “Amazing image, great subject and I love everything about it. Terrific composition, color, sharpness and DOF. Put a frame around it!!”
Next we have Jackie Schefer from Switzerland. She was not really in the wild but in an open zoo near Pattaya. She could stay very close and she really had fun playing for 30 minutes. This ostrich even hit her camera twice. That was the best to get this close up portrait.
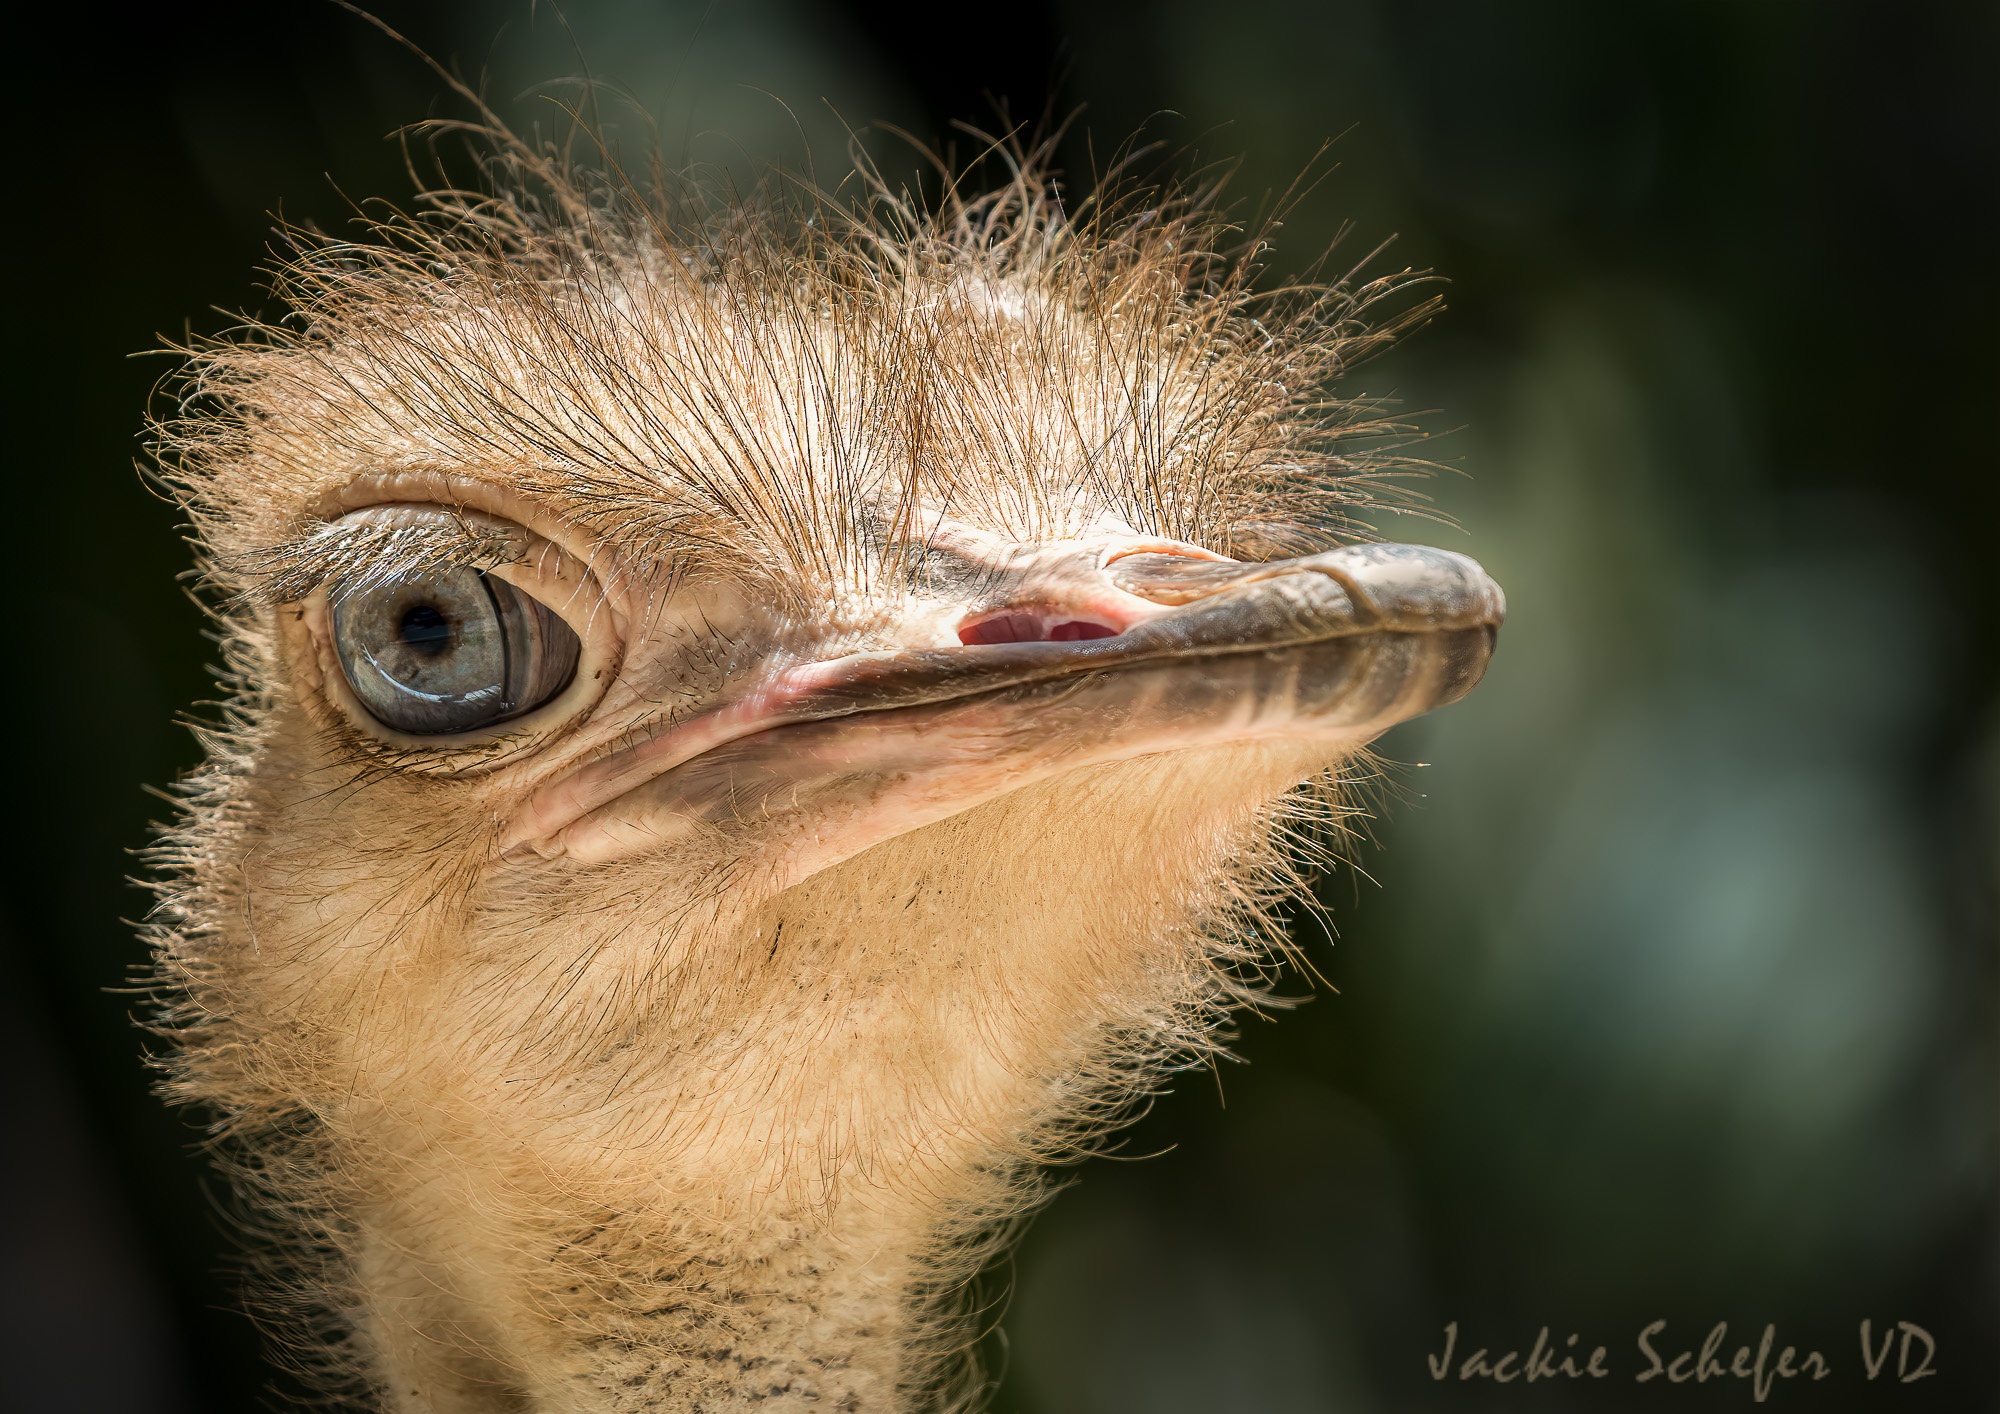
Comment: Brent Mail – “Wow Jackie – this image really stand out to me. Love these extreme closeups, something we don’t normally see with our naked eyes. Your image is super sharp on the eye, which is the first place I look. Love all the details here plus that shallow depth of field and darker background. Excellent work!”
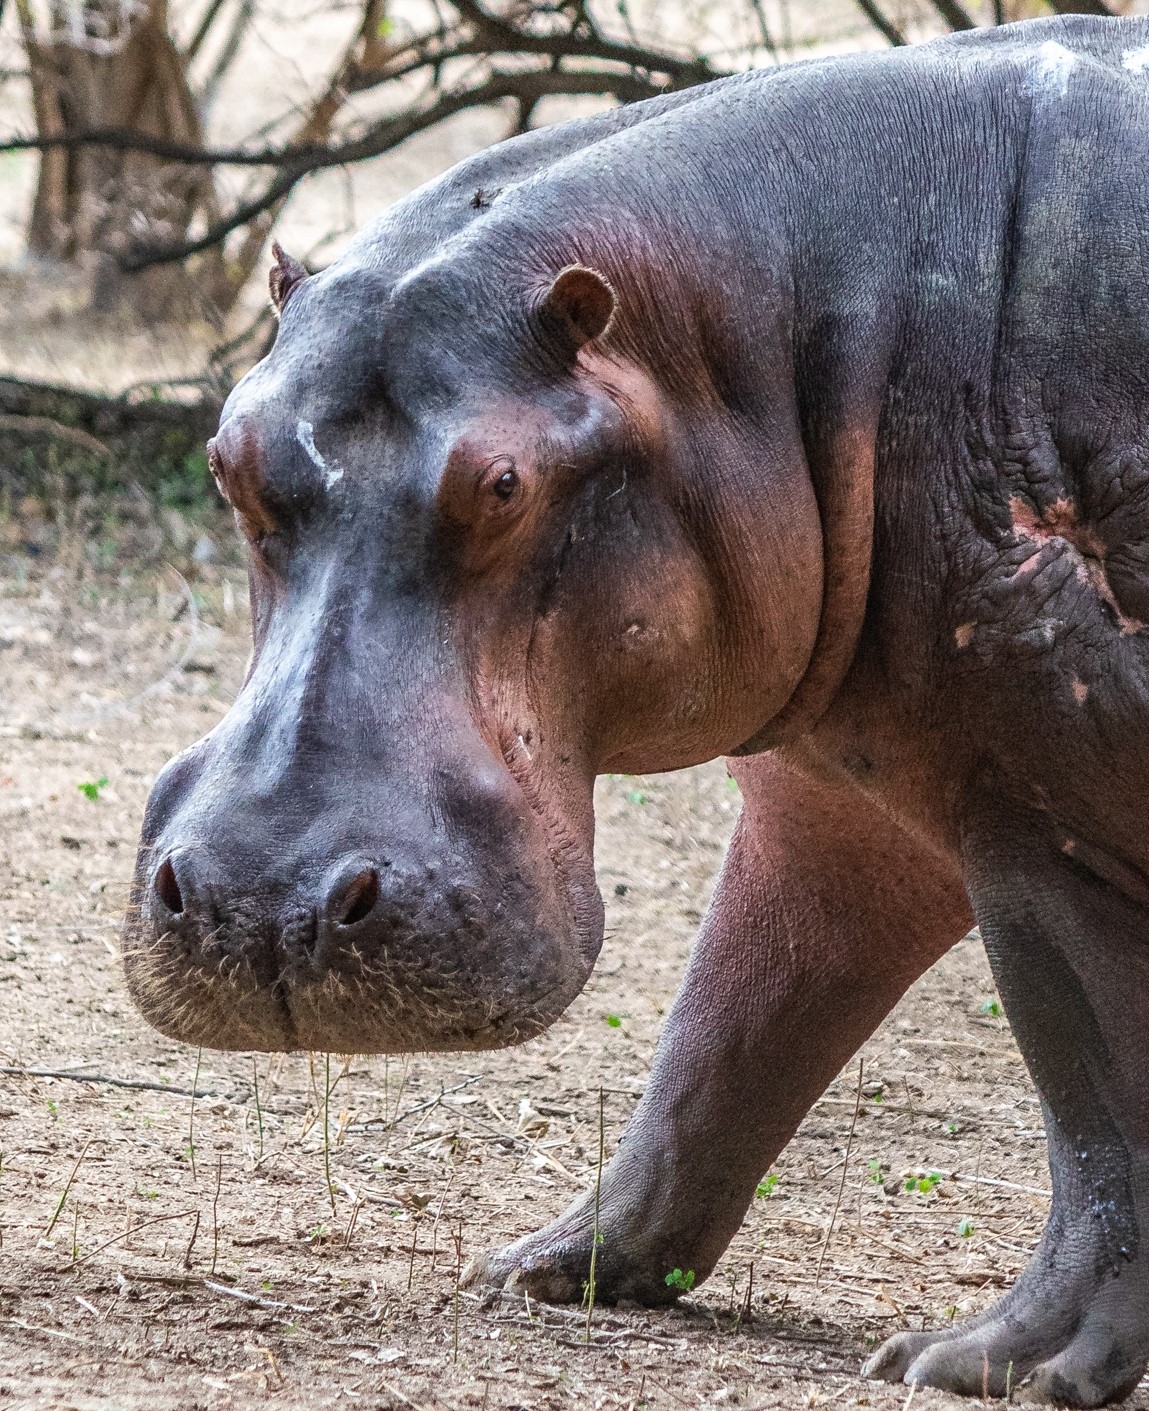
Next we have Karen Padilla from USA. This is Mitch. He could be found in camp between Karen and the group’s tents or next to the kitchen tent at night. During the day he could range quite a distance from camp. This photo was caught outside of camp about a mile. While he liked people and seemed to prefer them, they treated him as they would any wild animal – with a respectful distance between them and him. The injury on his shoulder was an old one that was healed but with a serious scar.
Comment: Denis O’Byrne – “Hi Karen. Nice head shot with a touch of curiosity in the eyes. Nice clarity and detail. Well done.”
And last but not the least is from Christine Rocher from Australia. She took this photo at the Perth Zoo 10am’ish, lighting was great at the time. This guy came hopping past Christine but on his way he stood still and said G’day Mate! She post processed and cropped in LR.
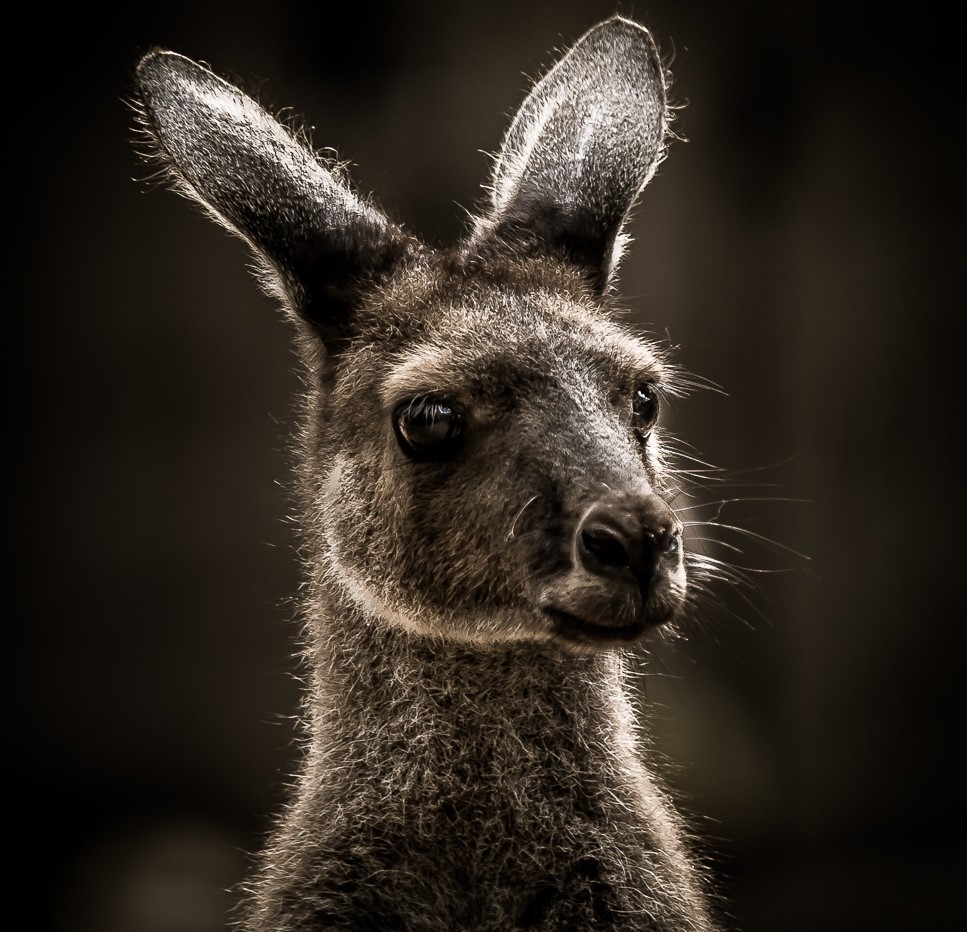
Comment: Peter Dwight – “Great capture Christine ,a beautiful little wallaby & so proud looking ,I love that soft glow you have around the portrait ,lovely shot.”
We hope you enjoyed some of these amazing wild images from our members and that they’ve inspired you to go out and find our own wild wherever you are. Be a part of this awesome family and check out the complete BootCamp Magazine and see for yourself!
Summary
- Wild can mean any number of things. Wild animals, wildflowers, wild child, wild weather, or wild hair. Be open to other interpretations of the theme if you don’t have wild animals in your area.
- Pay attention to camera settings when shooting, keep your shutter speed twice your focal length to reduce blurring from camera shake.
- Editing wild images can be fairly simple with small adjustments to areas such as the eyes to make them pop, simplifying your process without overdoing it.
Related Articles
Did you enjoy this article? Check out these related articles, too:
- Telling a Story Through An Image Using Patterns
Using patterns to draw your viewer’s attention to you artistic images. - Photography, Meet Simplicity
Practice minimalism to develop your artistic eye. - Leading Viewers On A Journey Through An Image!
A creative way to use leading lines to make your images more exciting and meaningful.
Do This Now
Dive into BootCamp and come join the fun – Click Here to join BootCamp today!
Share your thoughts with me in the comments section below. I love hearing what you guys come up with!
Im gonna love using shutter speed and lighroom now!